Blueberry Crumb Muffins

WP_20150507_009 1

It’s blueberry season over here and I received another pint of fresh, local blueberries from the farm! Thanks for reading, enjoy!

Blueberry Crumb Muffins – adapted from Little Sweet Baker

  • 2 & ½ cups all-purpose flour
  • 1 tbsp baking powder
  • 1 tsp baking soda
  • ½ tsp salt
  • ½ cup unsalted butter, melted and cooled – *put 2 tsp aside for the topping*
  • 1 cup sugar
  • 2 large eggs
  • 1 cup milk (any kind, whole or buttermilk is best)
  • 1 tbsp vanilla extract
  • 1 & ½ cups blueberries (fresh or frozen)

Topping –

  • 1  tbsp all-purpose flour
  • 2 tsp unsalted butter, melted
  • ⅛ tsp ground cinnamon
  • 1/4 cup sugar
Directions –
Preheat oven to 425F and spray or line a 12 cup muffin baking pan. Prepare the streusel topping by mixing all the ingredients together in a small bowl.
WP_20150505_004
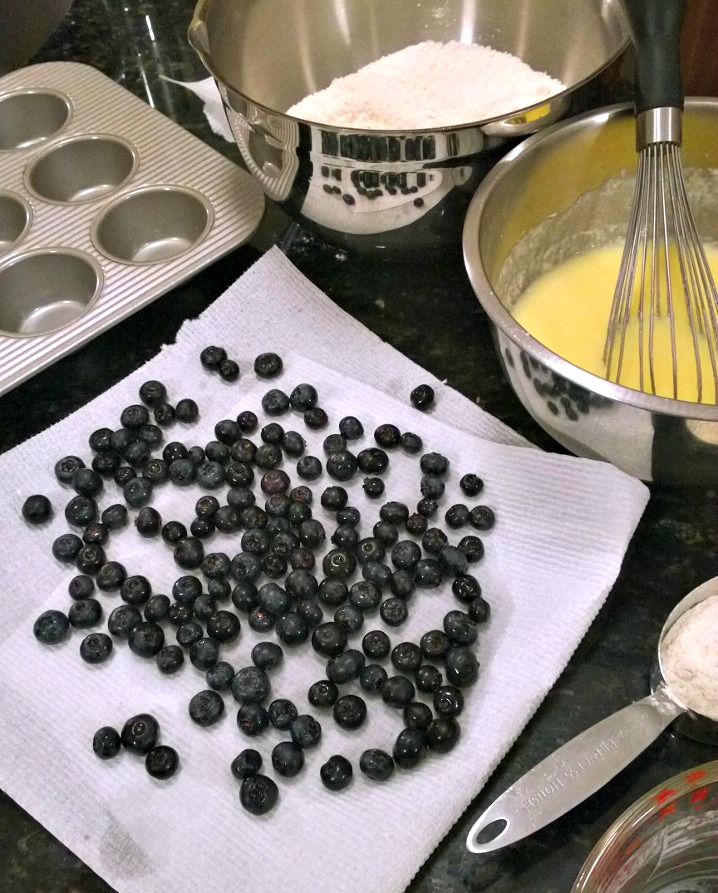
In a large bowl, whisk the flour, baking powder and salt together. Set aside. In a medium bowl, whisk the melted butter with the sugar, add the eggs, mix, then add the milk and vanilla, mix again.
WP_20150505_008
Add the wet ingredients to the dry and gently combine using a rubber spatula until moistened. Fold in the blueberries until just incorporated.
WP_20150505_017

Divide the batter into the 12 muffin cups, top with streusel and bake for 5 minutes at 425F, then keeping the muffins in the oven, reduce the heat to 375F and bake for another 15 minutes or until a toothpick inserted into the center comes out clean.

Mint Chip Brownie Ice Cream “Cake”

Phototastic-4_10_2015_7c9089d4-123e-45a9-9768-e145bc42fb12

My daughter just turned 9! This birthday celebration-worthy dessert was super sweet and decadent – my daughter called it “amazing”! 😉 Thanks for reading, enjoy!

Brownie Layer – adapted from Handle the Heat

  • 1 cup semi-sweet chocolate chips (*next time I think I’ll use bittersweet chocolate*)
  • 1 1/2 sticks (6 ounces) unsalted butter, cut into pieces
  • 4 ounces unsweetened chocolate, chopped
  • 1 1/2 cups granulated sugar
  • 3 large eggs plus 1 egg yolk
  • 1 teaspoon vanilla extract
  • 3/4 cup (94 grams) all-purpose flour
  • 1/4 teaspoon fine sea salt

Directions –

Preheat the oven to 350°F. Line an 8×8-inch or a 13×9-inch baking pan with parchment paper. (*I didn’t do this, but it makes for easier pan removal and slicing later on*)

WP_20150409_003

Melt the chocolate and butter over a double boiler. Stir to combine and take off the heat and set aside to cool slightly.

In a large bowl, use an electric mixer to beat the eggs and sugar on medium-high speed until light and thick, about 3 minutes. Beat in the vanilla extract. Stir in the cooled chocolate mixture with a rubber spatula. Add the flour and salt, folding gently until combined.

WP_20150409_006 1

Pour the batter into the prepared baking pan. Bake until a tester comes out with moist crumbs still attached, 35 to 40 for the 8×8 pan, or 20-25 minutes for the 13×9 pan. Do not overbake. Let cool to room temperature. Once cooled, place it in the freezer for at least 4 hours or overnight in preparation for the ice cream layer.

For the Mint Chip “Cake” – adapted from Glorious Treats

Ice Cream Layer- 

  • 1 carton (1.5 quarts) Mint Chip Ice Cream

Chocolate Layer-

  • 3/4 cup heavy whipping cream
  • 1 cup semi-sweet chocolate chips

Whipped Cream Layer-

    • 1- 8oz tub of Whipped Topping (*I used Truwhip*)

Garnish/Toppings-

  • Chopped Andes Mints, and/or mini chocolate chips

Directions –

Ice Cream Layer

WP_20150410_001
Allow a carton of ice cream to sit out at room temperature about 20 minutes, until soft enough to spread over the cooled brownies. Once the ice cream has been evenly spread, place the entire pan in the freezer to allow the ice cream to re-freeze.

Chocolate Layer

WP_20150410_008 1Heat the cream in the microwave for 1-2 minutes until hot (watch it so it does not boil). Add chocolate chips to the hot cream and set aside (undisturbed) about 3 minutes to allow the chocolate to melt. After 3 minutes, stir the chocolate until the cream and chocolate are fully combined. Set aside and allow to cool to about room temperature. Once cool, pour the chocolate over the ice cream layer, and spread evenly. Return pan to freezer.

Whipped Cream Layer

WP_20150410_010

Spread the whipped topping over the chocolate layer, then garnish with toppings of your choice. Return pan to freezer and FREEZE AT LEAST 3 HOURS before serving. The entire dessert can be made ahead, and kept in the freezer (covered) up to 3 days in advance.

Glowing Green Smoothie

WP_20150201_013

The easiest way for me to make sure I’m getting more fruits and veggies into my diet is blending lots of them all together. This blend seems popular among the green smoothie believers; and it does taste better than it looks thanks to the banana and all the other fruit. You can add some coconut oil to the mix or chia seeds if you’d like. I keep mine pretty simple 🙂 Thanks for reading, enjoy!

WP_20150201_005

Glowing Green Smoothie – adapted from Kimberly Snyder

  • 1/2 cup water
  • 1/2 a lemon, juiced
  • 1/2 head romaine lettuce, cut into chunks
  • 1/2 cup baby spinach
  • 2 celery stalks, cut into chunks
  • 1/2 apple, cut into chunks
  • 1/2 pear, cut into chunks
  • 1 small banana
  • ice
  • chia seeds (optional)
  • coconut oil (optional)

Directions –

Liquids first, followed by the softest/lighter produce and top with ice. Blend until it’s perfectly smooth – about 30 seconds.

Gluten-Free Pumpkin Pancakes

pump

These are so yummy and you wont miss the gluten 🙂

Healthy Pumpkin Pancakes – adapted from Paleo Grubs

  • 1/4 cup pumpkin puree
  • 3 tbsp coconut milk
  • 1 tbsp maple syrup
  • 3 eggs
  • 1 tbsp coconut oil, melted, plus additional for pan
  • 1 tsp vanilla
  • 1/4 cup coconut flour
  • 1 tsp cinnamon
  • Pinch of nutmeg
  • 1/2 tsp salt
  • 1/4 tsp baking soda
Directions –
  1. In a large bowl, whisk together the dry ingredients – the coconut flour, cinnamon, nutmeg, salt, and baking soda. Then in a separate bowl, whisk together the wet ingredients – the pumpkin puree, almond milk, honey, eggs, oil, and vanilla. Add the dry ingredients to the wet ingredients. Stir together until just combined.
  2. Heat a griddle or non-stick skillet to medium heat. Coat pan with coconut oil. Pour about 1/4 cup of batter onto the skillet. Cook for 2-4 minutes until the bottom is cooked through, and then flip. Cook for another 2-4 minutes until lightly browned. Repeat with remaining batter. Serve warm and enjoy!

I Bought A Juicer!

WP_20150122_018

I bought a juicer! I wasn’t sure how this would turn out because I haven’t tried beets since I was a kid…and those were the gross canned kind that you find in salad bars. The finished juice was the most gorgeous magenta color, and I hoped that it would taste as good as it looked! The first taste of anything new is usually off-putting, but as I continued to sip it, it tasted better and better. It’s not my new favorite, but I know I will make it again. The other recipe is a great starter juice, especially for kids. My daughter enjoyed this one, but I didn’t add the ginger because she wouldn’t have appreciated the spiciness of it. Thanks for reading, enjoy! 🙂


WP_20150122_016

Ginger Beet Juice – adapted from Wonky Wonderful

  • 1 small beet, peeled and trimmed
  • 2 apples, washed and cut
  • 2 carrots, washed and trimmed
  • 1 orange, juiced
  • 1 lime, juiced
  • 1 inch piece of ginger, peeled

Directions –

  1. Put all of the ingredients into the juicer according to the manufacturer instructions.
  2. Serve the juice cold over ice.

WP_20150121_022 1

Carrot Apple Ginger Juice – adapted from The Roasted Root

  • 3 carrots, washed and trimmed
  • 2 apples
  • 1/2 inch piece of ginger, peeled (*optional*)

Directions –

  1. Put the ingredients through the juicer according to the manufacturer’s instructions.
  2. Drink immediately, or store in a sealed container in the refrigerator. Keeps for about 2 days.

Healthier Pumpkin Spice Latte

6

This was my first pumpkin spice latte ever, so I can’t compare it well to a coffee shop drink. What I can tell you is that this is like pumpkin pie in a cup! It’s also much cheaper and not full of empty calories and syrupy-goodness that is the typical coffee chain offering. Thanks for reading, enjoy!

Healthier Pumpkin Spice Latte – adapted from Detoxinista

  • 1 cup coconut milk
  • 1 cup hot brewed coffee
  • 2 tablespoons pumpkin puree
  • 2 tablespoons pure maple syrup
  • ½ teaspoon pumpkin pie spice
7
Directions – 
Combine all of the ingredients in a high-speed blender, and blend until smooth and creamy. Adjust flavor to taste, and serve warm.

Paleo Frappuccino

frappuccino

This blended coffee drink is so tasty, healthy and cheap! I modified the recipe slightly to suit my taste and I have made it about four times in the last week 😉 Thanks for reading, enjoy!

Paleo Frappuccino – adapted from You Hunt, I Gather

  • 1 small, frozen banana
  • 1/3 cup coconut milk
  • 3/4 – 1 cup cold coffee
  • 1 TBSP maple syrup
  • 1 TBSP good quality cocoa powder
  • 1 tsp vanilla extract
  • 1/2 cup ice

Directions – 

Add all ingredients to a high-speed blender and blend for 1 minute or until desired consistency is reached.

DIY Hot Chocolate Mix

WP_20150110_004 1

The kids had been asking for hot chocolate for a while now, so I decided to let them make it 🙂 I love that there are only three simple ingredients in this decadent hot chocolate and it makes 4 cups of mix. Thanks for reading, enjoy!

cbe948e4-3de7-4f33-9d01-ca3a3df96c09_full

All Natural Homemade Hot Chocolate Mix – adapted from Clean Mama

  • 2 1/2 cups sugar
  • 1 1/2 cups unsweetened cocoa – I used this Dutch cocoa
  • 3 teaspoons sea salt

Directions – 

In a large bowl, combine all ingredients with a whisk. Store in a four cup, air-tight container or into smaller jars for gifting.

To make one serving of hot chocolate, combine 1 cup of warm milk and two tablespoons of mix. Stir to combine and enjoy!

**I added the milk and cocoa to my Vitamix and blended it up for a few seconds to make it nice and frothy. Top it with mini marshmallows or whipped cream if desired 🙂

Slow Cooked Pork Roast

WP_20140813_17_47_15_Pro

This was so simple and flavorful, makes a big batch and it’s so versatile. We’re using this pork for BBQ pulled pork sandwiches, but you could use some in one of my favorite macaroni dishes or these amazing taquitos. I don’t cook pork often enough, but after trying this recipe out, I’m sure add it to the rotation. If you follow the recipe link, you’ll see that there are a few different ways to season this up, but I chose the “plain” version so the leftovers would be easier to use. Thanks for reading, enjoy!

WP_20140813_18_42_56_Pro

**Potato Bun Recipe Here and Creamed Corn Recipe Here**

Slow Cooked Pork Roast – adapted from The Kitchn

  • 4 to 6 pound boneless pork shoulder or butt (or 5 to 7 pounds bone-in), trimmed of excess fat
  • 1/2 tablespoon salt
  • 1/2 tablespoon pepper
  • 2 tablespoons coconut oil
  • 1 yellow onion, sliced
  • 1 carrot, roughly chopped
  • 3 stalks celery, roughly chopped
  • 1 1/2 cups chicken stock
  • 2 bay leaves

Directions –

Preheat the oven to 325 degrees. Place a rack on the lower-third of the oven. Pat the pork dry with paper towels, and season with salt and pepper. Heat a large dutch oven over medium-high heat and add the oil. Sear all sides of the meat, add the vegetables and chicken stock and bring to a simmer. Once it simmers, cover and place in the oven. Bake for 2 to 4 hours, checking after the first two hours for “fork-tenderness” – My 4 pound bone-in roast was fall-off the bone tender at 3.5 hours. Transfer the pork to a large container. When cool enough to handle, use two forks or your fingers to shred the meat into pieces. Remove any large pieces of fat or bones. For more moist and flavorful pulled pork, you can mix some of the cooking liquid back into the pork. Start with a little, mix, then add more until the pork is as wet or dry as you like. Alternatively, for barbecue pulled pork, you can mix in barbecue sauce. Pulled pork will keep for 1 week in the refrigerator or for up to 3 months in the freezer.

Reese’s Peanut Butter Cup Cheesecake

WP_20131225_12_39_16_Pro20131225124856

Yeah – definitely not something you would want to make more than once a year! The crust starts out with 24 Oreo cookies and a half stick of butter  – not to mention the roasted peanuts!  There are also 16 Reese’s cups in and on this cake, 2 pounds of cream cheese, 1 cup of peanut butter…Thankfully, there will be at least 10 people who might be willing to try this. I don’t know many people who would turn down a Reese’s 😉

WP_20131225_17_26_05_Pro20131225173457

Verdict: It’s a little too sweet for my taste, but no one else complained 😉 We have half a cake left, but I have several people in mind to share this with 😉 Thanks for reading, enjoy!

Ruggles Reese’s Peanut Butter Cup Cheesecake – adapted from Food.com **Plan ahead–cheesecake needs to chill for at least 4 hours**

For the Crust:

  • 4 1/2 cups crushed Oreo cookies
  • 1 cup chopped roasted peanuts
  • 1/2 cup butter, melted

For the Filling:

  • 2 lbs cream cheese, softened
  • 5 eggs, at room temperature
  • 1 1/2 cups firmly packed brown sugar
  • 1 cup smooth peanut butter ( not natural-style)
  • 1/2 cup whipping cream
  • 1 teaspoon vanilla extract
  • 12 Reese’s Peanut Butter cups, broken into small pieces

For the Topping:

  • 1/2 cup Reese’s Peanut Butter chips
  • 1/2 cup semi-sweet chocolate chips
  • 1/4-1/2 cup heavy cream
  • 4 Reese’s Cups, chopped

Directions –  

To Make The Crust: Combine crushed Oreo cookies and peanuts that have been ground in a food processor with the melted butter. Pat the crust mixture onto bottom and sides of a 10-inch springform pan.

WP_20131223_18_54_31_Pro
To Make The Filling: Beat cream cheese in bowl of electric mixer until smooth. Add eggs, one at a time, beating well after each addition. Add sugar, peanut butter and cream; mix until smooth. Stir in vanilla, then fold in peanut butter cup pieces with a rubber spatula.

WP_20131223_19_37_11_Pro

Pour filling into prepared crust. Place springform pan into a larger baking pan. Pour hot water into the larger pan so that the water comes 1 inch up the sides of the springform pan.

WP_20131223_19_31_56_Pro

Bake at 275°F 1-1/2 hours, or until firm and lightly browned. Remove from the oven and allow to cool on a wire rack for one hour. You may run a knife along the edge of the cake to loosen it from the pan somewhat. Refrigerate for at least 4 hours.

For the Topping: Pour the cream into a microwave safe cup for about 45 seconds. Pour the hot cream over the peanut butter and chocolate chips and don’t stir for about three minutes. Stir with a whisk until smooth and shiny to break up any pieces and emulsify cream and chocolate. Add more hot cream to thin out the ganache if needed. Add chopped Reese’s to the cheesecake and then drizzle the ganache over all.