Glowing Green Smoothie

WP_20150201_013

The easiest way for me to make sure I’m getting more fruits and veggies into my diet is blending lots of them all together. This blend seems popular among the green smoothie believers; and it does taste better than it looks thanks to the banana and all the other fruit. You can add some coconut oil to the mix or chia seeds if you’d like. I keep mine pretty simple 🙂 Thanks for reading, enjoy!

WP_20150201_005

Glowing Green Smoothie – adapted from Kimberly Snyder

  • 1/2 cup water
  • 1/2 a lemon, juiced
  • 1/2 head romaine lettuce, cut into chunks
  • 1/2 cup baby spinach
  • 2 celery stalks, cut into chunks
  • 1/2 apple, cut into chunks
  • 1/2 pear, cut into chunks
  • 1 small banana
  • ice
  • chia seeds (optional)
  • coconut oil (optional)

Directions –

Liquids first, followed by the softest/lighter produce and top with ice. Blend until it’s perfectly smooth – about 30 seconds.

Advertisement

Avocado Super Smoothie

WP_20150124_029 1

This is amazing! It’s thick and creamy without the dairy and even my kids couldn’t detect the “green” in this smoothie. Thanks for reading, enjoy!

Avocado Super Smoothie –

  • 1 cup kale, washed and stems removed
  • 1 cup baby spinach, washed and big stems removed
  • 1 medium banana
  • 1/2 avocado
  • 1 small apple, cut into chunks
  • 1/2 cup coconut milk
  • 1/2 cup water, or more depending on how thick you prefer
  • Ice

WP_20150124_005

Directions –

Place all your ingredients in a blender carafe – starting with the liquid and topping off with the heavier items. Process for about 30 seconds until well blended. Pour into a tall glass and enjoy!

Brown Sugar Banana Bread

WP_20140310_07_13_01_Pro (1)

I love the library! I have borrowed many cookbooks lately, Back in the Day Bakery is one that I would buy. There are so many recipes in it that look and sound amazing. The first recipe I tried was chocolate chip cookies which baked up really thin and flat, but the flavor was one of the best I have tried. I will have to make those again, and hopefully work out the kinks so I can bake a batch worthy of photographing…

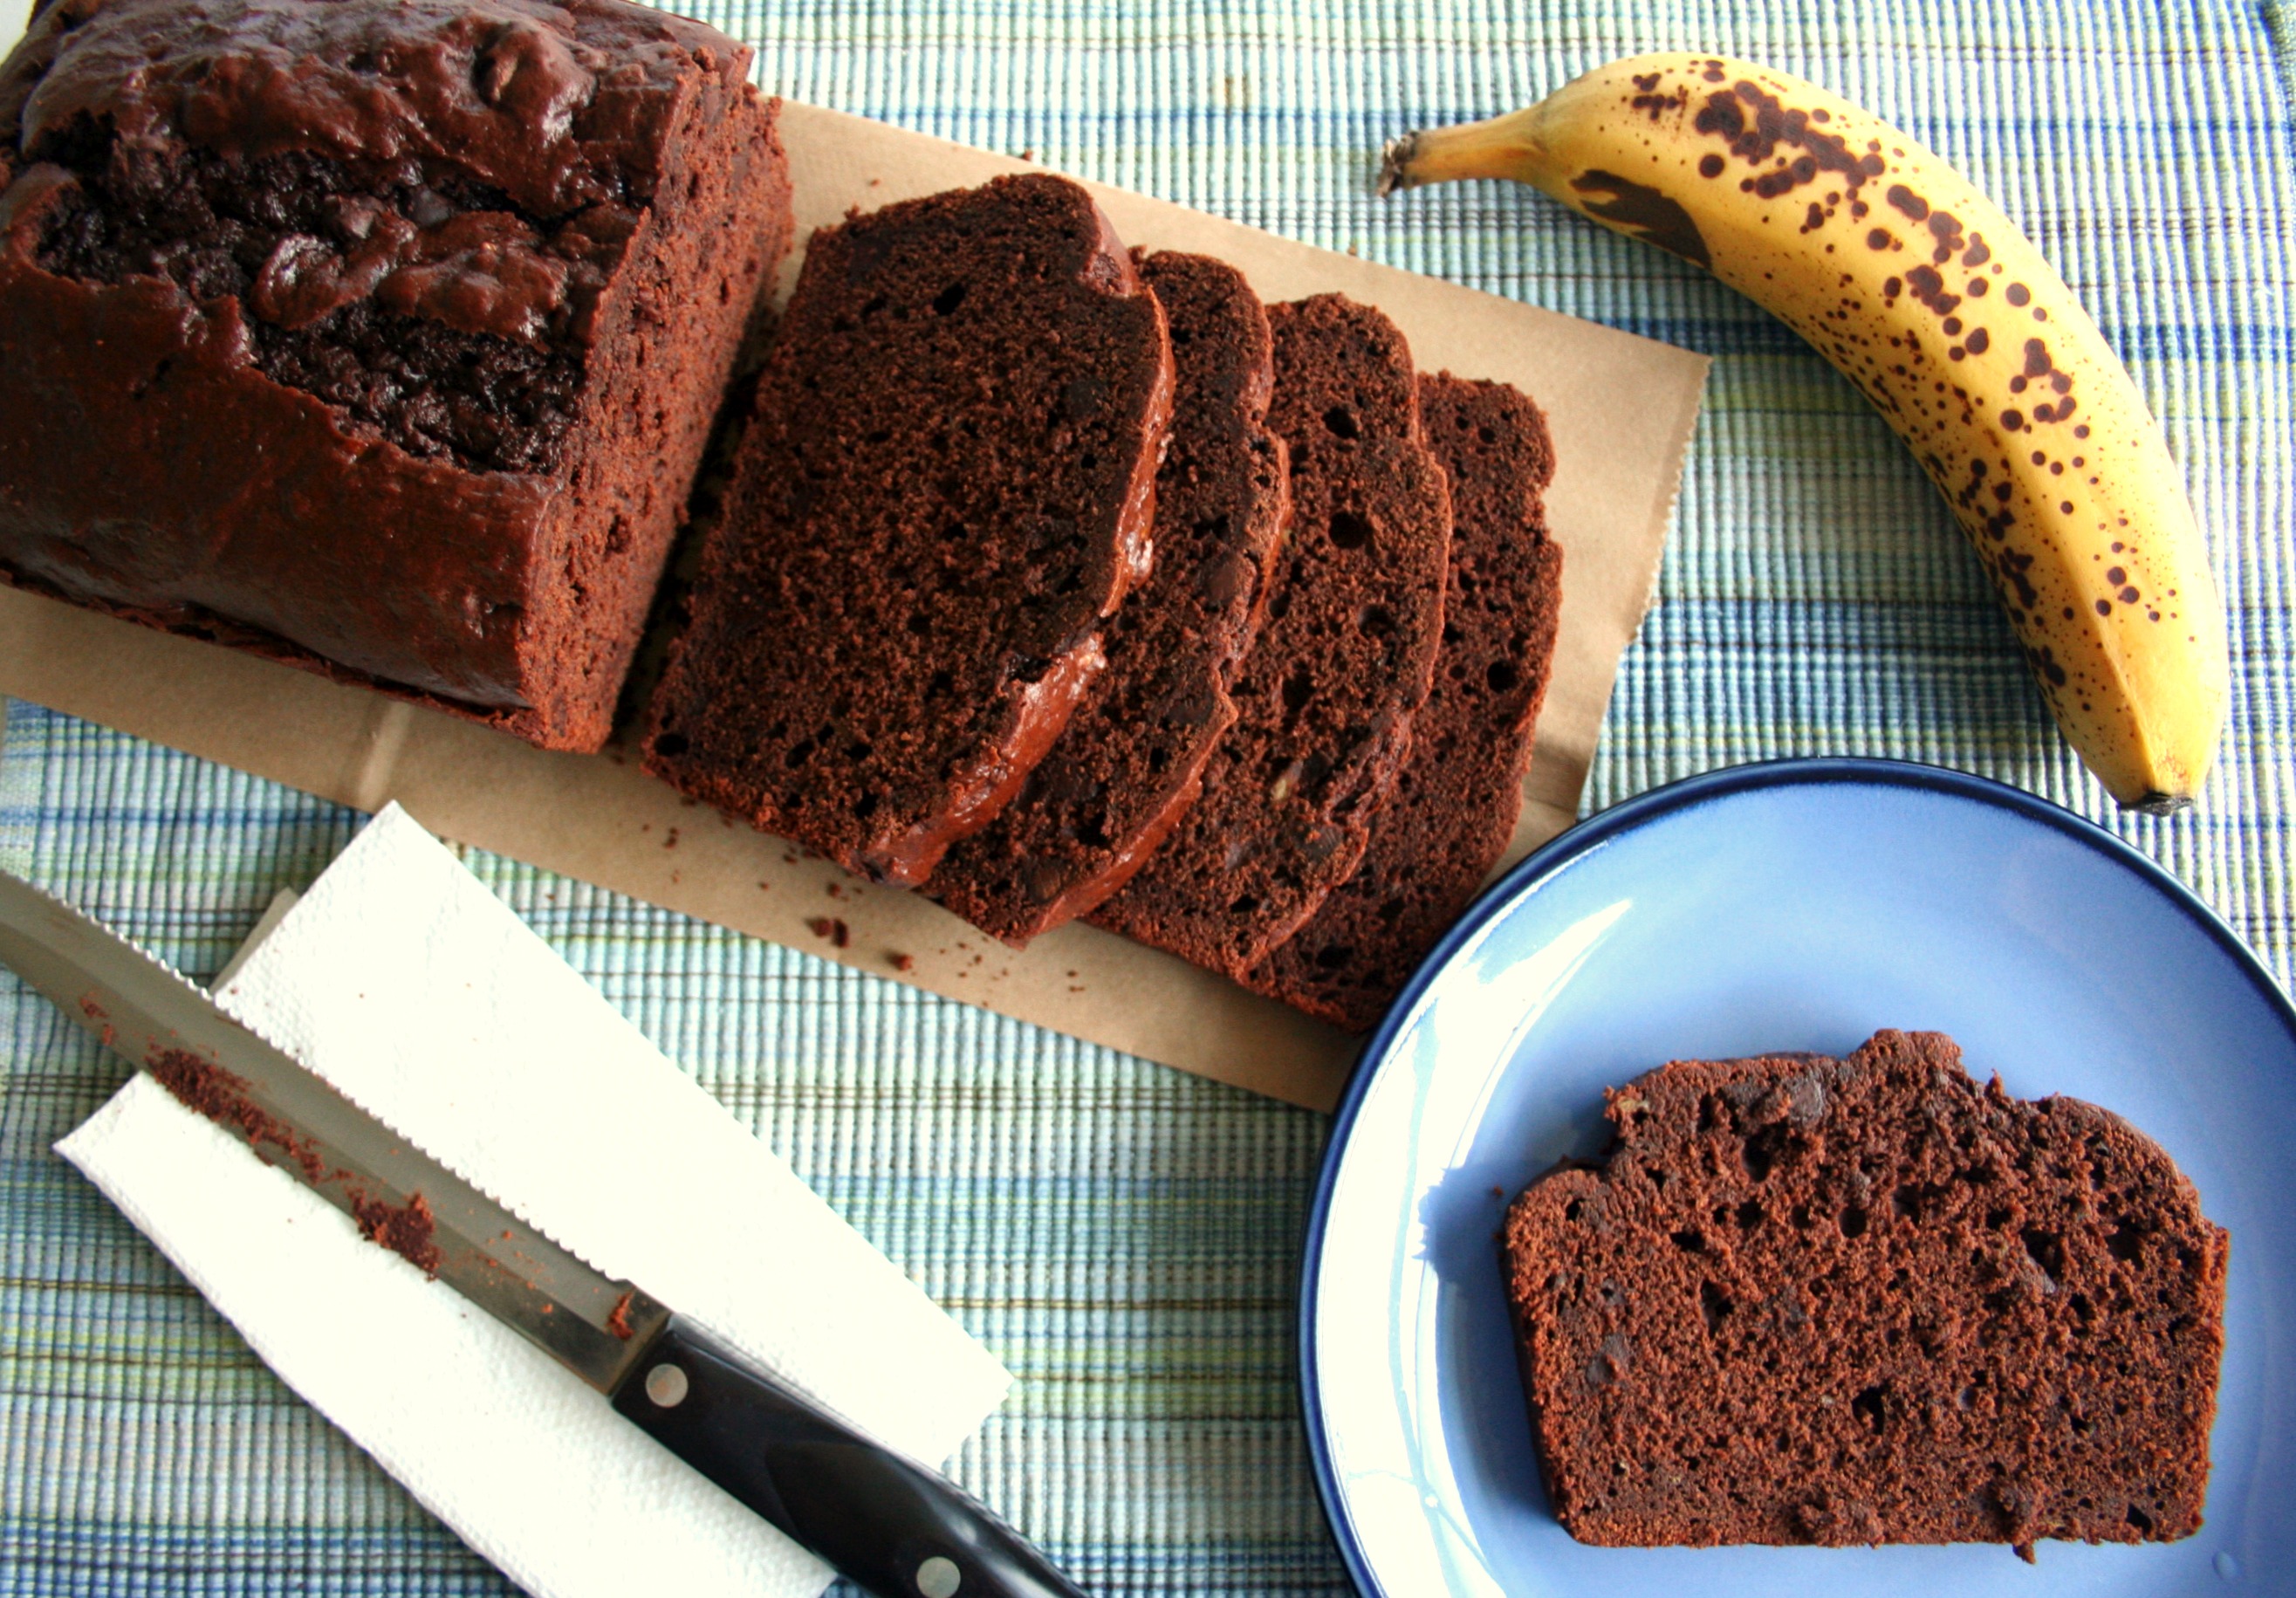
Anyway, onto the bread – it bakes up with a dense crumb, but it’s not at all tough or chewy. I didn’t have any mace on hand (who does?), but I replaced it for freshly grated nutmeg instead. Thanks for reading, enjoy!

Brown Sugar Banana Bread – from The Back in the Day Bakery

  • 2 cups AP flour
  • 3/4 cup light brown sugar
  • 3/4 tsp baking soda
  • 1/2 tsp fine sea salt
  • 1 tsp ground mace (I used nutmeg instead)
  • 1/2 tsp ground cinnamon
  • 1 1/4 pecans, toasted and chopped (I omitted)
  • 1 1/2 cups well mashed, very ripe bananas (about 3)
  • 1/4 cup sour cream
  • 2 large eggs
  • 6 TBSP unsalted butter, melted and cooled
  • 1 tsp vanilla extract
  • 2 TBSP dark brown sugar for sprinkling (optional)

Directions –

Position a rack in the lower third of the oven and preheat the oven to 350 degrees. Lightly spray a 9 x 5 inch loaf pan and line the bottom with parchment.

In a large mixing bowl, whisk together the flour, light brown sugar, baking soda, salt, mace, cinnamon and pecans; set aside.

In a medium bowl, mix the mashed bananas, sour cream, eggs, butter and vanilla with a sturdy wooden spoon. Gently fold the banana mixture into the flour mixture until just combined.

Scrape the batter into the prepared loaf pan, spreading it evenly with a spatula. If using, sprinkle the dark brown sugar on top of the loaf. Bake for 45 to 55 minutes, or until the loaf is golden brown and a toothpick inserted in the center of the loaf comes out clean. Cool the bread in the loaf pan for 5 to 10 minutes, then transfer to a wire rack.

Serve warm or at room temperature. Wrapped in parchment, the bread will keep at room temperature for up to 3 days.

Hungry for More?

chocchip

Chocolate Chip Banana Bread

20120613_124736Blueberry Banana Bread

banana

Banana Bread 2

coconana4

Coco-Nana Bread

4

His All-Time Favorite

Pina Colada Popsicles

popsicle

I haven’t made popsicles since last Summer, but I have been so inspired by the pretty pictures floating all over Pinterest. The kids were excited about these – because you know I never make sweet things! But these are the kind of treats I don’t feel guilty about giving them and they’re quite healthy. These are so easy to make and I’m sure I will try out a few more popsicle recipes before school starts up again 🙂 Thanks for reading, enjoy!

**If you’re interested in making these “boozy”, you could swap half the water with light rum**

Pina Colada Popsicles –

    • 8 ounces frozen, diced pineapple and mango
    • 1/2 cup orange juice
    • 1/2 cup of coconut milk
    • 1/2 hot water
    • 1 TBSP unsweetened coconut flakes

Directions-

Simply mix ingredients together, by hand or in a blender/food processor, and pour into individual popsicles molds.  Add a popsicle stick in the center of the mold and place in freezer for at least 4 hours.

Remove popsicles from freezer and run exterior of popsicle molds under hot water for a few seconds and then gently pull on popsicle stick to release from mold.

Sweet and Sour Chicken

image

I have made this twice in two weeks! My picky daughter loves this dinner and can't get enough of the peppers and pineapple 🙂 This is a fairly guilt-free take-out fake-out meal when you consider that Chinese restaurants bread and then deep fry their chicken, this is stir fried instead. Thanks for reading, enjoy! 🙂

Chinese Sweet and Sour Chicken – adapted from Steamy Kitchen via The Shiksa

  • 1 egg white
  • 2 tsp cornstarch
  • 1/2 tsp salt, divided
  • 1 lb boneless, skinless chicken breasts or thighs, cut into 1-inch chunks
  • 1 can (8 to 10 oz) pineapple chunks in juice (reserve the juice)
  • 1 tsp fresh grated ginger
  • 1/4 cup white vinegar
  • 1/4 cup ketchup
  • 2-3 tbsp brown sugar
  • 1-2 pinches cayenne pepper (or more to taste– spicy!)
  • 2 tbsp high heat cooking oil, divded (ex. grapeseed, peanut oil)
  • 1 red bell pepper, seeded and cut into 1-inch chunks
  • 1 yellow bell pepper, seeded and cut into 1-inch chunks

Directions – 

    In a bowl, whisk together the egg white, cornstarch, and 1/4 tsp of the salt. Add the chicken pieces and stir to coat evenly. Let sit for 15 minutes at room temperature or up to overnight in the refrigerator.

    Meanwhile, whisk together 1/4 cup of the reserved pineapple juice, ginger, vinegar, ketchup, brown sugar, remaining 1/4 tsp of salt, and 1-2 pinches cayenne pepper (or more to taste–optional).

    Set a wok or large saute pan over high heat. When a bead of water instantly sizzles and evaporates, pour in 1 tbsp of the oil and swirl to coat. Add the red and yellow bell pepper chunks and cook for 2 minutes. Remove from the wok onto a plate. Wipe the wok or pan dry.

    Return the wok to the stove on high heat. When a bead of water instantly sizzles and evaporates, pour in the remaining 1 tbsp of oil and swirl to coat (be sure to fully coat the pan so the meat won’t stick). Add the chicken to the pan, spreading it out in one layer.

    Let the chicken fry, untouched, for 1 minute, until the bottoms are browned. Flip and fry the other side the same for 1 minute. The chicken will still be pinkish in the middle.

    Add the cooked bell peppers, pineapple chunks, and pineapple juice mixture to the pan. Let simmer for about 2 minutes until the chicken is cooked through. Remove from heat. Let the chicken rest for a few minutes till the sauce thickens. Serve over Jasmine rice.

Orange Raspberry Muffins

The co-op has inspired me to find new way of enjoying organic produce! And after doing a quick search on FoodGawker, I found this recipe, and it was just in time, because I hate wasting food. These have great flavor, but the oven time and temp was way off for me. I thought as I read “400 degrees for over 20 minutes”, it wouldn’t be right for a muffin. Next time I will bake them at about 375 for 15-20 minutes. When these had about 8 minutes left, I knocked down the temp for a couple more minutes, then tested the muffins with a toothpick. I don’t know why I don’t always go with my gut on this sort of thing! 😉 Thanks for reading, enjoy!

Orange Raspberry Muffins –  adapted from Susi’s Kochen via Baking: From My Home to Yours

  • Grated zest and juice of 1 orange
  • About 3/4 cup buttermilk
  • 2 large eggs
  • 3 tablespoons honey
  • 1 stick (8 tablespoons) unsalted butter, melted and cooled
  • 1/3 cup sugar
  • 2 cups King Arthur Self-Rising flour (250 grams)
  • 2 1/2 teaspoons baking powder
  • 1/2 teaspoon baking soda
  • 1/2 teaspoon salt
  • 1 1/2 cups raspberries – fresh, preferably, or frozen (not thawed)
  • Decorating sugar, for topping (optional)

Directions –

Center a rack in the oven and preheat the oven to 400 degrees F.
Butter or spray the molds in a regular-size muffin pan or fit the molds with paper muffin cups. Place the muffin pan on a baking sheet.

Pour the orange juice into a large glass measuring cup or a bowl and pour in enough buttermilk to make 1 cup. Whisk in the eggs, honey and melted butter.

In a large bowl, rub the sugar and orange zest together with your fingertips until the sugar is moist and the fragrance or orange strong. Whisk in the flour, baking powder, baking soda and salt. Pour the liquid ingredients over the dry ingredients and, with the whisk or a rubber spatula, gently but quickly stir to blend. Don’t worry about being thorough – the batter will be lumpy and bubbly, and that’s just the way it should be. Stir in the raspberries. Dived the batter evenly among the muffins cups.

Bake for 22 to 25 minutes. If you want to top the muffins with decorating sugar, sprinkle on the sugar after the muffins have baked for 10 minutes. When fully baked, the tops of the muffins will be golden and springy to the touch and a thin knife inserted into the center of the muffins will come out clean. Transfer the pan to a rack and cool for 5 minutes before carefully removing each muffin from its mold.

Blueberry Banana Bread

In case you couldn’t tell, I love to try out new recipes. Especially trying variations of banana bread as you can see here, here, here, this one too, and this. I can’t get enough of them, and thankfully my husband is a willing taste tester. My husband didn’t notice the banana flavor, probably because he didn’t know there was any in this (he assumed blueberry, of course). I thought the bread was okay, and a little dense but that may be because I over stirred the batter? Not sure, I thought I did a pretty good job of not over mixing. Maybe it was tougher because there is no butter in this, which usually keeps loaves tender and moist. Thanks for reading, enjoy!
Blueberry Banana Bread – adapted from Chef in Training
  • 2 cups flour (250 grams)
  • 1 1/2 tsp. baking powder
  • 1/4 tsp. salt
  • 1 cup sugar (**I used 1/2 cup vanilla sugar, 1/2 plain**)
  • 3 Tbsp. canola oil
  • 2 spotty bananas, mashed
  • 1 egg
  • 1 tsp. vanilla extract
  • 1 1/3 cups fresh blueberries
Directions:
  1. Preheat oven to 350F. Grease and flour a 9×5-inch loaf pan.
  2. In a medium bowl, whisk together flour, baking powder and salt.
  3. In a large bowl, whisk together sugar, vegetable oil, egg, vanilla and mashed bananas until smooth. Add in flour mixture and stir until just combined and no streaks of flour remain. Fold in blueberries with a spoon or spatula, then pour batter into prepared pan.
  4. Bake for about 55-60 minutes, until a toothpick inserted into the center of the loaf comes out with only a few moist crumbs attached.
  5. Let bread cool in pan for 10 minutes, then turn out onto a wire rack to cool completely before slicing.

Blueberry Buttermilk Pancakes

I love Pinterest…and who doesn’t? I tried to fight joining for a while, but I can tell you that these past few months of browsing through have led me to some great recipes that I might not have otherwise found.
I really like the flavor of these because the oat flour gives them something extra. Next time I will toast the oats before grinding them up in the food processor to kick that “oaty” flavor up a notch. These would be great with strawberries in place of the blueberries and I’m sure I’ll get around to trying that variation soon. This recipe made 14 pancakes, which is great for us because I can freeze for future quick breakfasts for the kids. Now that we have a few mornings a week when we have to leave early, it really saves me time and worry. Thanks for reading, enjoy!
Blueberry Buttermilk Pancakes – adapted from Cooking Classy
 
  • 1 cup + 2 Tbsp lightly packed oat flour*
  • 1 cup + 2 Tbsp all-purpose flour
  • 2 Tbsp sugar
  • 2 1/2 tsp baking powder
  • 1 tsp baking soda
  • 1/2 tsp salt
  • 2 cups buttermilk
  • 3/4 cup milk
  • 2 eggs
  • 2 Tbsp butter, melted
  • 1 1/2 cups blueberries (fresh or frozen)
Directions:
Preheat a non-stick griddle over medium heat. In a small mixing bowl, whisk together oat flour, all-purpose flour, sugar, baking powder, baking soda and salt. In a large mixing bowl combine buttermilk, milk, eggs and melted butter. Stir in dry ingredients (mixture should by slightly lumpy, don’t over-mix). Pour 1/4 cup mixture onto buttered preheated griddle then drop about 10 -12 blueberries onto pancake. Flip pancake when bubbles start to appear on surface and bottom is golden.  Cook opposite side until golden.  Repeat process with remaining batter.  Serve pancakes warm topped maple syrup and butter.

*Oat flour can be purchased in the health food section of most super-markets. You can also make your own by grinding 1 1/2 cups whole oats in a food processor for about 2-3 minutes, until it is very fine.  I prefer the actual oat flour over grinding my own, it presents a slightly better texture.  Also, lightly pack the oat flour when you are measuring it, I found it measures a bit different then all purpose flour.

Strawberry Bread…Revisited

I love this bread! The last time I posted about this, I destroyed the loaf while trying to take it out of my pan. I now have two 9×5 inch loaf pans from USA Pans, and I love them and I want more of them. They’re so worth the price and I never have to grease these. Another good thing about them is that they aren’t coated in Teflon, so they’re never look ugly and scratched up and since cooking spray isn’t required, they wont get that sticky, brown gunk allover either. See how evenly the crust baked up? I’m going to chalk it up to the quality of the pans, which also have a nice weight to them and are really easy to clean.

Anyway, enough of my little infomercial! 😉 This bread is a welcome treat for any occasion!  I like the cut up strawberries that freckle the loaf, and it’s moist and not too dense. It’s also perfect with coffee or tea, eaten as a treat for breakfast or a nice snack during the day…good during any time really. Thanks for reading, enjoy!

Fresh Strawberry Bread – My Baking Addiction

  • 1/2 cup butter, softened
  • 1 cup sugar
  • 4 ounces cream cheese, softened
  • 2 eggs
  • 1 teaspoon vanilla extract
  • 2 cups flour
  • 2 teaspoons baking powder
  • 1/2 teaspoon baking soda
  • 1/2 teaspoon Kosher salt
  • 1/2 cup buttermilk
  • 1 1/2 cups strawberries, rinse, dried and chopped

Directions

1. Grease and flour a 9×5 inch loaf pan.
2. With electric mixer cream butter, sugar and cream cheese until fluffy. Add eggs one at a time. Mix in vanilla.
3. In separate bowl, mix flour, baking powder, baking soda and salt. Blend flour mixture with butter mixture just until blended. Add buttermilk and only stir until just combined; do not over mix.
4. Carefully fold in strawberries. Dough mixture will be thick.
5. Bake in a 350 degree oven for 50 to 60 minutes.

Banana Bread 2

I had six bananas on the counter that were becoming more and more spotted, which meant they became more and more perfect for banana bread. My husband noticed (of course it’s food related, right?) and mentioned he’d like to eat some banana bread for breakfast in the morning. I didn’t go grocery shopping like I should have, and then it rained the rest of the day so I didn’t want to go to the store, plus the kids were with me…excuses, excuses! 😉 I told him that I would find a new recipe that didn’t require buttermilk for times such as this. (I didn’t even have lemons or white vinegar on hand to make a buttermilk substitute.)

Verdict: This banana bread is moist, light and full of banana flavor – duh, right? I like this type of recipe that doesn’t add spices that mask the flavor of the banana. I did add toasted walnuts to mine because I like the crunch and texture it gives to the finished loaf. Also, I doubled the recipe because I had so many bananas, plus the container of sour cream had the perfect amount left for it.  Mine took about 50 minutes to bake using the convention setting on my oven. Whenever the smell of what is baking becomes really noticeable is when I start to check it. Thanks for reading, enjoy!

**You know what I’m loving? Measuring in grams! What a difference – it’s so much easier and there are no fractions! Alton Brown mentioned that very perk and I was immediately intrigued. My favorite website to convert cups into ounces or grams is here, and I don’t even bother with measuring cups anymore.**

Banana Bread – adapted from Eat Yourself Skinny!
  • 1/2 cup (1 stick) light butter, softened 
  • 1 cup sugar
  • 2 eggs
  • 1 tsp. vanilla
  • 1/2 cup light sour cream (I used full fat)
  • 1 cup mashed bananas (about 2 bananas)
  • 1 1/2 cups all-purpose flour
  • 1 tsp. baking soda
  • 1/2 tsp. salt
Directions – 
Preheat oven to 350 degrees F.  In a stand mixer, or hand held, mix together softened butter and sugar until well combined.  Then add in eggs and mix well.  Next add in vanilla, sour cream and mashed bananas then, while the mixer is on, slowly add the flour, baking soda and salt and mix slowly until completely combined, scraping the sides and the bottom.
Meanwhile, grease your pan(s) and lightly flour so that your bread won’t stick.  If using one 9×5 loaf pan, bake bread for about one hour.