Chili Con Carne

WP_20150218_021 1

Chilly nights are perfect for enjoying comfort foods that warm you from the inside out! This was flavorful and has the perfect amount of spiciness. We enjoyed it with this corn bread, aged cheddar cheese, cilantro and some sour cream. Thanks for reading, enjoy!

Chili Con Carne – adapted from Simply Recipes

  • 2 Tbsp red chili powder
  • 1 teaspoon chipotle chile powder
  • 1/2 teaspoon ancho chile powder
  • 1 Tbsp ground cumin
  • 2 teaspoons ground Mexican oregano
  • 1/2 teaspoon coriander
  • One – 2 pound chuck roast, cut into 1/2-inch cubes
  • Salt and pepper to taste – season lightly
  • 1 medium white onion, chopped
  • 3 cloves garlic, minced
  • 2 jalapeño chili peppers, stems removed, seeded, ribs removed, minced
  • 1 28-oz can whole tomatoes
  • 2 cups water
  • juice of 1/2 of a lime
  • 1 14-oz can red kidney beans, drained and rinsed
  • Salt to taste
  • Grated cheddar cheese, cilantro and lime wedges for serving

Directions –

1.  In a small bowl mix the chili powder, chipotle chili powder, ground cumin, oregano, and ground coriander. Set aside.

2. Heat a Dutch oven over medium high heat, add back in 1 tablespoon of bacon fat. Working in batches so that you don’t crowd the beef (crowding will steam cook the meat instead of browning it), brown the beef cubes on all sides. Remove beef from pan, set aside.

3.  Add another Tablespoon of bacon fat to the pan. Add the chopped onions and sauté until soft, about 5 minutes. Add the garlic and jalapeño, cook until fragrant, 1 minute more. Add the chili paste and cook for 2-3 more minutes.

4. Put onion chili mixture, beef, tomatoes, water, lime juice. Heat the chili on medium high heat until it comes to a simmer. Then reduce the heat to low. Cover and cook for 1 1/2 hours. Then uncover and cook for another half hour, keeping the temperature at a place where you can maintain a simmer.

5. Gently mix in the kidney beans. Add salt to taste. Adjust seasonings. Sprinkle with grated cheddar cheese, cilantro and sour cream if desired. Serve with cornbread.

Grandmother’s Buttermilk Cornbread – adapted from Allrecipes

  • 1/2 cup butter
  • 1/2 cup white sugar
  • 2 eggs
  • 1 cup buttermilk
  • 1/2 teaspoon baking soda
  • 1 cup cornmeal
  • 1 cup all-purpose flour
  • 1/2 tsp salt

Directions:

1. Preheat oven to 375 degrees F (175 degrees C). Butter a 8×8 baking dish or a 9 inch cake pan.

2. Melt butter in large skillet (I put it in the microwave for about 45 seconds). Remove from heat and stir in sugar. Quickly add eggs and beat until well blended. Combine buttermilk with baking soda and stir into mixture in pan. Stir in cornmeal, flour, and salt until well blended and few lumps remain. Fold in the cheese and pour into your prepared pan.

3. Bake in the preheated oven for 30 to 40 minutes, or until a toothpick inserted in the center comes out clean.(*mine took 30 minutes with convection)

Polish Sausage, Potato and Kale Soup

WP_20150128_021

Whenever it’s even a little cooler here, I like to take advantage. This winter has been so mild that it feels more like spring/early summer. Sometimes I wish for cooler air, but then I see the pictures of what Northerners are dealing with. I’m a lightweight when it comes to temperatures below 75!

This is a dairy-free, “creamy” soup but you can substitute unsweetened coconut milk with heavy cream or half and half. In my experience, the coconut milk doesn’t make the food taste “coconutty”. Thanks for reading, enjoy!

Sausage, Potato and Kale Soup – adapted from The Candid Appetite

  • 1 pound Polish sausage
  • 2 tablespoons ghee or olive oil
  • 1 large onion, chopped
  • 3 garlic cloves, minced
  • 1 teaspoon salt, plus more to taste
  • 1 teaspoon freshly cracked black pepper, plus more to taste
  • 1/2 teaspoon crushed red pepper flakes, optional
  • 2 large bunches of kale, stemmed and chopped
  • 1 pound red potatoes, sliced
  • 8 cups homemade chicken stock
  • 1/2 cup unsweetened coconut milk or heavy cream

Directions –

1. Heat a large heavy-duty pot over medium-high heat. Once the pot has heated through, add the sausage, which you removed from the casing. Using a wooden spoon, begin to break up the sausage and allow it to cook, stirring occasionally, until it has fully browned. Remove the crisped sausage from the pot and transfer it to a plate or bowl. Set aside.

2. Lower the heat to medium, add the butter or oil and throw in the onions and garlic. Stir, scraping down the bottom of the pot picking up the browned bits of sausage with the back of a wooden spoon, and cook until soft and translucent about 3 to 5 minutes. Season with salt, pepper, and crushed red pepper flakes, if using. Continue to sauté until the onions have caramelized. Add the chopped kale in batches, allowing it to wilt down as it cooks.Cook the kale for another 3 minutes until it has turned bright green and completely wilted down. Throw in the sliced potatoes and cooked sausage.

3. Pour in the chicken stock or broth and bring it up to a boil. Lower the heat and allow the soup to simmer until the potatoes are cooked tender and soft. Taste the soup for seasoning, at this point you may add more salt, pepper or red pepper flakes, if desired. Once the potatoes are fully cooked, stir in the heavy cream. Serve right away with some bread on the side. Enjoy!

Paleo Pancit

WP_20150127_021 1

After making this, I learned – one: I love fish sauce, and two: more cabbage, please! I was worried about using both but this recipe just looked and sounded so good. I’m glad I didn’t let apprehension get the best of me, because this was so perfect! It was savory, sour and had just enough saltiness; and textures in each bite of this pancit, (which I had never tried or heard of before), that I am on the look out for more Asian recipes that might hit all those notes again. Thanks for reading, enjoy!

Chicken Pancit – adapted from Everyday Paleo

  • 1.5 lbs chicken breasts, cut into small bite size pieces
  • 2 tablespoons coconut oil
  • 6 green onions, sliced thin
  • 2 cloves minced garlic
  • 2 carrots, sliced thin
  • 1 small bell pepper, sliced thin
  • 6 – 8 cups shredded green cabbage
  • ¼ cup coconut aminos or Tamari wheat free soy sauce
  • 1/4 cup chicken broth
  • 1 – 2 tablespoons fish sauce
  • Black pepper to taste
  • Lemon wedges

Directions –

In a large wok or skillet heat the coconut oil over medium to medium high heat.  When the wok or pan is nice and hot, add the chicken, green onions and garlic and saute for about 6-7 minutes or until the meat is done all the way through but still tender. Remove the meat from the pan and set aside.  Add the bell pepper and carrots to the wok or pan and cook for 3 minutes. Add in the cabbage and cook about 4 more minutes. Add the chicken back to the veggies and pour in the coconut aminos or soy sauce, chicken broth, and fish sauce. Season with lots of black pepper.  Stir well and cook for another minute or two.  Serve in bowls with a lemon wedge.

Maple Roasted Chicken and Sweet Potatoes

WP_20140709_20_05_55_Pro

**Sorry for the lack of posting – things are much different in our house. My kids and I just finished our third week of homeschooling, so I have had to put the blog on the back burner 🙂 I will post when I can! Thanks for stopping by :)**

Quick Post: One of my favorite combinations is chicken and sweet potato – I practically live off of this pairing! This is one of the most simple and cheap dinners I have tried since I changed my eating habits, and it’s just so good. I love how crispy the skin becomes and I eat it unashamedly! 😉 Before I put the skillet in the oven, I browned up the skin in the pan on my stove – that’s optional, but I recommend it! Thanks for reading, enjoy!

  • WP_20140709_19_02_27_Pro (1)

Maple Roasted Chicken and Sweet Potatoes – adapted from Honey, Ghee and Me

  • 2-4 chicken pieces (bone-in, skin-on)
  • 2 sweet potatoes
  • 1 yellow onion
  • 3 tbsp maple syrup (the real stuff- makes a huge difference)
  • 8 sprigs fresh thyme
  • 2 tbsp olive oil
  • 3/4 tsp salt
  • 1/4 tsp pepper

Directions –

Preheat oven to 400 degrees. Begin by peeling sweet potatoes and chop them into one inch chunks. Chop the onions into a similar size and arrange the vegetables in the bottom of a baking dish. Pour in olive oil and maple syrup and season the chicken with salt and pepper. Toss to coat in the oil and maple syrup, and leave all the chicken and vegetables in one even layer. Top with thyme sprigs and bake for 1 hour uncovered, turning the chicken half way through cooking time.

Buffalo Chicken Salad with Blue Cheese Dressing

salad

In an effort to make something new using yesterday’s leftovers, I made this. I had just enough chicken from this pizza to make this boring salad a meal. I also whipped up a simple buttermilk blue cheese dressing to go with it. And because wasting a perfectly good dressing would be just plain dumb; I made a batch of delicious hot wings to go with it! I haven’t made these in years, but they’re worth the extra time required. Thanks for reading, enjoy!

image

Buffalo Chicken Salad – adapted from The Pioneer Woman

  • Leftover marinated and grilled chicken from this, chopped
  • 2-3 TBSP Franks Red Hot
  • 2 TSBP butter
  • Romaine lettuce
  • avocado
  • cucumber
  • cherry tomatoes
  • Blue Cheese Dressing
  • Extra Blue Cheese Crumbles

Directions-

Place a skillet over medium heat; add the butter and Frank’s Red Hot. Heat just until butter has melted, then add chicken and coat with buffalo sauce. Turn off heat and set aside.
Heap tossed salad into individual bowls. Sprinkle blue cheese crumbles, cucumber, sliced avocado, chicken and cherry tomatoes and top with blue cheese dressing.

Homemade Blue Cheese Dressing – adapted from My Baking Addiction

  • 1/2 cup mayonnaise
  • 1/4 cup sour cream
  • 2- 4  tablespoons buttermilk (more to thin out)
  • 2 tablespoons white wine vinegar
  • 1/4 teaspoon Worcestershire Sauce
  • 1/2 teaspoon sugar
  • 1/2 teaspoon kosher salt
  • 1/4 teaspoon freshly ground black pepper
  • 1/8 teaspoon garlic powder
  • 1/2 cup Crumbled blue cheese

Directions- 

Combine mayonnaise, sour cream and milk in small bowl; mix until smooth. Stir in vinegar, Worcestershire sauce, sugar, salt, pepper and garlic powder until well blended. Fold in cheese. Transfer to container with tight-fitting lid. Chill until serving time. Stir well before serving.

Tequila Lime Chicken

chickena

Sorry for the radio silence! We recently came back home from our two-week long trip to California. I am really glad to be home again and I’m sure my kitchen missed me as much as I missed it. My husband sustained himself on one meal a day (not home cooked), and these goodies that I made for him before I left! What would he do without me? 😉 Since I’ve been back home, I have tried several new and successful recipes which I will share with you in the next few weeks.

Anyway, on to the recipe! This marinade gives the chicken amazing flavor and it’s a new family favorite. I used chicken thighs and served these tacos with pico de gallo, my fave Mexican rice and refried (in bacon grease!) pinto beans with lots of Monterey Jack cheese. I will make this again and again! Thanks for reading, enjoy 🙂

chickena1

Tequila Lime Chicken – adapted from The Pioneer Woman

  • 2 limes
  • 1/2 cup tequila
  • 1/4 cup olive oil (*I used grapeseed*)
  • 1 teaspoon kosher salt
  • 3 cloves garlic
  • 1 jalapeno, seeded and sliced
  • 1/2 bunch chopped fresh cilantro
  • 6-8 boneless, skinless chicken thighs (*If you have a few more pieces, this makes plenty of marinade*)
  • Corn tortillas
  • Monterey jack cheese
  • pico de gallo

Directions –

Slice open the limes and squeeze the juice into a food processor or blender. Add the tequila, olive oil, salt, garlic, jalapenos and cilantro. Blend the mixture until totally combined. Add the chicken to a large plastic bag and pour in the lime-tequila mixture. Seal the bag and marinate in the fridge for several hours or overnight.

Remove the chicken from the bag and grill it over medium-high heat. Rotate the chicken 45-degrees on both sides to create nice grill marks, and continue grilling until the chicken is cooked through, 4 to 5 minutes per side. Serve with corn tortillas, fresh pico de gallo, beans and rice.

Pork Carnitas

carnitas

Quick Post: My son loves taco night, and these definitely hit the spot.  I made the meat on a Friday and didn’t end up using it until a Monday. The advantage to letting it sit, is that the fat will rise to the top so you can remove it. The meat also tasted even better, and I was able to pull off even more fat off of the pieces of meat. Thanks for reading, enjoy!

Pork Carnitas – adapted from My Kitchen Escapades

  • 4 pound boneless pork butt, fat trimmed and cut into 2 inch cubes
  • 1 1/2 tsp salt
  • 3/4 tsp pepper
  • 1 tsp ground cumin
  • 1 onion, peeled and halved
  • 2 bay leaves
  • 1 tsp dried Mexican oregano
  • 2 Tb fresh lime juice
  • 2 C water
  • 1 medium orange, juiced and keep the spent halves

Directions –

1.  Adjust oven rack to lower middle position and heat to 300 degrees.  Combine all the ingredients in a large Dutch oven, including the spent orange halves and juice.  Bring the mixture to a simmer over medium-high heat, uncovered.  Once it simmers, cover pot and transfer it to the oven.  Cook until the meat falls apart when prodded with a fork, about 2 hours.
2.  Remove the pot from the oven and turn on the broiler.  Use a slotted spoon to remove the meat from the pan and place it on a large foil-lined jelly roll pan.  Remove and discard everything from the pot except for the cooking liquid.  Place pot over high heat on the stove and boil until thick and syrupy, about 20 minutes.  You should have about 1 C of liquid remaining when it is finished.
3.  While the liquid is reducing, use two forks to pull each cube of pork into three equal sized pieces.  Once the liquid has become a syrup, gently fold in the pieces of pork into the pot.  Try not to break up the pork any further.  Taste and add additional salt and pepper.
4.  Spread the pork back onto the foil lined pan and evenly spread the meat around so there is a single layer of meat.  Place the jelly roll pan on the lower middle rack of the oven and broil until the top of the meat is well browned and edges are slightly crisp, about 5 to 8 minutes.  Using a wide metal spatula, flip the pieces of meat and broil the other side until well browned and edges are slightly crisp, 5 to 8 minutes.  Serve immediately in a tortilla with all your favorite toppings.

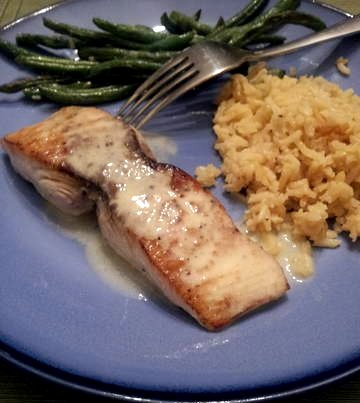
Pan Seared Mahi with Lemon Butter Sauce

This was really good and the lemon butter sauce was an amazing addition to this simple but elegant meal. I will use this sauce recipe again and again because it would compliment vegetables, fish and chicken wonderfully! My husband gave this an “8”, which I agreed with –  but the best compliment was from my picky six-year-old daughter…she ate it all without complaining! 😉 Thanks for reading, enjoy!

Pan Seared Mahi-Mahi –

  • 1 pound Mahi Mahi or other firm, white fish
  • flour to coat
  • 3 TBSP butter
  • salt and pepper to taste
  • 1 TBSP oil

Directions –

Dry the fish fillets well. Dust with flour on one side. Melt 1 tablespoon of the butter and brush the floured side of the fish. Season with salt and pepper. In a large skillet, heat the oil over medium-high heat. Place the fish on the skillet floured-side down and cook for 5 minutes per side, or until it is just cooked through. Remove the fish to a serving plate.

Lemon Butter Sauce – adapted from Food Network 

*This is half the original recipe, and we had more than enough for a pound of fish*

  • 1/2 cup dry white wine
  • 1.5 lemons, peeled and segmented
  • 1 tablespoons minced garlic
  • 1/2 tablespoon minced shallots
  • 1 teaspoon salt
  • 3 turns freshly ground black pepper
  • 1 dash Worcestershire sauce
  • 1 dash Tabasco sauce
  • 1/2 cup heavy cream (*I used half and half*)
  • 1 stick unsalted butter, cut up, at room temperature
  • 1 tablespoon finely chopped fresh parsley

Directions

Heat a large nonreactive skillet over high heat. When the skillet is hot, add the wine, lemons, garlic, and shallots. Cook for 3 minutes, breaking up and mashing the lemons with a wire whisk. Stir in the salt, pepper, Worcestershire, and hot sauce and cook until the mixture is somewhat syrupy, for about 3 minutes. Stir in the cream and cook for 1 minute. Over low heat, whisk in the butter a few pats at a time. When all of the butter has been added, remove from the heat, but continue whisking until all of the butter is incorporated into the sauce. Strain the sauce, pressing all of the liquid into a bowl. Stir in the parsley. Serve immediately, or keep warm for a few minutes until ready to use.

Chicken Cordon Bleu

I have been slackin’! I made this over a month ago and I am just getting around to sharing it with you. Even though it’s been awhile, I do remember that everyone enjoyed this. My husband was pleasantly surprised at how good it was 🙂 I used Applegate Farms ham for this instead of the prosciutto, and baby Swiss instead of Gruyere – other than that, I followed the recipe exactly. I recommend these roasted green beans and this creamy garlic pasta to serve along side this dish. Thanks for reading, enjoy!

Chicken Cordon Bleu – adapted from Food Network

  • 4 chicken skinless and boneless
  • 4 thin slices prosciutto di Parma
  • 1/2 pound Gruyere, grated
  • 1/4 cup all purpose flour
  • Kosher salt and freshly ground black pepper
  • 1 cup panko bread crumbs
  • 4 sprigs fresh thyme, leaves only
  • 1 clove garlic, peeled and finely minced
  • 2 tablespoons unsalted butter, melted
  • 2 eggs
  • extra virgin olive oil

Directions –

Preheat oven to 350 degrees F.

Lay the chicken breast between 2 pieces of plastic wrap. Using the flat side of a meat mallet, gently pound the chicken to 1/4-inch thickness. Remove the top sheet of plastic and lay 2 slices of prosciutto neatly over the top to cover the breast and sprinkle a quarter of the cheese over the prosciutto. Tuck in the sides of the breast and roll up tight like a jellyroll inside the. Squeeze the log gently to seal and twist both ends tight to form a nice log. Repeat with remaining chicken.

Season the flour with salt and pepper. Mix the bread crumbs with thyme, garlic and kosher salt, pepper, and melted butter. The butter will help the crust brown. Beat together the eggs and season so the flour, the eggs and the crumbs are all seasoned.

Remove the plastic wrap. Lightly dust the chicken with flour, dip in the egg mixture and gently coat in the bread crumbs. Lightly coat a baking pan with olive oil and carefully transfer the roulades onto it. Bake for 20 to 25 minutes until browned and cooked through.

Crock Pot Spaghetti Sauce


I’m usually leery about crock pot recipes and I rarely search for new ones. Most recipes I have seen (or most that are popular on Pinterest), are full of canned this and packaged that…I have seriously considered creating a new pin board entitled: “Recipes that Scare Me”!  There is nothing questionable in this recipe and it is so good! The aroma greeted me as I walked through the door after picking up my SIL from the air port. This was the perfect meal to come home to and I will make this again. It’s rich, hearty and goes perfectly any thick, tube pasta. I served this with a quick garlic bread, but if I had more time – I would have made this one (always a favorite!) Thanks for reading, enjoy!

Crock Pot Spaghetti Sauce – adapted from Iowa Girl Eats

  • 1 lb ground beef (I used 90/10 ground sirloin)
  • salt & pepper
  • 1 medium onion, diced
  • 28 oz can crushed tomatoes
  • 8 oz can tomato sauce
  • 6 oz can tomato paste
  • 1 Tablespoon brown sugar
  • 1 bay leaf (or 2 small)
  • 3 garlic cloves, minced
  • 2 teaspoons dried oregano
  • 2 teaspoons dried basil
  • 3/4 teaspoons salt
  • 1/2 teaspoon dried thyme
  • 1/4 teaspoon red chili pepper flakes (optional)
  • 2 Tablespoons butter

Directions:

Season ground beef with salt & pepper then brown with minced onion in a large skillet over medium-high heat. Drain then add to a large crock pot. Add all the ingredients except for the butter, stir to combine, then cook on low for 5-6 hours. Remove bay leaves, stir in butter, then serve over cooked pasta.