Carrot Cake for My Gram

WP_20140529_17_56_31_Pro (1)

My kids and I recently came back from our trip to California. While I was there, I used an entire 5 pound bag of flour…yeah, I went a little overboard spoiling my parents and my Grandma during those two short weeks 😉 I was glad to, and honored to cook with my 85 year old grandmother – the one who inspired me to cook in the first place. While it was a lot of time and effort to make so much for them, I was flattered to hear that my Gram actually learned from me!! and my Dad said my cinnamon rolls reminded him of his mother’s 🙂

Because Gram’s birthday happened the week after we flew in, I told her I would bake her a birthday cake. She couldn’t eat chocolate (huge bummer), but she loved carrot cake. Problem for this baker was that I have never made one, let alone eaten a piece in over 10 years!! Thankfully, a quick search at Pinterest led me to find this recipe that sounded tasty – kind of flimsy evidence to go on, but I went with it. I didn’t try any of it because of my Whole 30 craziness, but the family really enjoyed it and said it wasn’t too sweet and the frosting was perfect. That sounds like a win to me! Thanks for reading, enjoy!

WP_20140529_19_42_00_Pro (1)

Carrot Cake – adapted from Sprinkle Some Sugar

  • 1/2 cup coconut oil
  • 3/4 cup granulated sugar
  • 1 1/4 cup light brown sugar (or dark)
  • 5 eggs + 1 yolk
  • 1 tbs cinnamon
  • 3/4 tsp nutmeg
  • 1/4 tsp cloves
  • 3 1/4 cup flour
  • 2 tsp baking soda
  • 1 tsp baking powder
  • 1/2 tsp salt
  • 2 cups finely grated carrots (about 7-8 carrots)

Cream Cheese Frosting

  • 2 8 oz package cream cheese, room temperature
  • 1 cup unsalted butter, softened
  • 6 cups confectioner’s sugar
  • a pinch of salt

Directions –

For the Cake
Preheat oven to 350°. Line the bottom of two 9″ round baking pans with parchment paper and lightly grease and flour sides. Be sure to get every inch! Set aside.
Whisk the flour, baking powder, baking soda, cinnamon, nutmeg, clover all together and set aside.
In the bowl of your stand mixer fitted with the paddle attachment, combine the oil, brown sugar and granulated sugar together. Add in the eggs one at a time, egg yolk and vanilla and mix until smooth.
Pour in flour mixture and mix until just combined making sure everything is well mixed. Fold in the grated carrots by hand with a rubber spatula or spoon. Batter will be thick, this is okay. If you are adding pecans or raisins, do so now.
Distribute the batter evenly into both pans. Place in preheated oven and bake for 30-40 minutes. Start checking cake at 25 and check every 2 minutes after that. Once a toothpick comes out clean, cakes are done. Let them cool on wire rack or counter for 20 minutes. Flip pans over and cakes should pop right out onto wire rack or parchment or wax paper lined counter. Let them cool completely. While they are cooling, mix up the frosting.
For the Cream Cheese Frosting
Cream together the cream cheese and butter until fluffy and light in color. Add in the vanilla and mix until smooth. Add in the powdered sugar 1 cup at a time on low until combined. Whip frosting for another minute or so until smooth and creamy.
Once cakes are completely cooled, cut the domed tops off so they are completely flat and even. Place one cake on the bottom of a cake stand, facing up. Spread some frosting on top until completely covered. Add second cake, bottom up, and frost the rest of the cake. I found it much easier to do one thin layer of frosting, set it in the fridge and as it firmed up a bit, add another thick layer – the frosting looks much more even this way. This cake is even more moist and flavorful the second day once the flavors have all settled in with each other.
Store cake covered in the refrigerator for up to 5 days.

Reese’s Peanut Butter Cup Cheesecake

WP_20131225_12_39_16_Pro20131225124856

Yeah – definitely not something you would want to make more than once a year! The crust starts out with 24 Oreo cookies and a half stick of butter  – not to mention the roasted peanuts!  There are also 16 Reese’s cups in and on this cake, 2 pounds of cream cheese, 1 cup of peanut butter…Thankfully, there will be at least 10 people who might be willing to try this. I don’t know many people who would turn down a Reese’s 😉

WP_20131225_17_26_05_Pro20131225173457

Verdict: It’s a little too sweet for my taste, but no one else complained 😉 We have half a cake left, but I have several people in mind to share this with 😉 Thanks for reading, enjoy!

Ruggles Reese’s Peanut Butter Cup Cheesecake – adapted from Food.com **Plan ahead–cheesecake needs to chill for at least 4 hours**

For the Crust:

  • 4 1/2 cups crushed Oreo cookies
  • 1 cup chopped roasted peanuts
  • 1/2 cup butter, melted

For the Filling:

  • 2 lbs cream cheese, softened
  • 5 eggs, at room temperature
  • 1 1/2 cups firmly packed brown sugar
  • 1 cup smooth peanut butter ( not natural-style)
  • 1/2 cup whipping cream
  • 1 teaspoon vanilla extract
  • 12 Reese’s Peanut Butter cups, broken into small pieces

For the Topping:

  • 1/2 cup Reese’s Peanut Butter chips
  • 1/2 cup semi-sweet chocolate chips
  • 1/4-1/2 cup heavy cream
  • 4 Reese’s Cups, chopped

Directions –  

To Make The Crust: Combine crushed Oreo cookies and peanuts that have been ground in a food processor with the melted butter. Pat the crust mixture onto bottom and sides of a 10-inch springform pan.

WP_20131223_18_54_31_Pro
To Make The Filling: Beat cream cheese in bowl of electric mixer until smooth. Add eggs, one at a time, beating well after each addition. Add sugar, peanut butter and cream; mix until smooth. Stir in vanilla, then fold in peanut butter cup pieces with a rubber spatula.

WP_20131223_19_37_11_Pro

Pour filling into prepared crust. Place springform pan into a larger baking pan. Pour hot water into the larger pan so that the water comes 1 inch up the sides of the springform pan.

WP_20131223_19_31_56_Pro

Bake at 275°F 1-1/2 hours, or until firm and lightly browned. Remove from the oven and allow to cool on a wire rack for one hour. You may run a knife along the edge of the cake to loosen it from the pan somewhat. Refrigerate for at least 4 hours.

For the Topping: Pour the cream into a microwave safe cup for about 45 seconds. Pour the hot cream over the peanut butter and chocolate chips and don’t stir for about three minutes. Stir with a whisk until smooth and shiny to break up any pieces and emulsify cream and chocolate. Add more hot cream to thin out the ganache if needed. Add chopped Reese’s to the cheesecake and then drizzle the ganache over all.

Pumpkin Cheesecake

pumpkins

Last week I complained that I never get the opportunity to make desserts like this because my husband is not a fan of pumpkin anything. My home group crew saved the day when they selflessly volunteered to eat what ever pumpkin dessert I wanted to make. With all the great recipes to choose from, I decided on one I have never eaten or made. It’s been a couple of years since my last cheesecake (also a really great Fall dessert), so I hoped that this one would be worth making. Cheesecake is one of the more time-consuming desserts to make, not to mention the overnight stay in the refrigerator; but all that waiting paid off because this was a hit with everyone who tried it. It tasted better than I could have hoped! The cheesecake is so creamy and light and there was just a hint of cream cheese flavor, but the predominant flavor was pumpkin pie. This is apparently the type of cheesecake that appeals to people who don’t like cheesecake or don’t like pumpkin  pie. Everyone that tried it really enjoyed it and one even said it was better than Cheesecake Factory – what a great compliment 🙂 I made some minor tweaks to the recipe and combined some of My Baking Addiction’s recipe to Once Upon A Chef’s. My Baking Addiction shared a video with great tips to make the perfect cheesecake, like how to ensure that no water seeps into your cheesecake while it bakes in the water bath. Thanks for reading, enjoy!

Pumpkin Cheesecake – adapted from Once Upon A Chef with some tips from My Baking Addiction

For the Crust

  • 2 cups finely ground graham crackers (about 14 graham cracker sheets)
  • 1/4 granulated sugar
  • 6 tablespoons unsalted butter, melted
  • 1 teaspoon pumpkin pie spice

For the Filling

  • 1 15-ounce can pumpkin
  • 1-1/3 cups granulated sugar
  • 1 teaspoon ground cinnamon
  • 1/2 teaspoon ground ginger
  • 1/4 teaspoon ground nutmeg
  • 1/4 teaspoon ground cloves
  • 1/8 teaspoon ground all-spice (*optional*)
  • 1/2 teaspoon salt
  • 1 cup heavy cream, cold
  • 1-1/2 pounds (three 8-ounce packages) cream cheese, room temperature
  • 5 large eggs, room temperature

For Caramel Sauce – adapted from Kelsey’s Essentials

  • 1 cup sugar
  • 1/4 cup water
  • 3/4 cup heavy cream
  • 3 1/2 tablespoons unsalted butter
  • 1 teaspoon Fleur de Sel, or kosher salt

For the Crust

  1. Preheat the oven to 325 degrees. Wrap a 9-inch springform pan twice with aluminum foil (preferably heavy-duty). Take care to pull the foil all the way up the sides so that water cannot seep in from the water bath. Lightly oil the bottom and sides of the pan. Pulse the crackers (or crumbs), sugar and spices in a food processor fitted with the metal blade until finely ground. Add the butter and pulse a few times to combine. Dump the moistened crumbs into the prepared pan and, using a measuring cup or glass, press into an even layer. Bake until fragrant and set, about 15 minutes. Cool on a wire rack while you prepare the filling.

For the Filling

  1. Bring about 4 quarts of water to a simmer in a tea kettle (this will be used for the water bath). In a small, heavy saucepan, stir together the pumpkin, sugar, cinnamon, ginger, nutmeg, cloves, all-spice and salt. Over medium heat, bring the mixture to a sputter, stirring constantly. Reduce the heat to medium-low and cook, stirring constantly, for 5 minutes, until thick, bronzed and shiny. Scrape the mixture into a large food processor fitted with the metal blade and process for 1 minute with the feed tube open.
  2. With the motor running, add the cold cream. Add the cream cheese (cut into chunks) and process for about 30 seconds, scraping the sides if necessary, or until smoothly incorporated. Add the eggs and process for about 5 seconds or just until incorporated (do not overmix!).
  3. Set the cake pan in a large roasting pan. Pour the batter into the cooled crust, and then pour enough boiling water into the large roasting pan to come about halfway up side of the cake pan. Bake until the cake is just set, about 1-1/2 hours. If it jiggles, it’s not done. Carefully remove the roasting pan from the oven and set on a wire rack. Use a paring knife to loosen the cake from the sides of the pan. Cool until the water is just warm, about 45 minutes. Remove the springform pan from the water bath, discard the foil and set on a wire rack. Continue to cool at room temperature until barely warm, about 3 hours. Cover with plastic wrap and refrigerate until chilled, at least 4 hours or overnight.

For Caramel Sauce –

  1. In a heavy-bottomed saucepan, combine the sugar and water over medium-low heat until the sugar dissolves. Increase the heat and bring to a boil, without stirring. If necessary, use a wet pastry brush to wash down any crystals on the side of the pan. Boil until the syrup is a deep amber color, about 7-10 minutes.
  2. Remove the sugar from the heat and carefully whisk in the heavy cream. The mixture will bubble. Stir in the unsalted butter, and salt. Transfer the caramel to a dish and cool.

Oreo.Cheesecake.Cookies.

Quick Post: I had leftover Oreos and cream cheese, and lucky me – I found the perfect recipe! Plan ahead for this one because the batter needs to sit in the refrigerator to set. Thanks for reading, enjoy!

Oreo Cheesecake Cookies – adapted from Sally’s Baking Addiction

  • 2 cups + 2 tablespoons all-purpose flour
  • 1/2 teaspoons baking soda
  • 10 Tbsp salted butter, softened to room temperature
  • 2 heaping Tbsp full fat cream cheese*
  • 1 cup light brown sugar
  • 1/2 cup sugar
  • 1 egg + 1 egg yolk, at room temperature
  • 2 teaspoons vanilla extract
  • 18 Oreos, crushed into tiny pieces (*I only had 13*)

Directions: 

Preheat oven to 325 degrees. Mix the flour and baking soda in a bowl and set aside. With an electric mixer or stand mixer with a paddle attachment, cream the butter, cream cheese, and sugars together. Add the egg, egg yolk, and vanilla and mix well. Gradually add the flour mixture and stir until a dough forms (may take a couple minutes of stirring). Fold in the crushed Oreos.

Chill dough for at least 1 hour or up to 5 days in the refrigerator.

Measure 24 2-Tablespoons worth of dough. The cookies are rather large, but if you’d like them smaller, make each dough ball only 1 Tablespoon. Drop dough onto silpat or ungreased baking sheet. Make sure the balls of dough are tall. Do not flatten them. Bake for 8-11 minutes or until edges are slightly browned. The centers should appear soft and puffy. Let cool completely and enjoy!

Baked BBQ Pork Taquitos

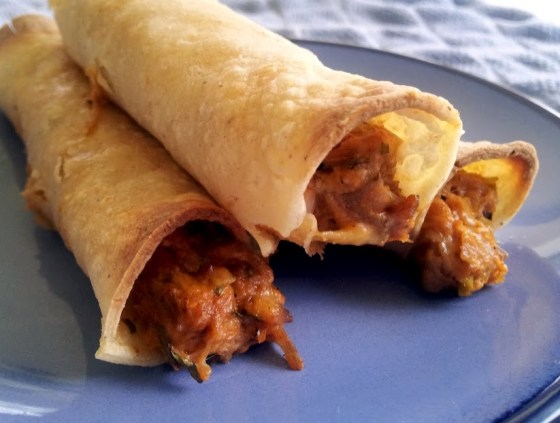
Quick Post: These were so good! I have made the recipe that these taquitos were inspired by, and those are amazing too. We all really enjoyed these, and my husband didn’t even mind/notice that there were some things in these he would normally pass on. The flavor compliment each other really well and all my modifications are listed below. Thanks for reading, enjoy!

Baked BBQ Pork Taquitos – adapted from Pink Parsley

  • 4 oz. cream cheese, softened to room temperature (reduced-fat is fine)
  • 1/3 cup bbq sauce
  • 1/2 tsp paprika
  • 1/2 tsp chile powder
  • 1/2 tsp garlic powder
  • 1 garlic clove, minced
  • 1/2 tsp mustard powder
  • 1/2 tsp brown sugar
  • pinch red pepper flakes
  • kosher salt and pepper to taste
  • 3 scallions, minced
  • 3-4 Tbs minced fresh cilantro
  • 2 1/2 cups shredded or chopped pork
  • 1 cup sharp cheddar cheese
  • 10-15 (6-inch) corn or flour tortillas
  • canola oil for brushing
  • BBQ sauce or ranch dressing for dipping
Directions:
Preheat the oven to 425 degrees and spray a baking sheet with cooking spray. In a large bowl, combine the cream cheese with the bbq sauce, paprika, garlic powder, mustard, brown sugar, chile powder, red pepper flakes, cilantro, scallions, and 1/4 tsp kosher salt.  Fold in the pork and cheese.  Taste and season with additional salt and pepper if necessary. Working 3-4 tortillas at a time, stack them on a microwave-safe plate and cover with a damp paper towel.  Cook 30 seconds, or until tortillas are soft and pliable.Spoon 2-3 tablespoons of filling onto the lower third of each tortilla, and roll tightly.  Place seam side-down on the prepared baking sheet.  Repeat with remaining tortillas and filling.Brush the taquitos lightly with canola oil, sprinkle with salt.  Bake 15-20 minutes, or until the tortillas are crisp and golden-brown.  Serve with bbq sauce and ranch dressing for dipping.

Peanut Butter Pie

Quick Post: This has to be the easiest, least-fancy dessert I have ever made. I’m not usually one to make something this unhealthy, but it’s one of M’s favorites. Don’t judge it’s outward appearance! I know chocolate would make all the difference, but this pie is decadent enough without it in my humble opinion. I know M would disagree, as he likes things so sweet it makes my teeth hurt! Also, he just really loves chocolate. If you decide to make this, make sure it sits in the fridge for at least four hours, but overnight would be even better. The last time I made this we didn’t wait too long – it tasted ok, but the day after it was so much better. Thanks for reading, enjoy!

Peanut Butter Pie – adapted from Let’s Dish

  • 1 (8-inch) graham cracker pie crust
  • 1 (8 oz.) package cream cheese, softened
  • 1/2 cup sugar
  • 1 teaspoon vanilla
  • 1 cup peanut butter
  • 1 (8 oz.) tub frozen whipped topping, thawed

Directions –

With an electric mixer, beat cream cheese and sugar until smooth.  Blend in peanut butter and vanilla.  Fold in whipped topping.  Spoon mixture into prepared pie crust.  Refrigerate at least 4 hours, or until firm.


Pan Seared Shrimp & Four Cheese Ravioli with Vodka Cream Sauce

Quick Post: I came across this recipe today, not even looking for something like this at all. The picture on the blog sold me on the idea. My family loves shrimp, tomato cream sauces, and lots of cheese so why not? Shrimp was on sale – thankfully it was the easy peel kind! Thanks for reading, enjoy!

Pan Seared Shrimp & Four Cheese Ravioli with Vodka Cream Sauce – adapted from Jane Deere
  • 1 pound large shrimp, peeled & deveined
  • 2 teaspoons lemon pepper seasoning (* I used some lemon zest and Italian seasoning )
  • 1 tablespoon butter
  • 2 tablespoons olive oil
  • 1-20 oz package refrigerated Four Cheese Ravioli (used: Buitoni)
  • 1 jar prepared tomato & basil pasta sauce (used: Bertolli)
  • 1 shallot, finely chopped
  • 2 cloves garlic, minced
  • 1 cup chicken or vegetable broth
  • 1 cup vodka (* I used 3/4 cup)
  • 1/2 cup cream cheese
  • 1/2 cup grated Parmesan cheese
  • 1/4 cup finely chopped fresh parsley
Directions –
Start a large pot of boiling, salted water for ravioli.In a medium sauce pan, add prepared tomato sauce and vodka and simmer over medium-low heat until the mixture reduces by 1/4, stirring often, about 20 minutes.

Meanwhile, heat a saute pan over medium heat and add 1 tablespoon butter and two tablespoons canola oil.  Allow butter to melt and stop foaming, do not brown.

Toss the shrimp with lemon pepper seasoning and add to the pan, in a single layer.  Sear shrimp for 1 minute, then flip and continue for 1 minute more.  Remove to a plate; set aside.

While shrimp are cooking, add ravioli to boiling water and cook for about 8 minutes.  Drain well.

Once the shrimp are cooked, add the shallots and garlic and saute until fragrant.  Add broth to deglaze the pan and simmer for 1 minute until slightly reduced.

Add cream cheese to the deglazed pan; cook over medium heat and whisk until smooth and melted.  Stir in the tomato sauce until well combined.  Remove from heat and whisk in parmesan cheese until well blended.  (If sauce is too thick, begin whisking in hot pasta water until desired consistency is reached: sauce should coat the back of a spoon)  Stir in chopped parsley.

Add shrimp and ravioli and toss to coat.  Serve warm with hot garlic bread and salad.

Strawberry Cream Cheese Bread (just keeping it real)

Note to self: impatience is NEVER rewarded. I learned this the hard way. I’ve made this bread twice this week (and plan on making it again next week – hopefully with better results). The first time was fine because I didn’t bother getting the loaf out of the pan while it was still hot and just cut the pieces out of the pan. There is a short window of opportunity to get loaves out of their pans before they stick, so I wanted to work on it within seven minutes of taking it out of the oven. That obviously didn’t help either. This loaf sticks like crazy, so now with two failed attempts at de-panning, I know now that I need to butter the pan and then put a piece of parchment paper on top of that. Next week we’ll see if that works! It better because this is not something I want to happen again.
Thanks for reading, enjoy!
Fresh Strawberry Bread – My Baking Addiction
  • 1/2 cup butter, softened
  • 1 cup sugar
  • 4 ounces cream cheese, softened
  • 2 eggs
  • 1 teaspoon vanilla extract
  • 2 cups flour
  • 2 teaspoons baking powder
  • 1/2 teaspoon baking soda
  • 1/2 teaspoon Kosher salt
  • 1/2 cup buttermilk
  • 1 1/2 cups strawberries, rinse, dried and chopped

Directions
1. Grease and flour a 9×5 inch loaf pan.
2. With electric mixer cream butter, sugar and cream cheese until fluffy. Add eggs one at a time. Mix in vanilla.
3. In separate bowl, mix flour, baking powder, baking soda and salt. Blend flour mixture with butter mixture just until blended. Add buttermilk and only stir until just combined; do not over mix.
4. Carefully fold in strawberries. Dough mixture will be thick.
5. Bake in a 350 degree oven for 50 to 60 minutes.

Super Bowl Appetizers

Quick Post: I don’t care much for football, but I do like making appetizers! Thanks for reading, enjoy!

Guacamole Ingredients – adapted from Alton Brown

  • 3 Haas avocados, halved, seeded and peeled
  • 1 lime, juiced
  • 1/2 teaspoon kosher salt
  • 1/2 teaspoon ground cumin
  • 1/2 teaspoon cayenne
  • 1/2 medium onion, diced
  • 2 Roma tomatoes, seeded and diced
  • 1 tablespoon chopped cilantro
  • 1 clove garlic, minced

Directions –

In a large bowl place the scooped avocado pulp and lime juice, toss to coat. Drain, and reserve the lime juice, after all of the avocados have been coated. Using a potato masher add the salt, cumin, and cayenne and mash. Then, fold in the onions, tomatoes, cilantro, and garlic. Add 1 tablespoon of the reserved lime juice. Let sit at room temperature for 1 hour and then serve.

Restaurant Style Salsa ingredients – adapted from The Pioneer Woman

  • 1 can (28 Ounce) Whole Tomatoes With Juice
  • 2 cans (10 Ounce) Rotel (diced Tomatoes And Green Chilies) *I drain these*
  • ¼ cups Chopped Onion
  • 1 clove Garlic, Minced
  • 1 whole Jalapeno, Quartered And Sliced Thin
  • ¼ teaspoons Sugar
  • ¼ teaspoons Salt
  • ¼ teaspoons Ground Cumin
  • ½ cups Cilantro (more To Taste!)
  • ½ whole Lime Juice

Directions –

Combine whole tomatoes, Rotel, onion, jalapeno, garlic, sugar, salt, cumin, lime juice, and cilantro in a blender or food processor. Pulse until you get the salsa to the consistency you’d like—I do about 10 to 15 pulses. Test seasonings with a tortilla chip and adjust as needed.

Refrigerate salsa for at least an hour. Serve with tortilla chips or cheese nachos.

I know this looks gross, but I assure you – if you love blue cheese you’ll love the taste of this!
Buffalo Chicken Dip ingredients –

  • 1 skin-on, bone-in chicken breast, roasted and shredded
  • 1 – 8 oz package of cream cheese at room temp
  • 1/2 cup blue cheese crumbles
  • 1/2 cup Monterey jack cheese
  • 1/2 blue cheese dressing
  • 1/2 cup Frank’s Red Hot

Directions –

Preheat oven to 350. Combine all ingredients in a 8×8 inch baking dish, cover with foil and bake for 20 minutes. Serve with celery sticks.

Brown Sugar Apple Cheesecake

Is this cheesecake ever good! I made it for the first time last year while visiting family in California. My dad requested this cheesecake specifically and I was apprehensive at first because at that time I had only made a cheesecake once. I am usually nervous about cooking for other people, but I wanted to impress him and everyone else who tried it. To my delight, my dad said it was the best cheesecake he ever had and even my Grandma said it was good…huge compliment in my book! Anyway, this cheesecake isn’t exactly a quick dessert and it is really important that you let it sit in the refrigerator overnight for the best flavor…your patience will be rewarded! Note to self – more apples next time. I ended up only using three of the four apples pictured because I thought three looked like enough when they were all cut up. M is requesting some type of chocolate infused cheesecake for Thanksgiving, so if that ends up happening I will be sure to post that one for you all. Also, if any of you out there has a tested cheesecake recipe recommendation, please leave me a comment! It’s always hard to choose new recipes – especially a chocolate cheesecake…there are so many to look through! Thanks for reading, enjoy!

Brown Sugar Apple Cheesecake Ingredients – adapted from Dorie Greenspan via Culinary Concoctions

(Everything minus the graham crackers)

For the Crust

  • 30 gingersnaps (* I used one sleeve of graham crackers)
  • 2 tbsp light brown sugar
  • 1/2 tsp ground cinnamon (optional)
  • 1/2 stick (4 tbsp) unsalted butter, melted

For the Apples

  • 1/2 stick (4 tbsp) unsalted butter
  • 3 large Golden Delicious or Fuji apples, peeled, cored and cut into eighths
  • 2 tbsp (packed) light brown sugar

For the Filling

  • 1 1/2 pounds (three 8-ounce packages) cream cheese, at room temperature
  • 3/4 cup (packed) light brown sugar
  • 6 tbsp sugar
  • 3 tbsp apple cider
  • 2 tsp pure vanilla extract
  • 2 tsp ground cinnamon
  • 3 large eggs
  • 3/4 cup sour cream
  • 1/3 cup heavy cream

* Caramel Sauce for Drizzling

Directions –

To Make the Crust: Butter the bottom and sides of a 10-inch springform pan.

Put the gingersnaps in a food processor and whir until you have crumbs; you should have a scant 2 cups.  (If you are using graham cracker crumbs, just put them in the food processor.)  Pulse in the sugar and cinnamon, if you’re using it, then pour over the melted butter and pulse until the crumbs are moistened.  Turn the crumbs into the springform pan and, using your fingertips, firmly press them evenly over the bottom and up the sides of the pan as far as they’ll  go.  Put the pan in the freezer while you preheat the oven.  (The crust can be covered and frozen for up to 2 months.)

Center a rack in the oven and preheat the oven to 350 degrees F.

Remove the pan from the freezer and wrap the bottom tightly in aluminum foil, going up the sides.  Place the pan on a baking sheet and bake for 10 minutes, or until the crust is set and lightly browned.  Transfer to a rack to cool while you make the apples and the filling.  Leave the oven at 350 degrees F.

To Make the Apples: Melt 2 tablespoons of the butter in a large nonstick skillet over medium-high heat.  When the foam subsides, toss in half of the apple slices and cook, turning once, until they are golden brown, about 3 minutes.  Sprinkle the apples with 1 tablespoon of the sugar and cook them, turning, just until coated, another minute or so.  Scrape the apples onto a plate, wipe out the skillet and repeat with the remaining apples.  Let the apples cool while you make the filling.

Getting Ready to Bake:  Have a roasting pan large enough to hold the springform pan at hand.  Put a kettle of water on to boil.

To Make the Filling: Working with a stand mixer, preferably fitted with a paddle attachment, or with a hand mixer in a large bowl, beat the cream cheese on medium speed, scraping down the bowl often, for about 4 minutes, or until it is velvety smooth.  Add the sugars and beat for another 2 minutes.  Beat in the cider, vanilla, and cinnamon.  Reduce the speed to low and beat in the eggs one by one, beating for 1 minute after each egg goes in.  Finally, beat in the sour cream and heavy cream, beating just until the batter is smooth.

Pour about one-third of the batter into the baked crust. Drain the apples by lifting them off the plate with a slotted spoon or spatula, and spoon them into the pan.  Cover with the remaining batter and, if needed, jiggle the pan to even the top.  Place the springform pan in the roasting pan and pour in enough boiling water to come halfway up the sides of the springform pan.

Bake the cheesecake for 1 hour and 30 to 45 minutes, covering the cake loosely with a foil tent at the 45-minute mark.  The cake will rise evenly and crack around the edges, and it should be fully set except, possibly, in the very center if the center shimmies, that’s just fine.  Gently transfer the cake, still in the pan, to a cooling rack and let it cool to room temperature, then refrigerate it for at least 6 hours; overnight would be better.

Run a blunt knife around the edges of the pan to loosen the crust, open the pan’s latch and release and remove the sides.

Source: Adapted from Baking: From My Home to Yours by Dorie Greenspan, Houghton Mifflin Company, November 2006