The “I want Chocolate Cake” Cake

My son turned 12! Good grief, where did the time go? PicMonkey Collage
The “I Want Chocolate Cake” Cake – adapted from Smitten Kitchen 

Cake

  • 6 tablespoons unsalted butter, at room temperature
  • 3/4 cup firmly packed dark brown sugar
  • 2 tablespoons granulated sugar
  • 1 large egg 1 large egg yolk
  • 3/4 cup buttermilk
  • 1 teaspoon vanilla extract
  • 1/2 cup Dutch cocoa powder
  • 1 cup all-purpose flour
  • 1/4 teaspoon baking soda
  • 1/2 teaspoon baking powder
  • 1/2 teaspoon table or fine sea salt

Frosting

  • 2 ounces unsweetened chocolate
  • melted and cooled
  • 1 1/2 cups powdered sugar
  • 1/2 cup unsalted butter, at room temperature
  • Pinch of fine sea salt (optional)
  • 1 tablespoons cream or whole milk
  • 1/2 teaspoon vanilla extract

Directions –

Make the cake: Heat oven to 350°F. Line the bottom of an 8-inch square cake pan with parchment paper, and either butter the parchment and exposed sides of the pan, or spray the interior with a nonstick spray.

In a large bowl, use a hand or stand mixer to beat the butter and sugars until fluffy; scrape down bowl. Add the egg, yolk and vanilla and beat until combined, then the buttermilk and mix again. Scrape the bowl down well and don’t worry if the batter looks uneven. Place your flour, cocoa, baking soda, baking powder and salt in a sifter (I find this step necessary because my cocoa is very lumpy) and shake it over the batter bowl. Stir on low until just combined; scrape down bowl a final time. Scoop batter into prepared pan and smooth flat.

Bake for 18 to 22 minutes, until a toothpick inserted into the center comes out clean. Let cool for 5 to 10 minutes in cake pan on cooling rack, then flip out onto rack or serving plate to completely finish cooling before frosting.

Make the frosting: Place frosting ingredients in a food processor and run machine to to mix. Scrape down bowl then process for another 1 to 2 minutes, until smooth and somewhat fluffed. Scoop the frosting onto the cooled chocolate cake and swirl it around. Cake keeps at room temperature for a day or two, or in the fridge up to a week,.

Whole Grain Waffles

WP_20140128_17_58_53_Pro (1)

My kids love waffles – what’s not to love? I get to make a weeks worth of school breakfasts in less than an hour, and the kids get another maple syrup delivery system 😉 I I like to use wheat pastry flour because it’s mild enough that the kids don’t mind, and I like that I can sneak a little fiber into breakfast. This batch makes about 10 waffles, most of which get cooled, divided, bagged and frozen. Warm them up in a 350 degree oven for about 10 minutes, or mere seconds in your microwave. Thanks for reading, enjoy!

Whole Wheat Waffles – adapted from Cookie and Kate

  • 1 cup whole wheat pastry flour
  • 1 cup whole wheat flour (you can also use spelt, rye, cornmeal or buckwheat)
  • 1½ teaspoons baking powder
  • 1 teaspoon baking soda
  • ½ teaspoon salt
  • 2 cups buttermilk (make your own: add 2 tablespoons of vinegar or lemon juice to 2 cups milk, and let sit for 5 minutes)
  • 3 eggs
  • 1 tablespoon maple syrup (or honey)
  • ¼ cup (1/2 stick) butter (original recipe called for one full stick of butter)
  • ½ teaspoon cinnamon
  • ½ teaspoon vanilla extract
Directions –
  1. Preheat your oven to 200 degrees and heat up your waffle iron.
  2. Mix the dry ingredients (flours, baking powder, baking soda, and salt) in a large mixing bowl.
  3. In a large measuring cup, whisk together the buttermilk, eggs and syrup or honey.
  4. Pour the liquid ingredients into the dry ingredients. Stir just until they are mixed.
  5. Add the melted butter and mix well.
  6. Pour batter into your waffle iron until the butter reaches the edges of the iron. Cook until crisp and golden.
  7. Place each waffle on a rack in the oven (in a single layer) to keep them warm until you’re ready to serve. Five minutes in the oven may actually help them get a little crispier.

Pancake Mini-Muffins

WP_20140305_07_12_46_abc

Planning ahead saves time, right? I love when I find recipes that make life a little easier, especially school mornings! There are far more mornings than I care to admit when I have had to force my eyes to open; and the last thing I want to do is think about breakfast. These are so quick, easy and the kids love them 🙂

The best thing about these is that I don’t have to stand over a hot stove and flip each one! I made some minor changes by replacing all the AP flour with half whole wheat pastry flour, and buttermilk because I had plenty on hand. When ever I use this muffin tin, the baked goods love to stick; so instead of adding the chocolate chips to the batter we added a few to the tops. Once they finished baking/cooling completely, I bagged them and placed them in the freezer. In the morning, we microwave them for about 3 minutes at 50% power so they don’t dry out or become rocket hot. Once they’re all gone, I will make another batch because I’m sure they’ll fight over the last 6… Thanks for reading, enjoy! 🙂

WP_20140303_18_46_57_Pro

Pancake Mini-Muffins – adapted from The Pioneer Woman

  • 1 1/2 cups AP flour
  • 1 1/2 cups whole wheat pastry flour
  • 1 Tablespoon Baking Powder
  • 3 Tablespoons Sugar
  • 3/4 teaspoons Salt
  • 2 1/2 cups buttermilk
  • 2 whole Eggs
  • 1 Tablespoon Vanilla Extract
  • 4 Tablespoons Butter, Melted
  • Chocolate chips, optional
  • coconut oil to prep the tin (or whatever you prefer)

Preparation Instructions

Preheat oven to 400 degrees

Sift together flour, baking powder, sugar, and salt. Set aside.

In a large bowl, combine buttermilk, eggs and vanilla

Combine dry ingredients and wet ingredients, then stir in melted butter. If batter is too thick, stir in a little milk.

Spray a mini-muffin pan generously with coconut oil. Fill cups 2/3 full. If using chocolate chips, drop 2 to 3 onto each cup.

Bake for 8 to 10 minutes, or until golden brown on top. Let sit in the pan for 1 to 2 minutes, then turn them out of the pan. (Use a small knife if any are stubborn.)

Serve warm with warm syrup!

Soft and Fluffy Cinnamon Rolls

WP_20140112_11_11_01_Pro

Verdict: These were really good and I only made some minor modifications – 1/4 cup butter and 1 cup brown sugar in the filling, 1 tablespoon of cinnamon, and  a pinch of salt. My husband likes my go-to cinnamon roll recipe just a bit more, but likes this frosting recipe better. These rolls are so much bigger than those (about 3 inches in diameter), and they are lighter – just stop yourself from adding too much flour. The dough rolls out easily, but it’s not as easy to slice into rolls. I need to invest in some flavorless and wax-free dental floss – that would definitely help. Thanks for reading, enjoy!

Go to AverieCooks.com for the recipe: Overnight Buttermilk Soft and Fluffy Cinnamon Rolls

WP_20140111_20_58_53_Pro

WP_20140111_21_13_24_Pro

WP_20140111_21_36_36_Pro

WP_20140112_11_00_11_Pro

Honey Buttermilk Bread

WP_20140111_21_58_14_Pro

Quick Post: Plush interior, nice chew, light, with a dark crust; and great for egg sandwiches! Thanks for reading, enjoy!

WP_20140113_09_41_17_Pro (2)

…and look: toasty perfection 🙂

Honey Buttermilk Bread – adapted from Restless Chipotle

** makes two – 8 x 4 inch loaves **

  • 2 1/4 tsp. yeast
  • 1/4 cup warm water
  • 2 cups warm buttermilk
  • 1/3 cup honey
  • 1/4 cup butter, melted and cooled
  • 1 teaspoon salt
  • 3/4 teaspoon baking soda
  • 5 – 5 1/2 cups white bread flour ( 635 grams – 698 grams)

Directions –

Combine 5 cups of bread flour along with the other dry ingredients inside your standing mixer bowl. Pour the liquids over top and mix until it forms a shaggy dough. Knead on low speed for 5 minutes, adding remaining flour 1 tablespoon at a time if needed. When dough pulls from the sides of the bowl remove it from the mixer to a floured surface and knead until elastic and smooth.

Place in greased bowl, turn to grease the top, cover and allow to rise for 1 1/2 hours. Punch down and form into two loaves. Place in prepared loaf pans, lightly cover with plastic wrap and allow to rise for 45 minutes.

Preheat oven to 400F. Bake for 30 minutes, covering tops with foil if they brown too fast. Remove loaves from oven and brush with melted butter. Turn out and cool completely on a rack. Cover the loaves if you want soft crusts.

Buttermilk Waffles

WP_20140108_17_24_16_Pro

School  just started up again and breakfast time can be a bit of a hassle, and I love having waffles in my freezer for easy, no-brainer breakfasts. I doubled this batch and it made 14 – 1/2 cup waffles that I “healthified” slightly by using whole wheat pastry flour and some grapeseed oil instead of all butter. These are lightly crispy, fluffy with just a touch of sweetness; and they don’t even need syrup. Once the waffles cool, I pull them apart, stack them, bag them and freeze them. Depending on how much time I have in the mornings, I’ll reheat them in my oven at 35o for 7-10 minutes – or if we’re running late, the microwave works just fine. Thanks for reading, enjoy!

WP_20140108_16_42_07_Pro

Buttermilk Waffles – slightly adapted from Completely Delicious

**Click the link for the unmodified recipe**

  • 1 1/2 cups whole wheat pastry flour
  • 1 1/2 cups AP flour
  • 1/4 cup butter
  • 1/2 cup grapeseed oil
  • 1/2 cup sugar
  • 1/2 cup arrowroot powder or cornstarch
  • 4 tsp. baking powder
  • 1 tsp. baking soda
  • 1/2 tsp. salt
  • 2 1/2 cups buttermilk
  • 4 eggs
  • 2 tsp. vanilla extract

Directions –

In a large bowl, combine the flour, sugar, cornstarch, baking powder, baking soda, and salt. In a separate bowl, whisk together the buttermilk, eggs, melted butter and vanilla. Add the buttermilk mixture to the dry ingredients and stir until just combined.

Preheat a waffle maker according to manufacturer’s instructions. Grease with non-stick spray if necessary. Pour scant 1 cup batter into the hot waffle maker (1/2 cup for smaller waffle irons). Cook until golden brown, and serve.

Chicken (or Turkey) Pot Pie with Cheddar Biscuit Crust

potpie1

Chicken pot pie is comfort food at its finest: rich, creamy and hearty filling topped with a golden, flaky, buttery crust….yes, please! But if you’re too busy, or you’d rather not mix, chill, roll and hope it was all worth the effort; do yourself a favor and make this biscuit topping instead. These biscuits are so simple to make and you can even stir them up ahead of time and they bake up light, fluffy, and flavorful.

Verdict: So.Freaking.Good. I can’t wait to make this again; and I know I’ll have a good excuse to make it with leftover turkey next time. Thanks for reading, enjoy!

Chicken Pot Pie – adapted from Food.com

*6-8 generous servings*

  • 1 cup potato, diced
  • 1 cup onion, diced
  • 1 cup celery, diced
  • 1 cup carrot, diced
  • 1/4 cup melted butter
  • 1/4 cup all-purpose flour
  • 3 cups chicken broth
  • 1  cup half and half
  • salt and pepper to taste
  • 4 cups roasted chicken breast or turkey, shredded
  • 1 cup frozen peas

Directions –

Preheat oven to 375°FSaute onion, celery, carrots and potatoes in butter for about 10 minutes. Add flour to sautéed mixture, stirring well. Cook one minute stirring constantly.Combine broth and half and half.Gradually stir into vegetable mixture.Cook over medium heat stirring constantly until thickened and bubbly.Stir in salt and pepper; add chicken and peas – stir to combine.Pour into one 13 x 9 casserole dish.

potpie2

For the biscuit crust – adapted from Just a Taste

  • 2 cups all-purpose flour
  • 2 teaspoons baking powder
  • 1 teaspoon baking soda
  • 1/2 teaspoon salt
  • 1/2 teaspoon black pepper, or to taste
  • 1 cup coarsely grated cheddar cheese
  • 1/4 cup grated parmesan cheese
  • 3/4 cup cold, unsalted butter, cut into 1/2-inch pieces
  • 1 1/4 cups well-shaken buttermilk

Directions –

*You can prepare the dough up to two days ahead of time*

Sift together the flour, baking powder, baking soda, salt and pepper into a medium bowl. Add the cheeses and toss to coat. Blend in the butter with your fingertips until the mixture resembles wet sand.

Add the buttermilk and stir just until a dough forms. Drop the biscuit dough onto the pot pie filling in small mounds, leaving spaces between biscuits.

Bake at 375 degrees until the biscuits are puffed and golden brown and the filling is bubbling, 35 to 40 minutes. Let stand 10 minutes before serving.

Cheddar Buttermilk Biscuits

biscuit1

Quick Post: These are a perfect accompaniment to your hearty chili, or for the base for some yummy sausage gravy! Thanks for reading, enjoy 🙂

Cheddar Biscuits – adapted from Martha Stewart

  • 2 to 2 1/4 cups all-purpose flour, plus more for work surface
  • 2 1/4 teaspoons baking powder
  • 3/4 teaspoon baking soda
  • 1/2 teaspoon salt
  • 1/4 teaspoon ground pepper
  • 6 tablespoons cold unsalted butter, cut into small pieces
  • 3/4 cup buttermilk
  • 3/4 cup shredded cheddar cheese

Directions –

Preheat oven to 425 degrees, with rack on lower shelf. In a large bowl, whisk together 2 cups flour, baking powder, baking soda, salt, and pepper. Cut in butter with a pastry blender until mixture resembles coarse crumbs, with some pea-size lumps. Mix in buttermilk and cheese until combined. With a floured hand, knead dough against side of bowl until it holds together. If it is sticky, knead in up to 1/4 cup more flour.

After kneading biscuit dough, turn it out onto a lightly floured work surface. Pat the dough to 1 inch thick. With a floured 2-inch biscuit cutter, cut out rounds as close together as possible. Place on a baking sheet. Gather scraps; pat again, and cut out more rounds.

Brush the tops with 1/2 tablespoon melted unsalted butter. Bake until biscuits are golden brown, rotating sheet halfway through, 18 to 20 minutes. Serve warm.

Cinnamon Rolls

cinnamonrolls

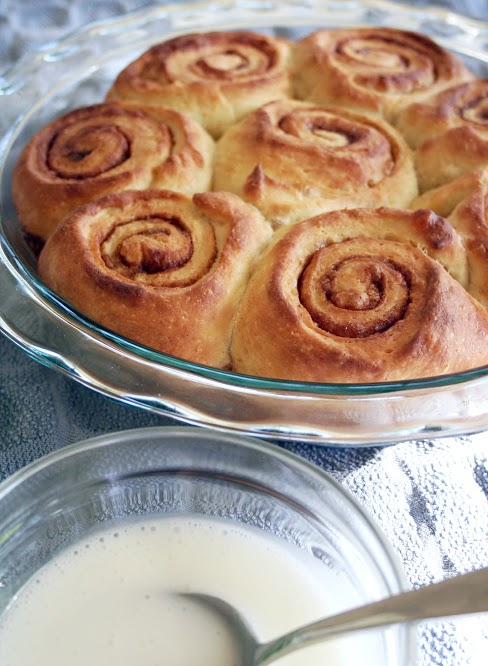
I wanted to try a new recipe for cinnamon rolls besides our go-to fave. I love the richness of the dough, but it does require 5 eggs and it makes 12 huge rolls. I sent a batch of these with my husband to share with volunteers this weekend; and made this smaller batch with some minor changes just to suit our preferences. Instead of white sugar, I used brown sugar for the filling and significantly less cinnamon. I also swapped the water and milk for buttermilk; and I used less butter in the filling – only two tablespoons. Oh, and instead of making 11 rolls (weird number) I made 8 slightly larger rolls that fit in the baking dish better.

Verdict: These were okay, and I guess good in a pinch if you don’t have lots of eggs on hand. The glaze is missing something too – cream cheese in my opinion. The dough was not nearly as easy to work as the other recipe, and it was actually really frustrating to cut into rolls. The differences were much more obvious because I had just made the overnight rolls…so I was really aware and very picky. I probably won’t bother making these again only because we’ve already found the best recipe. Thanks for stopping by!

cinnamonrolls1

Easy Cinnamon Rolls – heavily adapted from Sally’s Baking Addiction

Rolls-
  • 2 and 3/4 cup all-purpose flour
  • 3 Tablespoons granulated sugar
  • 1 teaspoon salt
  • 2 1/4 tsp instant yeast (1 packet)
  • 3/4 cup buttermilk
  • 2 and 1/2 Tablespoons unsalted butter
  • 1 large egg
Filling-
  • 3 Tablespoons unsalted butter, softened to room temperature
  • 1 heaping tsp ground cinnamon
  • 1/3 cup brown sugar
Glaze-
  • 1 cup powdered (confectioners’) sugar
  • 1 teaspoon vanilla extract
  • 2 Tablespoons milk

Directions –

  1. Make the dough: Set aside 1/2 cup of flour. In a large bowl, toss the remaining flour, sugar, salt, and yeast together until evenly dispersed. Set aside.
  2. Heat the water, milk, and butter together in the microwave until the butter is melted and the mixture is hot to touch. About 125F-130F degrees. Stir the butter mixture into the flour mixture. Add the egg and only enough of the reserved flour to make a soft dough. I only needed 1/3 cup, but you may need the full 1/2 cup. Dough will be ready when it gently pulls away from the side of the bowl and has an elastic consistency.
  3. On a lightly floured surface, knead the dough for about 5-6 minutes. Place in a lightly greased bowl and let rise until doubled in bulk – about an hour.
  4. Turn out the dough onto a lightly floured surface and shape in a 14×8 inch rectangle. Spread the softened butter on top. Mix together the cinnamon and sugar and sprinkle it all over the dough. Add more cinnamon/sugar if desired. Roll up the dough tightly. Cut into 8 even pieces and place in a lightly greased 9-inch round pan. Loosely cover the rolls with plastic wrap and allow to rise overnight in your refrigerator.
  5. In the morning, take the rolls out and allow to rise until they become puffy. Preheat the oven to 350F. Bake for 25-30 minutes until lightly browned.
  6. Make the glaze: Right before serving, top your cinnamon rolls with glaze. Mix the powdered sugar and milk together until smooth and drizzle over rolls. If you prefer a thicker glaze, add more powdered sugar and then add salt to cut the sweetness, if desired.

Buttermilk Oatmeal Bread

bread1

I love making bread – actually, I love that I know how to, and that it’s been three years since I tried it out for the first time. I remember feeling so intimidated by yeast (silly now that I think about it), but I’m so glad I got over that 🙂 When I see my daughter smiling as she’s smelling fresh from the oven bread, I know it’s something that she will always love and remember about me. I can’t wait to pass on what I have learned to her, so she can pass her knowledge onto someone else.

I had a homemade batch of buttermilk that I needed to use up, plus we were almost out of sandwich bread. Thankfully Pinterest came to my rescue again! I doubled this recipe  and my sweetener of choice was raw honey. When I took it out of the oven, I smelled the honey and oats – so perfect! It has a great slightly chewy bite and flavor is mild enough for sweet or savory toppings. Thanks for reading, enjoy!

bread

Buttermilk Oatmeal Bread – adapted from Buttered Side Up

  • 1/2 cup water
  • 1 cup buttermilk
  • 1 tablespoon instant yeast
  • 1/4 cup sugar, maple syrup or honey, divided
  • 1/4 cup butter, melted and cooled
  • 2 cups all-purpose flour (250 grams)
  • 2 cups whole wheat flour (262 grams)
  • 1/2 cup old-fashioned rolled oats
  • 2 teaspoons sea salt

Directions:

1) Gently warm the buttermilk in a 4 cup or larger measuring cup. Add the oats, hot water, melted butter, sweetener and salt. Stir to combine and set aside until it cools slightly.
2) In a standing mixer bowl, combine the flours, (I always hold back at least 1/2 cup). Add the yeast, and buttermilk mixture and mix to combine.
3) Using the dough hook, knead until smooth and elastic, about 5-7minutes. Add flour as necessary. Return to mixing bowl and let rise until doubled, about 1-2 hours, depending on how warm your house is.
4) Form risen dough into loaves, buns or whatever shape you wish. Place in greased pans (if making a loaf use a 9×5-inch pan) and let rise until nearly doubled, about 1 more hour.
5) During the last 15 minutes of rising, preheat your oven to 350, bake loaves for 35 -40 minutes or until the internal temp is 190 degrees. Remove from pan and allow to cool completely on a wire rack before slicing.