Brownie in a Mug

WP_20150209_030 1

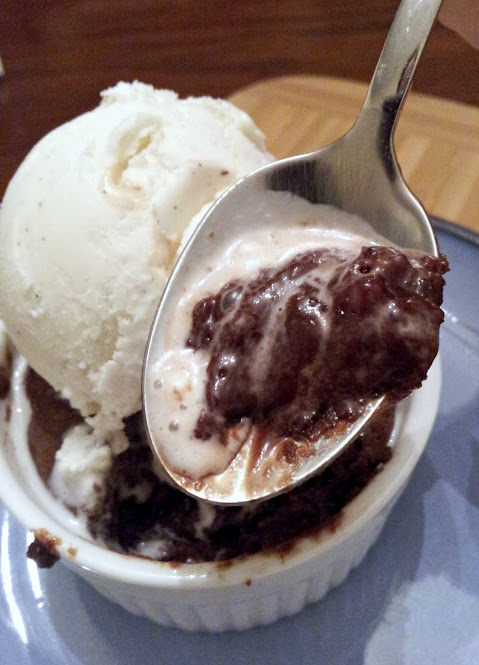
Sometimes, you just have to have chocolate, it has to be warm and vanilla ice cream is a must! Good quality cocoa powder is so important, and I used my stash of Valhrona 🙂 Yes, it is worth the $1 + an ounce price! This brownie is rich, moist, and more cakey than fudgy and hits all the right buttons. I’m kind of mad at myself for making this! 😉 Thanks for reading, enjoy!

Brownie in a Mug – adapted from Simply Recipes

  • 1/4 cup flour
  • 3 – 4 Tbsp sugar
  • 2 Tbsp cocoa
  • Pinch of salt
  • Tiny pinch of cinnamon
  • 1/4 cup water
  • 2 Tbsp unsalted butter, melted
  • 1 to 2 drops vanilla extract
  • ice cream

Directions –

Place flour, sugar, cocoa, salt, and cinnamon in a microwave safe ceramic mug. Stir with a fork or spoon to mix well and break up any clumps.

Add the butter, water, and vanilla to the cup and stir until the mixture is smooth and there are no lumps.

Place in microwave and heat on high until the mixture is cooked through, about a 1 minute and 20 seconds. If you don’t know the power level on your microwave, start with 60 seconds and increase until the brownie is done. It should still be moist when cooked through, not dry.

Let cool for a minute and serve with a scoop of vanilla ice cream.

I Bought A Juicer!

WP_20150122_018

I bought a juicer! I wasn’t sure how this would turn out because I haven’t tried beets since I was a kid…and those were the gross canned kind that you find in salad bars. The finished juice was the most gorgeous magenta color, and I hoped that it would taste as good as it looked! The first taste of anything new is usually off-putting, but as I continued to sip it, it tasted better and better. It’s not my new favorite, but I know I will make it again. The other recipe is a great starter juice, especially for kids. My daughter enjoyed this one, but I didn’t add the ginger because she wouldn’t have appreciated the spiciness of it. Thanks for reading, enjoy! 🙂


WP_20150122_016

Ginger Beet Juice – adapted from Wonky Wonderful

  • 1 small beet, peeled and trimmed
  • 2 apples, washed and cut
  • 2 carrots, washed and trimmed
  • 1 orange, juiced
  • 1 lime, juiced
  • 1 inch piece of ginger, peeled

Directions –

  1. Put all of the ingredients into the juicer according to the manufacturer instructions.
  2. Serve the juice cold over ice.

WP_20150121_022 1

Carrot Apple Ginger Juice – adapted from The Roasted Root

  • 3 carrots, washed and trimmed
  • 2 apples
  • 1/2 inch piece of ginger, peeled (*optional*)

Directions –

  1. Put the ingredients through the juicer according to the manufacturer’s instructions.
  2. Drink immediately, or store in a sealed container in the refrigerator. Keeps for about 2 days.

Cafeteria Sloppy Joes

WP_20140306_17_47_33_Pro

Yum! These are the least fussy sloppy joes that I came across in my search. The flavor was kid friendly without too sweet or bland – I loved it and happily ate leftovers the next night. My picky eater quickly ate her portion without any coercion from me – that almost never happens and that is a win in my book 😉 Thanks for reading, enjoy!

Cafeteria Sloppy Joes – adapted from Food Network

  • 1 pound lean ground beef
  • 1 small onion, chopped
  • 2 cloves garlic, minced
  • 2 tsp cumin
  • 2 tsp smoked paprika
  • 1/4 tsp cayenne
  • 1 cup ketchup
  • 1 TBSP brown sugar
  • 2 TBSP cider vinegar
  • 1/2 cup water
  • salt and pepper to taste

Directions
Brown 1 pound ground beef in a large skillet with olive oil. Add 1 chopped onion, 3 chopped garlic cloves, 2 teaspoons each ground cumin and smoked paprika and 1/4 teaspoon cayenne pepper; cook 1 minute. Stir in 1 cup ketchup, 2 tablespoons apple cider vinegar, 1 tablespoon brown sugar and 1/2 cup water and simmer until thick, about 15 minutes. Serve on slider rolls with potato chips

Salted Caramel Sauce

caramel1

I have never made caramel before, but I watched this episode of Kelsey’s Essentials and decided that this should be easy enough to try. Thankfully it worked out really well and I will use this recipe again. This caramel is destined to become part of the Snicker’s cake that I will be serving on Labor Day. I am also going to attempt making marshmallow fluff from scratch so hopefully that recipe turns out as well as this caramel! 🙂 Thanks for reading, enjoy!

Salted Caramel Sauce – adapted from Kelsey’s Essentials

  • 1 cup sugar
  • 1/4 cup water
  • 3/4 cup heavy cream
  • 3 1/2 tablespoons unsalted butter
  • 1 teaspoon Fleur de Sel, or kosher salt

Directions –

In a heavy-bottomed saucepan, combine the sugar and water over medium-low heat until the sugar dissolves. Increase the heat and bring to a boil, without stirring. If necessary, use a wet pastry brush to wash down any crystals on the side of the pan. Boil until the syrup is a deep amber color, about 7-10 minutes.

Remove the sugar from the heat and carefully whisk in the heavy cream. The mixture will bubble. Stir in the unsalted butter, and salt. Transfer the caramel to a dish and cool.

*Cook’s Note: The salted caramel sauce will keep in the refrigerator up to 2 weeks. Reheat before serving.

Cookies & Cream Muddy Buddies

oreo

The best thing I heard someone say about these last night was: “I can tell without even trying them; they’re good!” And they are, and completely addicting…it’s a good thing that I made them for a big group of people and not for my family of four! The recipe that I found suggested the candy melts, but I didn’t have them. Recently, I found a tip  for melting chocolate with a little bit of coconut oil to replace those, and it worked so well I decided to use the method again. The white chocolate didn’t want to melt as smoothly as the semi-sweet kind, so I just kept adding coconut oil by the teaspoon, and melting the mixture slowly until it became the right consistency. I forgot to add more chopped Oreos to the mix, but these were still so good. Next time I will not skip that step 😉 Thanks for reading, enjoy!

Cookies and Cream Muddy Buddies – adapted from Your Cup of Cake

“Cream”

  • 5 cups Rice Chex cereal
  • 1 cup white chocolate chips
  • 8 Oreos finely crushed
  • 1/2 cup powdered sugar
  • 1 tsp – 3 tsp coconut oil

“Cookies”

  • 5 cups Rice Chex cereal
  • 1 cup semi sweet chocolate chips
  • 8 Oreos finely crushed
  • 1/2 cup powdered sugar
  • 1 tsp coconut oil

Directions –

1. “Cream”- Measure out the rice Chex and place in a large bowl. Measure out powdered sugar and crushed Oreos and place in a container with a lid (You’ll need to shake the mixture in this later).

2. Melt white chocolate with the coconut oil, be careful not to burn it! (My microwave has a melt setting that I use) Pour melted chocolate over rice cereal and stir until coated. Transfer the coated cereal to the container with the powdered sugar and cookies. Shake until evenly coated. Dump the mixture on to a cookie sheet to cool.

3. Repeat steps 1 and 2 using the “Cookies” ingredients. Once cooled, mix the two batches together and fold in more chopped Oreos (I skipped this step – oops!)

Chocolate Cobbler

cake1

Chocolate – okay. Cobbler – what?? Never heard of you!  This recipe seems to be a favorite among Tasty Kitchen members, and since I have this brand new bag of King Arthur Self-Rising flour waiting to be used, I figured this was a good place to start. What makes KAF Self-Rising flour (besides the quality), is that it is unbleached and the baking powder is aluminum free. I know my local grocery store does not carry a similar product, and now I’m hoping that it will stock this soon!

I thought about making a fruit cobbler, but I know the hubbs appreciates a good chocolate dessert. This one is so simple and because I’m so darn lazy and didn’t feel like making a special trip to the store for fruit, I went with it. The batter is different from most desserts, especially because you don’t stir the whole batter together before pouring in the baking dish. It’s super simple and requires pantry and kitchen staples, but it takes 40 long minutes to bake! Hopefully it’s worth the wait! 🙂

Verdict: Chocolatey, gooey goodness! Make sure to top it off with a generous scoop of vanilla ice cream! Thanks for reading, enjoy!

cake

Chocolate Cobbler – adapted from Tasty Kitchen

  • 1 cup King Arthur Unbleached Self-Rising Flour
  • ¼ teaspoons Salt
  • 7 TBSP Cocoa Powder, Divided (*this is my favorite*)
  • 1-¼ cup Sugar, Divided
  • ½ cups Milk
  • â…“ cups Melted Butter
  • 1-½ tsp Vanilla Extract
  • ½ cups Light Brown Sugar, Packed
  • 1-½ cup Hot Tap Water (*I added 1 tsp of this espresso powder*)

Directions:

Preheat oven to 350 degrees.

First stir together the flour, baking powder, salt, 3 tablespoons of the cocoa, and 3/4 cup of the white sugar. Reserve the remaining cocoa and sugar.

Stir in the milk, melted butter, and vanilla to the flour mixture. Mix until smooth.

Pour the mixture into an ungreased 8-inch baking dish. I prefer my 2 quart casserole from Princess House.

In a separate small bowl, mix the remaining white sugar (it should be 1/2 cup), the brown sugar, and remaining 4 tablespoons of cocoa. Sprinkle this mixture evenly over the batter.

Pour the hot tap water over all. DO NOT STIR!

Bake for about 40 minutes or until the center is set.

Let stand for a few minutes if you can hold yourself back. Serve with homemade ice cream using the gooey sauce to spoon over all.

Hummus

hummus

This was really easy to make and I enjoyed eating it with lots of raw carrots. Now if I can only get my kids to try it, that would be great! Thanks for reading, enjoy 🙂

Hummus – adapted from The Kitchn

  • 1 15-oz can of chickpeas, drained
  • 1/2 of a fresh lemon, juiced
  • 1 small clove of garlic, minced finely
  • 2 tbsp. olive oil
  • 3 tbsp. tahini
  • 1/2 teaspoon salt
  • 1/2 teaspoon finely ground black pepper

Tools

A food processor or blender

Directions –

Combine all ingredients. Blend until smooth. If it is a little dry, just add a little more lemon juice or olive oil, a teaspoon at a time, until you have the desired consistency. Add more salt and pepper if you like. Scrape out the hummus in a serving bowl and sprinkle the sumac on top. Serve with raw veggies, or spread on some pita bread.

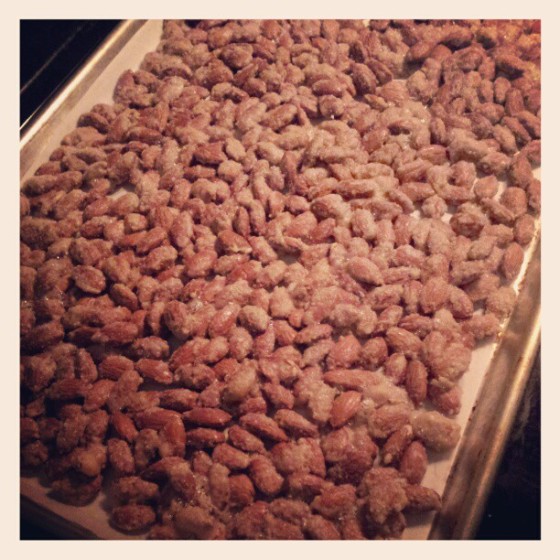
Vanilla Almonds

almonds

(Happy New Year! I meant to post this a couple of weeks ago…but I was visiting family)

I was inspired to make these after watching one of my favorite cooking shows. I knew I would need some quick teacher gifts for the kids (I hope they like almonds!), and some snacks for the party we’re hosting today. I tried a few and I am happy to report that they are really tasty! Our friends loved them and I even had some recipe requests for them 🙂 Thanks for reading, enjoy.

Vanilla Almonds – adapted from Kelsey’s Essentials

  • 1 egg white
  • 1 tsp. pure vanilla extract
  • 4 cups whole almonds
  • 3/4 cup sugar
  • 1/4 tsp. salt
  • 1/2 tsp. ground cinnamon

Directions:

Preheat the oven to 300 degrees F. Beat the egg white with the vanilla extract, add the almonds and stir to coat. Combine the sugar, salt, and cinnamon and combine with mixture. Place in a single layer on a greased baking sheet. Bake at 300 degrees F for 20 minutes. Remove and cool on wax paper and break into clusters.

Flour Tortillas

Hallelujah! I found the best, most authentic tasting, not to mention easiest flour tortilla recipe out there. What makes it even more amazing is that the dough is very forgiving and really easy to roll out. Recipes that call for milk, baking powder or oil cannot come close to the awesomeness of shortening (or lard), sorry! I used this non- hydrogenated vegetable shortening instead of Crisco.

Last night I made chimichangas, which my family loved – but the star of the meal was definitely the tortillas. The batch I made didn’t last long – in fact, my son requested a wrap for his lunch using the last one 😉 I made another batch today that is half white whole wheat, half all-purpose flour in an attempt to redeem these a little. They are still as pliable and soft as the all white flour tortillas and just as tasty! Thanks for reading, enjoy! 🙂

Flour Tortillas – adapted from The Urban Spork

  • 2  3/4 cups all-purpose flour, plus a little extra for rolling the tortillas
  • 5 tablespoons vegetable shortening, lard or 2 1/2 tablespoons of each (for the most authentic version)
  • 3/4 teaspoon salt
  • 3/4 cup very warm tap water

Directions

Combine the flour and shortening in a large mixing bowl and work the shortening into the flour with your fingers until completely incorporated.  If this isn’t done thoroughly (until no particles of shortening remain visible), the tortillas will have an irregular texture.  Dissolve the salt in the water and pour about 2/3 cup over the dry ingredients and immediately work it in with a fork; the dough will be in large clumps.  If all the dry ingredients haven’t been dampened, add the rest of the liquid (plus a little more, if necessary).  Scoop the dough onto your work surface and knead until smooth.  It should be a medium-stiff consistency – not firm, but not quite as soft as most bread dough either.

Divide the dough into 12 portions and roll each into a ball.  Set them on a plate, cover with plastic wrap and let rest for at least 30 minutes – this makes the dough easier to roll.

Heat an ungreased griddle or heavy skillet over medium to medium-high heat.

Flatten a ball of dough, flour it, then roll forward and back across it; rotate a sixth of a turn and roll forward and back again; continue rotating and rolling until you reach a 7-inch circle, lightly flouring the tortilla and work surface from time to time.

Lay the tortilla on the hot griddle (you should hear a faint sizzle and see an almost immediate bubbling across the surface).  After 30 to 45 seconds, when there are browned splotches underneath, flip it over.  Bake 30 to 45 seconds more, until the other side is browned; don’t overbake the tortilla or it will become crisp.  Remove and wrap in a cloth napkin placed in a tortilla warmer.  Roll and griddle-bake the remaining tortillas in the same manner – stack them one on top of the other in the warmer.

Small Batch Brownies

Quick Post: Light, cakey brownie. Not chewy, but it hit the spot 🙂  Thanks for reading, enjoy!

Brownies – adapted from Just Eat It!

  • 1/2 cup chopped chocolate (about 3 ounces)
  • 6 TBSP butter
  • 2 eggs
  • 1/2 cup granulated sugar
  • 1/2 cup all-purpose flour
  • 2 tbsp cocoa powder
  • 1/2 cup chopped, toasted walnuts

Directions –

Preheat oven to 350 degrees. Butter three – 6 ounce ramekins or a small baking dish.

Melt the butter and chocolate on low heat, stir and set aside to cool slightly. Whisk together the sugar and the eggs, then stir the chocolate mixture into the egg mixture.

Add the flour and cocoa powder. Fold in the nuts. Bake for 18 – 20 minutes or until set, and the center should be a little underdone.