Brownie in a Mug

WP_20150209_030 1

Sometimes, you just have to have chocolate, it has to be warm and vanilla ice cream is a must! Good quality cocoa powder is so important, and I used my stash of Valhrona 🙂 Yes, it is worth the $1 + an ounce price! This brownie is rich, moist, and more cakey than fudgy and hits all the right buttons. I’m kind of mad at myself for making this! 😉 Thanks for reading, enjoy!

Brownie in a Mug – adapted from Simply Recipes

  • 1/4 cup flour
  • 3 – 4 Tbsp sugar
  • 2 Tbsp cocoa
  • Pinch of salt
  • Tiny pinch of cinnamon
  • 1/4 cup water
  • 2 Tbsp unsalted butter, melted
  • 1 to 2 drops vanilla extract
  • ice cream

Directions –

Place flour, sugar, cocoa, salt, and cinnamon in a microwave safe ceramic mug. Stir with a fork or spoon to mix well and break up any clumps.

Add the butter, water, and vanilla to the cup and stir until the mixture is smooth and there are no lumps.

Place in microwave and heat on high until the mixture is cooked through, about a 1 minute and 20 seconds. If you don’t know the power level on your microwave, start with 60 seconds and increase until the brownie is done. It should still be moist when cooked through, not dry.

Let cool for a minute and serve with a scoop of vanilla ice cream.

Carrot Cake for My Gram

WP_20140529_17_56_31_Pro (1)

My kids and I recently came back from our trip to California. While I was there, I used an entire 5 pound bag of flour…yeah, I went a little overboard spoiling my parents and my Grandma during those two short weeks 😉 I was glad to, and honored to cook with my 85 year old grandmother – the one who inspired me to cook in the first place. While it was a lot of time and effort to make so much for them, I was flattered to hear that my Gram actually learned from me!! and my Dad said my cinnamon rolls reminded him of his mother’s 🙂

Because Gram’s birthday happened the week after we flew in, I told her I would bake her a birthday cake. She couldn’t eat chocolate (huge bummer), but she loved carrot cake. Problem for this baker was that I have never made one, let alone eaten a piece in over 10 years!! Thankfully, a quick search at Pinterest led me to find this recipe that sounded tasty – kind of flimsy evidence to go on, but I went with it. I didn’t try any of it because of my Whole 30 craziness, but the family really enjoyed it and said it wasn’t too sweet and the frosting was perfect. That sounds like a win to me! Thanks for reading, enjoy!

WP_20140529_19_42_00_Pro (1)

Carrot Cake – adapted from Sprinkle Some Sugar

  • 1/2 cup coconut oil
  • 3/4 cup granulated sugar
  • 1 1/4 cup light brown sugar (or dark)
  • 5 eggs + 1 yolk
  • 1 tbs cinnamon
  • 3/4 tsp nutmeg
  • 1/4 tsp cloves
  • 3 1/4 cup flour
  • 2 tsp baking soda
  • 1 tsp baking powder
  • 1/2 tsp salt
  • 2 cups finely grated carrots (about 7-8 carrots)

Cream Cheese Frosting

  • 2 8 oz package cream cheese, room temperature
  • 1 cup unsalted butter, softened
  • 6 cups confectioner’s sugar
  • a pinch of salt

Directions –

For the Cake
Preheat oven to 350°. Line the bottom of two 9″ round baking pans with parchment paper and lightly grease and flour sides. Be sure to get every inch! Set aside.
Whisk the flour, baking powder, baking soda, cinnamon, nutmeg, clover all together and set aside.
In the bowl of your stand mixer fitted with the paddle attachment, combine the oil, brown sugar and granulated sugar together. Add in the eggs one at a time, egg yolk and vanilla and mix until smooth.
Pour in flour mixture and mix until just combined making sure everything is well mixed. Fold in the grated carrots by hand with a rubber spatula or spoon. Batter will be thick, this is okay. If you are adding pecans or raisins, do so now.
Distribute the batter evenly into both pans. Place in preheated oven and bake for 30-40 minutes. Start checking cake at 25 and check every 2 minutes after that. Once a toothpick comes out clean, cakes are done. Let them cool on wire rack or counter for 20 minutes. Flip pans over and cakes should pop right out onto wire rack or parchment or wax paper lined counter. Let them cool completely. While they are cooling, mix up the frosting.
For the Cream Cheese Frosting
Cream together the cream cheese and butter until fluffy and light in color. Add in the vanilla and mix until smooth. Add in the powdered sugar 1 cup at a time on low until combined. Whip frosting for another minute or so until smooth and creamy.
Once cakes are completely cooled, cut the domed tops off so they are completely flat and even. Place one cake on the bottom of a cake stand, facing up. Spread some frosting on top until completely covered. Add second cake, bottom up, and frost the rest of the cake. I found it much easier to do one thin layer of frosting, set it in the fridge and as it firmed up a bit, add another thick layer – the frosting looks much more even this way. This cake is even more moist and flavorful the second day once the flavors have all settled in with each other.
Store cake covered in the refrigerator for up to 5 days.

Chocolate Cream Pie with Oreo Crust

WP_20140315_20_55_49_Pro

Quick Post: I know I’m late to the game here, but this was our first year to “celebrate” Pi Day. This chocolate cream pie was amazing, and the flavor was even better with age. The first day, it was all mocha; but the next day it became the most perfect chocolate flavor – swoon worthy, amazingly rich, velvety and thick! Thanks for reading, enjoy!

WP_20140314_20_43_04_Pro

Chocolate Cream Pie – adapted from King Arthur Flour

Crust – *recipe link*

  • 24 Oreos
  • 4 TBSP butter, melted

Filling –

  • 2 tablespoons unsalted butter
  • 1 1/3 cups semisweet chocolate, chopped (about 6 ounces)
  • 1 teaspoon vanilla extract
  • 2/3 cup granulated sugar
  • 3 tablespoons arrowroot powder or cornstarch
  • 2 tablespoons unsweetened cocoa powder
  • 1 teaspoon espresso powder, optional; for richer chocolate flavor
  • 1/8 teaspoon salt
  • 3 large egg yolks
  • 1 cup heavy cream, divided
  • 2 cups milk

Stabilized Whipped Cream – *recipe link*

  • 1 cup heavy cream
  • 1/4 cup confectioners’ sugar
  • 1/4 tsp powdered gelatin
  • 2 TBSP water
  • pinch of salt
  • chocolate curls (optional)

Directions –

For the Crust – 

In a medium-sized bowl or a food processor, add the Oreo cookies and blend until the texture of coarse meal or crumbs. Add the melted butter and blend until well combine. Place the ground crumb mixture into a 9- or 10-inch deep-dish pie pan and press onto the bottom and up the sides evenly. Try to make the crust about 1/8 inch (1/3 cm) evenly all around. Refrigerate the crust for at least an hour before you add the filling of your choice.

For the Filling – 

1)Place the chopped chocolate, butter, and vanilla extract in a 2-quart mixing bowl; set aside.

2) In a medium saucepan away from heat, whisk together the sugar, cornstarch, cocoa, espresso powder, and salt. Whisk in 1/4 cup of cold heavy cream until the mixture is smooth, with no lumps. Repeat with another 1/4 cup of the cream. Whisk in the egg yolks.

3) Place the saucepan over medium heat, and gradually whisk in the remaining cream and milk.

4) Bring to a boil, whisking constantly as the mixture thickens; boil for 1 minute.

5) Remove the pan from the heat and pour the mixture over the reserved chocolate and butter.

6) Whisk until the chocolate is melted and the mixture is smooth.

7) Pass the filling through a strainer into a bowl to remove any lumps.

8. Place plastic wrap or buttered parchment paper on the surface to prevent a skin from forming, and chill thoroughly.

9. Pour the chilled pudding into the chilled Oreo crust and top with whipped cream and chocolate curls.

For the topping – In bowl sprinkle gelatin over cold water. Scald 2 tablespoons of whipping cream and pour over gelatin. Stir until dissolved. Refrigerate about 15 minutes. Then whisk until smooth. Mix remaining cream, sugar and salt. Mix in smooth gelatin mixture stopping to scrape bowl twice.

Cookie Dough Brownie Bombs

WP_20140210_20_50_04_Pro

These are a perfect special occasion (ahem, Valentine’s Day), treat that any chocolate lover would appreciate. My husband was pretty excited about these because the original is one of his favorites, so how bad could the addition of brownie be? The brownie bakes up thin, chewy and fudgy and it sticks really well to the frozen dough ball. As I rolled the brownies around the cookie dough I decided that these win the prize for messiest dessert ever – my hands were coated in sticky brownie, but in the end these were worth the effort. Thanks for reading, enjoy!

Cookie Dough Brownie Bombs – adapted from Handle the Heat

For the cookie dough:
1 stick unsalted butter, at room temperature
1/2 cup lightly packed light brown sugar
2 tablespoons granulated sugar
1 – 3 tablespoon milk (any kind)
1/2 teaspoon vanilla extract
1 1/2 cups all-purpose flour
1/8 teaspoon fine salt
3/4 cup miniature chocolate chips

For the brownies:
1 stick unsalted butter, melted
1 cup granulated sugar
1 cup unsweetened natural cocoa powder
1/4 teaspoon salt
1/2 teaspoon vanilla
2 large eggs
1/2 cup all-purpose flour

For the chocolate coating:
16 ounces semisweet chocolate, chopped
4 teaspoons coconut oil (or more if needed )

Directions –

For the brownies:

WP_20140210_18_31_36_Pro

Meanwhile, make the brownies. Preheat the oven to 325°F. Line an 8×8-inch pan with foil, leaving an overhang.

In a large bowl combine the butter, sugar, cocoa powder, and salt. Stir until well combined, mixture will be thick. Let cool if the butter is still hot. Stir in the vanilla and then the eggs, one at a time, stirring very well after each addition. Stir until the batter is very well blended. Add the flour and stir again until very well blended. Spread into prepared pan.

Bake for 20 minutes, or until cooked through but still very moist and fudgy. Let cool.

For the cookie dough:

WP_20140210_17_09_03_Pro

In the bowl of an electric mixer beat the butter, brown sugar, and granulated sugar on medium-high speed until very well combined and fluffy. Add in the milk and vanilla. On low speed gradually add the flour and salt. Stir in the miniature chocolate chips.

Scoop the dough into 2 teaspoon-sized balls and place on a parchment lined baking sheet. Freeze for an hour, or until firm.

To assemble:

Cut the brownies into 1-inch squares. Flatten a square with the palm of your hand. Place a cookie dough ball into the middle of the flattened brownie and wrap the brownie around the cookie dough ball. Don’t worry if it’s not perfect, just try to get as much of a round shape as possible, rolling the ball between your palms. Repeat with the remaining brownie and cookie pieces. Freeze the balls for 30 minutes.

For the chocolate coating:

WP_20140210_20_09_43_Pro

Combine the chopped chocolate and coconut oil in a microwave-safe bowl and microwave on high for 1 minute. Stir, and continue heating in 30-second bursts, stirring between bursts, until the chocolate is melted.

Dip each brownie ball into the chocolate to coat completely. Allow the excess to drip off then return to the baking sheet. Refrigerate for at least 10 minutes, or until set. Store in an airtight container in the fridge.

Soft and Fluffy Cinnamon Rolls

WP_20140112_11_11_01_Pro

Verdict: These were really good and I only made some minor modifications – 1/4 cup butter and 1 cup brown sugar in the filling, 1 tablespoon of cinnamon, and  a pinch of salt. My husband likes my go-to cinnamon roll recipe just a bit more, but likes this frosting recipe better. These rolls are so much bigger than those (about 3 inches in diameter), and they are lighter – just stop yourself from adding too much flour. The dough rolls out easily, but it’s not as easy to slice into rolls. I need to invest in some flavorless and wax-free dental floss – that would definitely help. Thanks for reading, enjoy!

Go to AverieCooks.com for the recipe: Overnight Buttermilk Soft and Fluffy Cinnamon Rolls

WP_20140111_20_58_53_Pro

WP_20140111_21_13_24_Pro

WP_20140111_21_36_36_Pro

WP_20140112_11_00_11_Pro

One Bowl Chocolate Cake with Dark Chocolate Mascarpone Frosting

WP_20131231_21_28_07_Pro
I decided this holiday season to start some new traditions for my family. Before Christmas, the kids and I attempted to make a gingerbread house from scratch…next year we’ll work out all the kinks and I’ll post those results 😉 We never do anything for the New Year, so I decided it would be fun foods for dinner (the kid’s choice) and a cake to celebrate and make a “wish” on (actually, we’re going to announce what goals we’d like to meet for the New Year).

Verdict: Yum! The cake itself is fairly lean, but the three sticks of butter and cup of mascarpone cheese more than makes up for that! 😉 This cake is a new favorite and I love that it makes a double layer 8-inch, cute, little cake 😉 Oh, and the frosting! It’s fluffy, rich, but not too sweet. It makes a huge batch (about 4 cups) so I used about half and froze the rest. Oh, and I piped “2014”  with melted white chocolate with some coconut oil mixed in to make it thin it out and make it smooth. Thanks for reading, enjoy!

WP_20131231_12_26_29_Pro

One-Bowl Chocolate Cake – adapted from Martha Stewart

  • 3/4 cup unsweetened Dutch cocoa powder
  • 1 1/2 cups unbleached cake flour (150 grams) or AP flour
  • 1 1/2 cups sugar
  • 1 1/2 teaspoons baking soda
  • 3/4 teaspoon baking powder
  • 3/4 teaspoon salt
  • 2 large eggs
  • 3/4 cup buttermilk
  • 3/4 cup water + 3/4 tsp espresso powder (*espresso optional*)
  • 3 tablespoons safflower oil
  • 1 teaspoon pure vanilla extract

Directions –

Preheat oven to 3o0 degrees. Butter two 8-inch round cake pans (2 inches deep); grease and line each cake pan with parchment paper. Sift cocoa, flour, sugar, baking soda, baking powder, and salt into the bowl of a mixer. Beat on low speed until just combined. Raise speed to medium, and add eggs, buttermilk, water/espresso powder, oil, and vanilla. Beat until smooth, about 3 minutes.

Divide batter between pans (my portions weighed 1 pound 2 ounces). Bake until set and a toothpick inserted into the centers comes out clean, about 40 – 45 minutes. Let cool for 15 minutes. Turn out from pans. Transfer, face-up, to wire racks. Let cool completely. Wrap and freeze layers if desired.


123

Dark Chocolate Mascarpone Frosting – adapted from Not So Humble Pie
*frosts a 8-inch two or three layer cake 

  • 1 pound semisweet chocolate, finelly chopped
  • 6 tablespoons dutch-processed cocoa powder
  • 6 tablespoons boiling water
  • 3 sticks (1 1/2 cups or 339g) unsalted butter, room temperature
  • 1 cup mascarpone cheese (or in a pinch, cream cheese)
  • 1/2 cup powdered sugar
  • pinch salt

Directions –

Combine the boiling water and dutch processed cocoa. Mix well to remove any lumps and then set aside to cool.

Melt the chocolate over a double-boiler and then set aside to cool. Allow the melted chocolate to come to room temperature before using (otherwise it will melt your butter and that’s bad), this should take 25-30 minutes.

Once the chocolate is cool, beat the butter and powdered sugar in your stand mixer with the paddle attachment until light and fluffy (roughly 4 minutes).  While it is mixing, combine the mascarpone cheese with the cocoa powder slurry.

WP_20131231_16_53_19_Pro
Once the butter is light and fluffy, add the cooled melted chocolate to the butter and beat until uniform, scraping down the sides as needed.  Then add the mascarpone cocoa mixer and beat until well combined.  The frosting should be ready to use, however if it seems too soft you can place it in the refrigerator for 10 minutes and it will firm up.

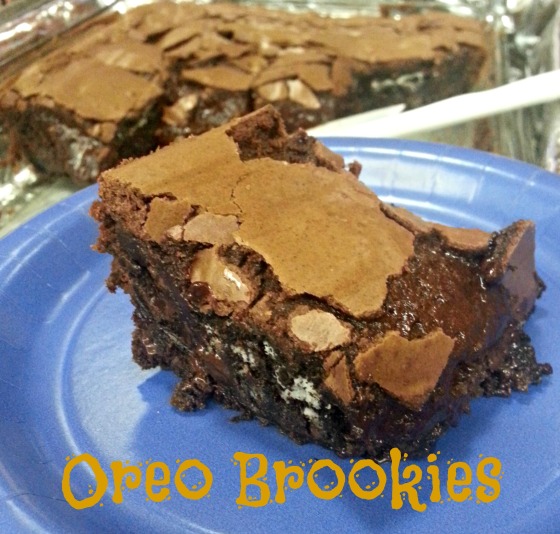
Oreo Brookies…or BrOreos?

oreobrookies

This insane dessert takes a little bit of planning, but it’s easy enough. Just don’t expect to be able to whip it up last minute because you need to allow the first layer to cool completely before you can continue with the other layers. My friend asked me if I could make her husband a special treat for his birthday – what a fun surprise! Of course I said yes. What better way to get the opportunity to make something so completely ridiculous and decadent? Birthdays are a great excuse to make something so butter, sugar, calorie and fat-filled and you don’t have to feel so bad about it cause, hey – we’re celebrating here! 😉

Verdict: Everyone loved these. They are so rich and gooey! I wasn’t a huge fan until the second day – wow…they reached another level of awesome! My health-nut friend thought she could get by on a tiny piece; but once she tried that she had to go back for more – something she rarely allows herself to do! I heard from more than one person that this was the best dessert they have ever eaten and have already received requests for this on their birthdays…so, yeah – this recipe is a keeper! Thanks for reading, enjoy!

Oreo “Brookies” – adapted from Brown Sugar

For the Cookie Crust –

  • 2 sticks unsalted butter, at room temp
  • 1 cup brown sugar
  • 1 cup white sugar
  • 2 eggs
  • 1 TBSP vanilla extract
  • 2 1/4 cups AP flour (281 grams)
  • 1/2 cup unsweetened cocoa powder
  • 1 tsp baking soda
  • 1 tsp salt
  • 12 ounce bag of semi-sweet chocolate chips

For the Brownie Layer –

  • 1 stick unsalted butter, room temp
  • 1 1/2 cups sugar
  • 4 eggs
  • 1 tsp vanilla
  • 3/4 cup AP flour (94 grams)
  • 1/4 unsweetened cocoa powder
  • 1/2 tsp salt
  • 8 ounces bittersweet chocolate, melted
  • 12 whole Oreo cookies

Directions –

For the Cookie Dough: Preheat your oven to 350 degrees. Lightly butter a 13×9 inch baking dish.

In a mixer bowl, beat the butter and sugars until light and fluffy. Add eggs one at a time, blending each one in before adding the next – periodically scrape the sides of the bowl down. Add vanilla extract.

In a separate bowl, add all your dry ingredients and whisk to combine. Add your dry ingredients to your butter/sugar mixture in three parts, scraping the sides of the mixer bowl if needed. Mix in your chocolate chips.

Place the finished dough in your baking dish and with a damp spatula (or your hand) pat the dough until flat and evenly distributed. Bake for 20-25 minutes, take out and allow to cool completely. (*I let it cool for an hour at room temp, and then I placed it in my fridge for another hour*)

For the Brownie: Preheat your oven to 350 degrees.

In a standing mixer bowl, beat together butter and sugar until light and fluffy. Add each egg to the mixer one at a time, being sure to mix in each addition before adding the next. Add in vanilla extract.

In a separate bowl, combine cocoa, flour and salt. Slowly add the dry ingredients to the butter/sugar mixture until blended. Fold in the melted chocolate until combined.

brookies1

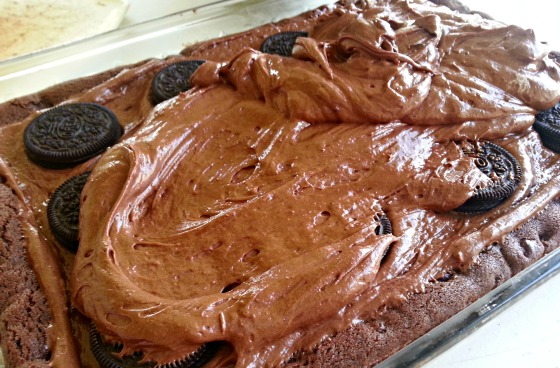
Pour half of the brownie batter on top of the cookie crust, then evenly space out the Oreo cookies; then pour the rest of the brownie batter over all and spread evenly across the top of the Oreos. Bake for 25-30 minutes.

Snicker’s Cake

124

When it comes to making a cake (especially the three layer, super involved kind), I need a good excuse to make one. My husband on the other hand would have liked me to make this because it was a Monday – no real reason and no company to help us eat it. I know better! The last thing we need is a giant cake all to ourselves,  not to mention how selfish that would be 😉

snickers1
I have used this particular chocolate cake recipe many times before, so I knew it would be really good. Also, for quality control sake, I had to taste the fluff and salted caramel I made – so I knew those were also really good. This is definitely not a cake I would have wanted to make in one day because of all the components; also, it’s much easier to work with when the cake layers have been frozen. On Friday, I made the salted caramel and the chocolate cake – let the cake cool completely, wrapped them up individually in plastic and then placed them in the freezer. I made the fluff on Sunday, stored it in a glass container and let it sit on my counter. Monday I made the nougat and I decided to reduce the amount of peanuts added; but other than that modification, I made it as directed. Also, I totally forgot to add the salted caramel to the top of the nougat filling – boo! I figured no one would care especially once i poured ganache and more caramel sauce over the top 😉

Verdict: This cake tastes as good as it looks – maybe even better. All the guests at our Labor Day party really enjoyed it and we only have about 1/4 of it left! 🙂  I’m glad that all that work I put into it paid off, and I’m sure I will get requests for it in the future 🙂 Thanks for reading, enjoy!

snickers
Snickers Cake – adapted from Punky Purls via Brown Eyed Baker

For the Cake:

  • 2½ cups AP flour (312 grams)
  • 3 cups granulated sugar
  • 1 1/2 cups Dutch-process cocoa powder
  • 1 tablespoon baking soda
  • 1½ teaspoons baking powder
  • 1  teaspoons salt
  • 3 eggs, at room temperature
  • 1 1/2 cups buttermilk, at room temperature
  • 1 1/2 cups hot water
  • 1 1/2 tsp espresso powder
  • ¾ cup vegetable oil (*I used grapeseed oil)
  • 4½ teaspoons vanilla extract

For the Nougat Filling:

  • 4 tablespoons unsalted butter
  • 1 cup granulated sugar
  • ¼ cup evaporated milk
  • 1½ cups marshmallow fluff
  • ¼ cup creamy peanut butter
  • 1 teaspoon vanilla extract
  • 1½ cups salted peanuts, roughly chopped

For the Salted Caramel Buttercream Frosting:

  • ½ cup unsalted butter, at room temperature
  • 4 ounces cream cheese, at room temperature
  • ¼ cup salted caramel sauce
  • 2 cups powdered sugar

For the Milk Chocolate Ganache:

  • 8 ounces milk chocolate, finely chopped
  • 4 ounces (½ cup) heavy cream

For the Assembly & Garnish:

Directions –

1. Make the Cake: Preheat oven to 350 degrees F. Grease three 8-inch round cake pans, line the bottoms with rounds of parchment paper, grease the parchment, then flour the insides of the pans, tapping out excess; set aside.

2. In the bowl of an electric mixer (or large mixing bowl if you’re using a hand mixer), sift together the flour, sugar, cocoa powder, baking soda, baking powder and salt. In a medium bowl, whisk together the eggs, buttermilk, coffee, oil and vanilla.

3. Add the wet ingredients to the dry ingredients and mix for 2 minutes on medium speed. Scrape the sides and bottom of the bowl and mix for an additional 20 seconds (the batter will be very thin).

4. Divide the batter evenly among prepared pans. Bake for 20 minutes and rotate the pans in the oven. Continue to bake until a toothpick inserted into the center of one of the cakes comes out almost clean (with a few moist crumbs), about 12 more minutes. Cool the cakes (in the pans) on wire racks for 20 minutes, then carefully turn them out onto cooling racks to cool completely.

5. Make the Nougat Filling: Melt the butter in a medium saucepan over medium heat. Add the sugar and evaporated milk, stirring until dissolved, and bring to a boil. Reduce the heat to low and cook for 5 minutes, stirring occasionally. Remove the pan from heat and add the marshmallow fluff, peanut butter, and vanilla extract, stirring until completely smooth. Fold in the peanuts. Let the nougat mixture cool to room temperature before using it in the cake. You can do this leaving it at room temperature or you can pop it into the refrigerator to speed up the process. Be sure to give a stir occasionally as it cools.

6. Make the Frosting: Beat together the butter and cream cheese on medium-high speed for 5 minutes (I like to use the whisk attachment for my KitchenAid stand mixer, but it’s not necessary). Pour in the salted caramel and beat until combined. Reduce the speed to medium-low and slowly add the powdered sugar, a little at a time, until it has all been incorporated. Increase the speed to medium-high and beat for an additional two to three minutes, until light and fluffy.

7. Assemble the Cake: If your cakes baked up uneven or have domed on top, level off the tops. Place one cake layer on a serving plate. Cover with half of the nougat filling and then spread a couple spoonfuls of the salted caramel sauce over top to evenly cover the nougat filling. Top with a second cake layer and cover with the remaining nougat filling and top with caramel sauce. Place the final cake layer on top face-down. Frost the cake with the salted caramel frosting, finishing it as smoothly as possible. Refrigerate the cake for at least 1 hour, until the frosting is set.

8. Make the Chocolate Ganache: While the cake chills, make the chocolate ganache. Place the chocolate in a medium bowl; set aside. Place the cream in a small saucepan over medium heat and warm until it just comes to a boil. Pour the cream over the chopped chocolate and let sit for 2 minutes. Begin whisking the mixture in the center, gradually working your way outward until the ganache is completely smooth. Set aside to cool, whisking occasionally, until it has thickened slightly, yet still a pourable consistency.

9. Garnish the Cake: Transfer the ganache to a 2-cup measuring cup. Slowly pour the chocolate ganache into the center of the cake, letting it push itself outward and flow over the sides of the cake. Refrigerate the cake for at least 30 minutes, giving the ganache a chance to set up. To finish garnishing, drizzle some additional salted caramel sauce over the top and side of the cake, and top with chopped peanuts. Keep the cake refrigerated, removing it from the refrigerator about 20 minutes prior to serving.

Homemade Marshmallow Fluff!

fluff

(*crossing fingers*) I hope this works out! Hi, name is Shawna, and I’m a total food snob. I am compelled to make as much as possible at home, cause it soothes my soul! 😉

Verdict: I don’t even like marshmallows, let alone the “fluff” stuff, but this is amazing! Lightly sweet and, well – fluffy! Mission accomplished 🙂

Homemade Marshmallow Creme – adapted from Cooking Classy

  • 3/4 cup granulated sugar
  • 1/2 cup light corn syrup
  • 1/4 cup water
  • 1/8 tsp salt
  • 2 large egg whites
  • 1/4 tsp cream of tartar
  • 1 tsp vanilla extract

Directions –

  • In a small saucepan combine sugar, corn syrup, water, and salt. Heat mixture over moderately high heat, whisking occasionally until mixture reaches 240 degrees on a candy thermometer. Meanwhile, in the bowl of an electric stand mixer fitted with whisk attachment, whip together egg whites and cream of tartar on medium speed (I had to whip mine on high speed because the whisk attachment on my mixer doesn’t reach quite that low, so if yours doesn’t either you may want to crank up the speed), until soft peaks form.
  • Once the sugar mixture reaches 240 degrees, remove from heat, set stand mixer containing egg white mixture on low speed and carefully pour about 2 Tbsp of hot sugar mixture down the side of the bowl into the egg white mixture. With the mixer running, slowly pour remaining syrup down the side of the bowl into the egg white mixture, increase speed to medium-high and whip mixture until stiff glossy peaks form, about 8 – 10 minutes. Stir in vanilla during the last minute of mixing. Use immediately or store in an airtight container in refrigerator up to two weeks.

Salted Caramel Sauce

caramel1

I have never made caramel before, but I watched this episode of Kelsey’s Essentials and decided that this should be easy enough to try. Thankfully it worked out really well and I will use this recipe again. This caramel is destined to become part of the Snicker’s cake that I will be serving on Labor Day. I am also going to attempt making marshmallow fluff from scratch so hopefully that recipe turns out as well as this caramel! 🙂 Thanks for reading, enjoy!

Salted Caramel Sauce – adapted from Kelsey’s Essentials

  • 1 cup sugar
  • 1/4 cup water
  • 3/4 cup heavy cream
  • 3 1/2 tablespoons unsalted butter
  • 1 teaspoon Fleur de Sel, or kosher salt

Directions –

In a heavy-bottomed saucepan, combine the sugar and water over medium-low heat until the sugar dissolves. Increase the heat and bring to a boil, without stirring. If necessary, use a wet pastry brush to wash down any crystals on the side of the pan. Boil until the syrup is a deep amber color, about 7-10 minutes.

Remove the sugar from the heat and carefully whisk in the heavy cream. The mixture will bubble. Stir in the unsalted butter, and salt. Transfer the caramel to a dish and cool.

*Cook’s Note: The salted caramel sauce will keep in the refrigerator up to 2 weeks. Reheat before serving.