Oven-Baked Sweet Potato Fries and Ketchup

WP_20140622_18_44_10_Pro

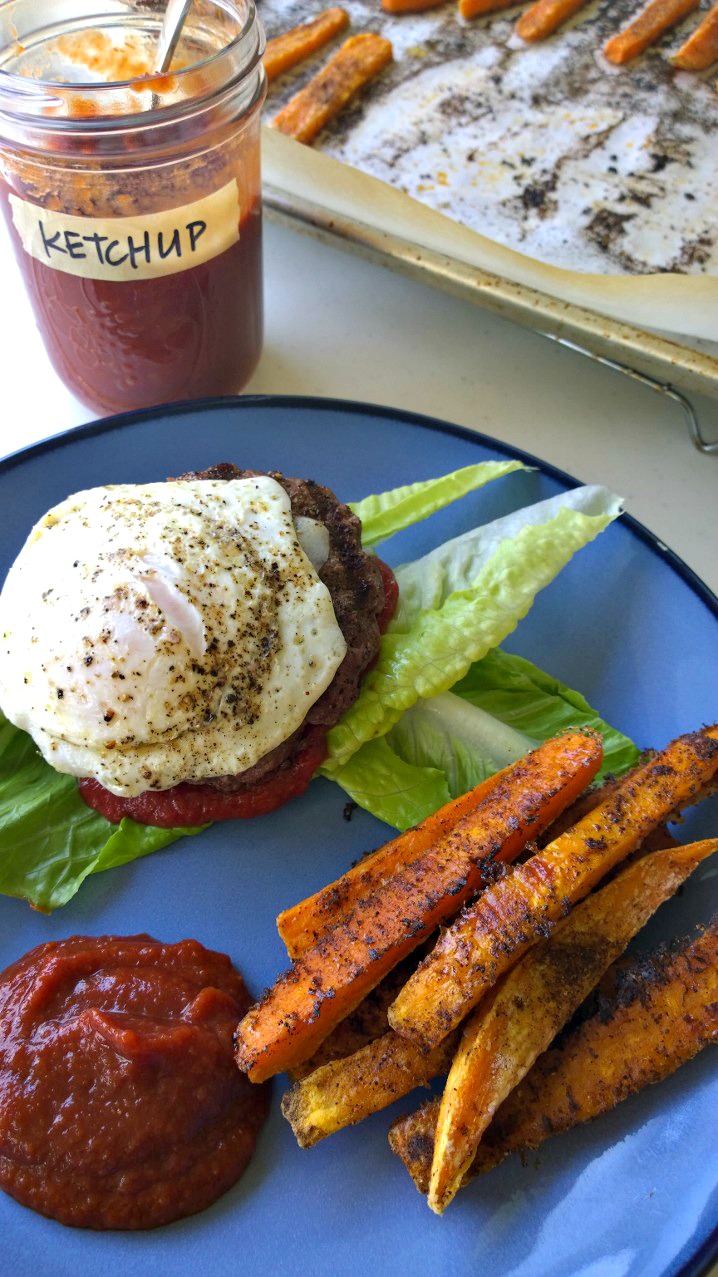
Yum! The “fries” were sweet and a little spicy, soft but not mushy. I really liked dipping in homemade mayo over the ketchup, but over all I would say this was a successful experiment. Thanks for reading, enjoy!

Oven-Baked Spiced Sweet Potato Fries – adapted from The Iron You

  • 3 medium sweet potatoes (about 4 to 5 oz each)
  • 1 tablespoon arrowroot powder
  • 2 tablespoons olive oil (or melted coconut oil)
  • 1 teaspoon paprika
  • ½ teaspoon chili powder
  • ½ teaspoon garlic powder
  • ½ teaspoon ground cumin
  • pinch of cayenne pepper
  • ½ teaspoon fine grain sea salt


Directions –

Preheat oven to 425°F (220°C) and place a rack in the middle.
Wash the sweet potatoes but don’t peel them, Cut each lengthwise in half. Cut again lengthwise into quarters, then once more into eighths and then once more in the same way, so you are left in the end with sixteen long wedges. Finally, cut each wedge in half crosswise.
Place the sliced sweet potatoes in a large Ziploc bag (or other freezer bag) and sprinkle with arrowroot powder. Close the bag and shake until the sweet potatoes are fully covered.
In a small bowl combine paprika, chili powder, garlic powder, cumin, cayenne pepper and salt.
Place the sweet potatoes onto a baking sheet that has been line with parchment paper and brushed lightly with some of the olive oil (or coconut oil). Spread sweet potatoes evenly leaving enough space between them for the air to circulate. Drizzle with the remaining olive oil (or coconut oil).
Sprinkle with some of the spice mixture.
Bake in the oven for 20 to 25 minutes, until golden brown. Turning the sweet potatoes once with the help of a spatula (be careful not to burn yourself though). For crispier fries turn on the broiler the last 3 to 4 minutes.

WP_20140622_17_41_18_Pro

Paleo Ketchup – adapted from The Iron You

  • 6 oz  tomato paste
  • 3 TBSP maple syrup
  • 1/3 cup water
  • 1/3 cup apple cider vinegar
  • 3/4 teaspoon fine grain sea salt
  • 1 garlic clove
  • ½ small onion

Directions –

In a medium saucepan over medium heat combine tomato paste, honey, water, apple cider vinegar, salt, garlic and onion. Whisk until very smooth and bring to a boil. Reduce heat to low and let gently simmer for 20 minutes, stirring every so often. The sauce will thicken and the flavors will bind.
Remove from the heat, cover with a lid and let cool at room temperature. (*I used my stick blender to puree the ketchup*)
Once cool, transfer to an airtight container and keep in the fridge.


Advertisement

Whole 30 Chicken Fajitas and Cauli “Rice”

WP_20140521_18_30_03_Pro


Yum! This is a new favorite that just gets better the next day. I love the cauli-rice and it is a good substitute for rice and I know I’ll be making this again. It takes more work than regular rice, but the flavor is savory, nutty, fluffy and much more nutritious. Thanks for reading, enjoy!

Chicken Fajitas – inspired by Simply Recipes

  • 1 1/4 to 1 1/2 pounds skinless, boneless chicken breasts, divided horizontally, then sliced into 1/2″ strips
  • 2 Tbsp coconut oil
  • 1 large red onion, sliced lengthwise (root to tip) into 1/4-inch strips
  • 2 bell peppers, sliced into 1/4-inch strips

Marinade

  • 2 Tbsp lime juice
  • 3 Tbsp olive oil
  • 1 garlic clove, minced
  • 1/2 teaspoon salt
  • 1/2 teaspoon ground cumin
  • 1/2 teaspoon chili powder
  • 1/2 jalapeno, seeded and minced
  • 1/4 cup chopped cilantro
  • Salt to taste

Directions –

Mix all the marinade ingredients together in a glass or plastic container. Add the chicken, mix well, cover and let marinate at room temperature for 1 hour. (You can marinate them in the refrigerator for up to 8 hours, but remove them an hour before cooking so that they can come closer to room temp.)

Remove the chicken from the marinade. Heat a large cast iron frying pan on high heat for 1 to 2 minutes. Add a tablespoon of coconut oil to the pan. As soon as the oil begins to shimmer, lay the chicken breast pieces in the pan. Depending on the size of the pan, and if you have had to cut the chicken breasts, you may have to work in batches. Let the chicken cook undisturbed for 2-3 minutes, until you have a good sear. Once seared well on one side, turn the pieces over and cook for another 2-3 minutes until well seared on the second side. Once seared on the second side, remove to a cutting board and cover with aluminum foil to rest for 5 minutes.

While the chicken is resting, cook the onions and peppers. Add another tablespoon of coconut to the frying pan. Heat on high. As soon as the oil is hot, add the onions and peppers to the pan. Use a metal spatula to scrape up some of the browned bits from the chicken and stir to coat the onions and peppers with the oil and brown bits. Spread the onions and peppers in an even layer in the pan. Let them cook undisturbed for 2 minutes. You want them to sear with some blackening. Stir the vegetables and continue to cook for another 2 minutes.


Oven-Roasted Cauliflower Rice – adapted from The Clothes Make the Girl

  • 1 head of cauliflower, cleaned and cut into florets
  • 1 TBSP coconut oil, melted
  • salt to taste

Directions –

Preheat oven to 425, and prepare two baking sheets.

Using a food processor, place a portion of the florets in the bowl with the blade attachment and pulse until the mix resembles rice – about 10-15 pulses. Pour the “rice” in a medium bowl and continue with the other florets. Pour the  coconut oil over the cauliflower and sprinkle with salt. Using your hands, toss the mixture well and then spread half of the cauliflower onto each baking sheet.

Roast for 15 minutes and then rotate the pans and continue cooking until tender and beginning to get a few brown spots, about 10 more minutes.


Breakfast Sausage


WP_20140427_19_27_02_Pro (1)


This Whole 30 kick has forced me to make just about everything from scratch – not a problem on most days, but sometimes I want a break. This change has definitely been a huge lesson in discipline for me, but I can tell you that the results are completely worth it. In less than three weeks, I lost 9 pounds and haven’t counted a single calorie or fat gram, and I am not starving myself! I have more energy, sleep better, I feel stronger, my clothes fit way better and have much more confidence than I did a few months ago.

Anyway, back to the recipe – these are super quick and easy to make. I serve them with fried eggs, roasted sweet potato and some avocado – all Whole 30 approved! Thanks for reading, enjoy!

WP_20140428_07_23_18_Pro

Breakfast Sausages – adapted from Primal Palate

  • 1 lb Ground Pork
  • 1 tsp Fennel
  • 1 tsp Garlic
  • 1 tsp Paprika
  • 1/2 tsp Black Pepper
  • 1/2 tsp Sage
  • 1/2 tsp Salt
  • 2 Tbsp Organic Coconut Oil
  • 1/4 tsp Cayenne Pepper
  • 1/4 tsp White Pepper

Directions –

Process Combine pork, garlic, and all spices in a mixing bowl, mixing until it reaches an even consistency. Form pork mixture into 2-ounce patties (approximately 8 patties). Heat a skillet to medium heat with 1 tablespoon of coconut oil per 4 patties. Cook the patties for approximately 3–4 minutes per side. Each side should be golden, and the center of the patties should no longer be pink.

Spaghetti Squash with Garlic and Parmesan

WP_20140404_12_18_30_Pro (1)


Two weeks ago,  I purposed to eliminate refined sugars and flour from my diet. The new and kind of drastic change in eating habits has inspired me to try new vegetables and clean eating recipes. The first four days of detox were painful to say the least, but I’m so glad that I have made this change. I have more energy, I’m more clear-headed and I don’t feel sluggish or bloated. This veg is on of my new favorites and I have purchased six in the last two weeks. They’re cheap, versatile and a great substitute for spaghetti noodles.

This side dish is so darn quick, easy and flavorful that I could eat it daily – the hardest part is cutting the squash in half. All you need is a roasted squash, good olive oil, chopped garlic and Parmesan cheese to make this savory and satisfying side dish. The first time I served it along side sautéed tilapia and steamed peas. The next three times I served it along a spinach salad with my favorite maple Dijon dressing. Soon I will share with you the other clean eating recipes I have tried, like my favorite peanut butter, banana and chocolate smoothie, stuffed zucchini boats; and a spaghetti squash bake that tasted even better the next day. Thanks for reading, enjoy!

Roasted Spaghetti Squash with Garlic and Parmesan – adapted from Chow

    • 1 large spaghetti squash or two small ones
    • 4 tablespoons olive oil
    • Kosher salt
    • Freshly ground black pepper
    • 2-3 medium garlic cloves, finely chopped
    • 1 medium shallot, finely chopped (*if you have it on hand*)
    • 3/4 cup finely grated Parmesan cheese, plus extra for serving

Directions –

Heat the oven to 375°F and arrange a rack in the middle. Cut the squash in half lengthwise and scrape out the seeds. Brush the flesh with 2 tablespoons of the oil and season generously with salt and pepper. Place the squash halves cut-side up on a baking sheet and roast until fork tender, about 40-50 minutes.

WP_20140408_13_19_26_ProWP_20140408_13_25_31_ProWP_20140408_16_23_34_ProWP_20140408_16_29_00_Pro

Remove the squash from the oven and let sit at room temperature until cool enough to handle, about 30 minutes. Scrape the flesh with a fork to make long strands; set aside.

Heat the remaining 2 tablespoons of oil in a large saucepan over medium heat until shimmering, about 3 minutes. Add the garlic and shallot, season with salt and pepper, and cook until softened and lightly browned, about 3 minutes.

Add the reserved squash, toss with tongs to coat thoroughly, and cook until heated through, about 3 minutes. Remove from the heat and add the cheese a handful at a time while tossing the squash to evenly coat. Serve with freshly ground black pepper and extra cheese.

Simple Rice Pilaf

WP_20140115_18_25_07_Pro

Quick Post: Years ago, before I was a food snob, I bough boxed rice and pasta sides without thinking twice. This is a great substitute for a basic Rice-a-Roni side and it has way more flavor, not to mention ingredients that I can pronounce 😉 Thanks for reading, enjoy!

Simple Rice Pilaf – adapted from Simply Scratch

  • 2 TBSP unsalted butter
  • 1 TBSP olive oil
  • 1 cup Orzo pasta
  • 1 cup long grain white rice
  • 2.5 cups chicken stock
  • salt and pepper to taste

Directions – 

Melt butter in a 2 quart saucepan until hot and bubbly. Add the orzo and toast until it becomes lightly golden. Add the cup of rice, stir. Pour in the chicken stock and bring back to a boil. Reduce heat to low, cover and simmer for 18-20 minutes or until the liquid is absorbed. Remove from heat and let it sit for 5 minutes. Fluff with a fork and serve.

Orange Glazed Chicken Thighs and Coconut Rice

WP_20140109_19_04_16_Pro

Quick Post: It doesn’t look like much, but my family enjoyed it. I really loved the coconut rice – it doesn’t taste like coconut, but the coconut milk makes the rice rich and creamy. Thanks for reading, enjoy!

Orange Glazed Chicken Thighs – adapted from The Stay at Home Chef

  • 8 chicken thighs
  • 1 cup orange juice (about 4 oranges)
  • 1 orange, zested
  • 1/4 cup rice vinegar
  • 2 tablespoons soy sauce
  • 1/3 cup brown sugar
  • 1 tsp fresh ginger, grated
  • 1/2 tsp red pepper flakes
 Directions –
1. Preheat your oven to 425 degrees. Spray a 9×13 pan with non stick cooking spray. If you want to be fancy, line the bottom of the pan with orange slices (optional).
2. In a small saucepan, combine the orange juice, orange zest, rice vinegar, soy sauce, brown sugar, ginger, and red pepper flakes. Bring to a boil, then reduce heat to medium-low and simmer for about 5 minutes.
3. Place your chicken thighs skin-side up in the prepared baking dish. Pour half of the glaze over the chicken thighs.
4. Cook in the oven for about 30 minutes. Take the remaining glaze and pour it over the chicken.
5. Cook for an additional 15-20 minutes. The skin will get nice and crisp and browned.

WP_20140109_18_59_57_Pro

Coconut Rice –

  • 1 1/2 cups long grain white rice
  • 1 can of unsweetened coconut milk, plus enough water to make 2 cups
  • 1 cup water
  • salt to taste (optional)

Directions –

In a medium saucepan, add water and coconut milk and rice. Cover and bring to a boil, then add salt – stir to dissolve, reduce heat to a simmer and continue cooking until all the liquid has been absorbed, about 15-18 minutes.


Buttermilk Baked Chicken with Mashed Potatoes and Homemade Creamed Corn

chicken1

I’m all for eating healthier in January to sort of make up for all the rich foods that I made during the holidays…but sometimes it’s hard to quit the comfort. All of these recipes were delicious, but the cream corn had me swooning and will definitely be a repeat offender in this house! Thanks for reading, enjoy 🙂

Buttermilk Baked Chicken – adapted from Food Republic

  • 2 cups buttermilk
  • 1 tablespoon Dijon mustard
  • 1 tablespoon hot sauce, such as Tabasco
  • 2 teaspoons paprika
  • 1 teaspoon coarse salt, plus more for seasoning
  • 1 onion, coarsely chopped
  • 5 garlic cloves, smashed (*I used garlic powder*)
  • 4 (6-ounce) skinless boneless chicken breast halves
  • 2 cups panko (Japanese-style) breadcrumbs
  • freshly ground black pepper
  • 2 tablespoons peanut oil
Directions –
To prepare the marinade, in a large mixing bowl whisk the buttermilk, mustard, hot sauce, paprika, salt, onion and garlic together to combine. Put the chicken in a plastic storage bag, add the buttermilk mixture and smoosh the chicken around to thoroughly coat in the marinade. Press out the air, seal the bag and marinate the chicken in the refrigerator for at least 24 hours, preferably up to 2 days.
When ready to cook the chicken, preheat the oven to 400 degrees F. Remove the chicken from the marinade, wiping off any excess buttermilk, and discard. Season both sides of the chicken breasts lightly with salt and pepper. Spread the breadcrumbs out on a flat plate. Press the chicken breasts into the breadcrumbs to completely coat all sides, shaking off the excess.
Put a cast-iron or ovenproof skillet over medium-high heat. Coat the pan with 2 tablespoons of oil. Once the oil is shimmering, lay the chicken in the pan – you may have to do this in batches. Sear for 3 minutes on each side. Nestle the seared chicken breasts side by side in the skillet. Transfer the skillet (and chicken) to the oven and bake for roughly 20 to 25 minutes, or until the chicken is cooked through and the crust is golden.

WP_20140107_17_53_54_Pro

Home-Style Mashed Potatoes – adapted from Pass the Sushi

      • 2 pounds potatoes (I had Russett)
      • 2 TBSP butter
      • 1/2  cup heavy cream
      • salt

Directions –

Scrub and peel the potatoes. Dice into even 1/2″ cubes to even out cooking time. Place in a large Dutch oven with just enough water to cover. Salt the water and bring to a boil. Cook, covered, for 15-20 minutes, or until a fork pierces the potatoes easily.

Drain the potatoes and return to the Dutch oven. Add the cream and using a blender or a masher, mash the potatoes. Add 2 tablespoons butter and mix until incorporated. Add more cream if needed (starch may very from potato to potato). Season with salt and pepper to taste and top with remaining 2 tablespoons of butter to entice friends and family into extra big spoonfuls.

WP_20140107_17_59_42_Pro

Homemade Creamed Corn – adapted from Fabulously Fugal

      • 20 ounces frozen corn thawed
      • 1 cup heavy cream
      • 1 tsp salt
      • 2 T sugar
      • 1/4 tsp pepper
      • 2 T butter
      • 1/2 cup milk
      • 2 TBS flour
      • 1/4 cup Parmesan Cheese

Directions –

Heat first 6 ingredients together in a large pot. In a separate small bowl, wisk separately  the 1/2 cup milk and 2 TBS of flour (this is what will help thicken the cream).

Stir into corn mixture and cook over medium heat (stir often so the cream doesn’t burn) until mixture is thickened and corn cooked through. Remove from heat and stir in 1/4 cup Parmesan cheese.

Salad with Maple-Dijon Dressing

salad123

It’s a new year and I tend to get inspired to eat a little healthier. This is a really simple, light but flavorful salad with lots of textures and flavors. Use whatever you have to make it interesting, because salads can be so bland and boring. I listed goat cheese in the ingredients even though I didn’t have any, but it would have been a nice tangy, creamy addition. Thanks for reading, enjoy!

Maple-Dijon Dressing – adapted from The Six o’clock Scramble

  • 1/4 cup extra virgin olive oil
  • 1/8 cup balsamic vinegar
  • 1 Tbsp. pure maple syrup
  • 1 tsp. Dijon mustard
  • 1/4 tsp. herbes de Provence

Salad –

  • grilled chicken, chopped
  • apple, sliced
  • tomatoes
  • almonds, chopped
  • crumbled goat cheese

Directions –

Place all dressing ingredients into a lidded jar and shake well to combine.  Spoon over your salad greens and toss.

Creamy Chicken and Rice Soup

WP_20131229_13_07_09_Pro

I had just enough leftover chicken to make this, plus everything else on hand to make this recipe – I love that! This was perfect for a Sunday lunch and we all enjoyed it with our favorite crescent rolls. Thanks for reading, enjoy!

Creamy Chicken + Lemon Rice Soup – adapted from Simply Scratch

  • 1 tablespoon Olive Oil
  • 1 small onion, diced
  • 2 medium peeled carrot, diced small
  • 2 stalks celery, diced small
  • 8 cups chicken stock or broth
  • 3/4 cup white rice
  • 2 tablespoons fresh lemon juice, strained
  • 2 whole eggs, beaten
  • kosher salt and fresh black pepper to taste
  • 1 heaping cup leftover shredded chicken

Directions –

Heat your Dutch oven over medium heat and add one tablespoon of olive oil.

Sauté the diced carrots and celery until they’re just starting to soften. Pour in the low sodium chicken broth and bring to a boil.

Pour in the 3/4 cup of long grain rice. Cover the pot with a tight fitting lid and reduce the heat to medium high. Cook the rice for 20 minutes; stand nearby just in case there’s a boil-over.

In a bowl, beat the two eggs and add in the lemon juice. Once the twenty minutes are up, remove the lid to the soup and gather some of the broth into a ladle. While stirring, slowly pour in the hot broth into the egg mixture. Then pour the warmed egg/broth mixture into the Dutch oven and stir.

Add in the shredded chicken and minced parsley. Taste the soup and check the seasonings, season with salt and pepper to your liking.

Easy, Stove Top, No-Roux Macaroni and Cheese

stovetop

This couldn’t be easier and it’s so tasty, quick, creamy and surprise – there is no butter in this recipe! Thanks for reading, enjoy!

Creamy No-Roux Stove Top Macaroni and Cheese – adapted from The Kitchn

  • 1 pound pasta, any shape
  • 1 1/2 cups milk
  • 2 tablespoons all-purpose flour
  • 3 cups shredded cheese, like cheddar, monterey jack, or colby
  • 1/2 teaspoon salt
  • 1/2 teaspoon powdered mustard
  • 1/4 tsp paprika
  • 1/4 tsp cayenne
  • fresh cracked black pepper to taste

Directions –

1. Bring about 4 quarts of water to a boil over high heat in the pasta pot. Add the pasta and a tablespoon of salt. Cook until the pasta is al dente, about 8 minutes. Drain and set aside.

2. When the pasta has finished cooking, prepare the cheese sauce. Begin warming 1 cup of the milk in the saucepan over medium heat. Whisk together the remaining 1/2 cup of milk and the flour until there are no lumps. When you just start to see tendrils of steam rising from the warming milk, whisk in the milk-and-flour mixture. Continue whisking gently until the milk thickens slightly to the consistency of heavy cream, 3-4 minutes.

3.Turn the heat to low and begin mixing handfuls of cheese into the milk. Stir in the salt and mustard. Stir until all the cheese has melted and the sauce is creamy. Taste and adjust the seasonings as desired. Remove the sauce from heat.

4. In a large serving bowl, combine the pasta and 1/2 of the cheese sauce. Stir to coat the pasta evenly. Add the second half of the sauce and any extra add-ins.