Hamburger Potato Buns

WP_20131230_18_52_55_Pro (1)

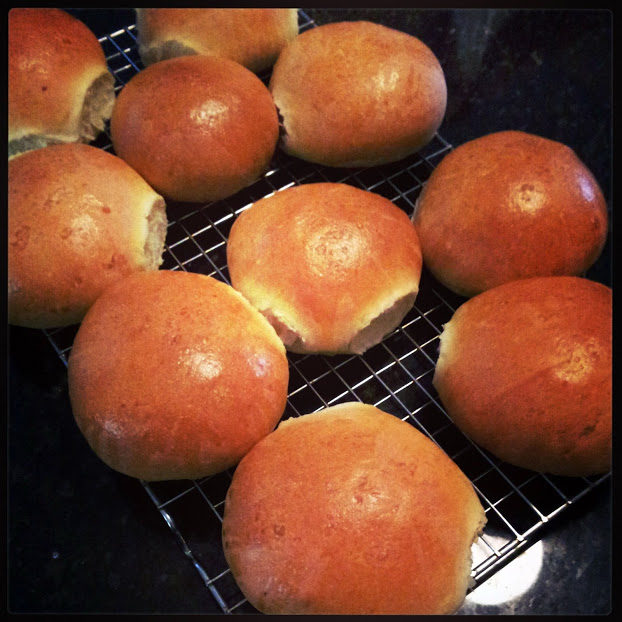
Quick Post: Once you have made homemade buns, there will be no going back to store-bought! These are fluffy, flavorful and substantial enough for all your toppings. Thanks for reading, enjoy! 🙂

Hamburger Potato Buns – adapted from King Arthur Flour

**Recipe modified for a double batch**

  • 4 cups AP flour (5oo grams), hold back about 1/4 cup
  • 2 cups white whole wheat flour (240 grams), hold back about 1/4 cup
  • 1/2 cup potato flour
  • 4 tablespoons sugar
  • 2 1/2 teaspoons salt
  • 4 tsp instant yeast
  • 1 stick unsalted butter, melted
  • 2 cups milk, warmed

WP_20140306_12_43_38_Pro20140306124521

Directions –

1) Combine all of the dough ingredients and mix and knead them — by hand, mixer, or bread machine — to make a soft dough.

2) Place the dough in a lightly greased bowl, cover, and let rise in a warm place for 1 hour, or until it’s almost doubled in bulk.

3) Turn the dough onto a lightly greased surface, gently deflate it, and divide it into 6 pieces. Roll each piece into a ball.

4) Place the balls into the greased cups of a hamburger bun pan, flattening gently. Or place them on a lightly greased or parchment-lined baking sheet, leaving about 2″ to 3″ between them; flatten gently.

5) Cover and let rise until the buns have doubled in size, 60 to 90 minutes. Towards the end of the rising time, preheat the oven to 350°F.

6) Bake the buns for 15 to 20 minutes, or until they’re light golden brown.

7) Remove them from the oven, and brush them with melted butter, if desired.

8) Transfer the buns to a rack to cool. Store buns, well-wrapped, at room temperature for several days; freeze for longer storage.

Hungry for More?

buns1

Mashed Potato Burger Buns

6

Brioche Buns

1

Beautiful Burger Buns

Whole Grain Waffles

WP_20140128_17_58_53_Pro (1)

My kids love waffles – what’s not to love? I get to make a weeks worth of school breakfasts in less than an hour, and the kids get another maple syrup delivery system 😉 I I like to use wheat pastry flour because it’s mild enough that the kids don’t mind, and I like that I can sneak a little fiber into breakfast. This batch makes about 10 waffles, most of which get cooled, divided, bagged and frozen. Warm them up in a 350 degree oven for about 10 minutes, or mere seconds in your microwave. Thanks for reading, enjoy!

Whole Wheat Waffles – adapted from Cookie and Kate

  • 1 cup whole wheat pastry flour
  • 1 cup whole wheat flour (you can also use spelt, rye, cornmeal or buckwheat)
  • 1½ teaspoons baking powder
  • 1 teaspoon baking soda
  • ½ teaspoon salt
  • 2 cups buttermilk (make your own: add 2 tablespoons of vinegar or lemon juice to 2 cups milk, and let sit for 5 minutes)
  • 3 eggs
  • 1 tablespoon maple syrup (or honey)
  • ¼ cup (1/2 stick) butter (original recipe called for one full stick of butter)
  • ½ teaspoon cinnamon
  • ½ teaspoon vanilla extract
Directions –
  1. Preheat your oven to 200 degrees and heat up your waffle iron.
  2. Mix the dry ingredients (flours, baking powder, baking soda, and salt) in a large mixing bowl.
  3. In a large measuring cup, whisk together the buttermilk, eggs and syrup or honey.
  4. Pour the liquid ingredients into the dry ingredients. Stir just until they are mixed.
  5. Add the melted butter and mix well.
  6. Pour batter into your waffle iron until the butter reaches the edges of the iron. Cook until crisp and golden.
  7. Place each waffle on a rack in the oven (in a single layer) to keep them warm until you’re ready to serve. Five minutes in the oven may actually help them get a little crispier.

Chocolate Cream Pie with Oreo Crust

WP_20140315_20_55_49_Pro

Quick Post: I know I’m late to the game here, but this was our first year to “celebrate” Pi Day. This chocolate cream pie was amazing, and the flavor was even better with age. The first day, it was all mocha; but the next day it became the most perfect chocolate flavor – swoon worthy, amazingly rich, velvety and thick! Thanks for reading, enjoy!

WP_20140314_20_43_04_Pro

Chocolate Cream Pie – adapted from King Arthur Flour

Crust – *recipe link*

  • 24 Oreos
  • 4 TBSP butter, melted

Filling –

  • 2 tablespoons unsalted butter
  • 1 1/3 cups semisweet chocolate, chopped (about 6 ounces)
  • 1 teaspoon vanilla extract
  • 2/3 cup granulated sugar
  • 3 tablespoons arrowroot powder or cornstarch
  • 2 tablespoons unsweetened cocoa powder
  • 1 teaspoon espresso powder, optional; for richer chocolate flavor
  • 1/8 teaspoon salt
  • 3 large egg yolks
  • 1 cup heavy cream, divided
  • 2 cups milk

Stabilized Whipped Cream – *recipe link*

  • 1 cup heavy cream
  • 1/4 cup confectioners’ sugar
  • 1/4 tsp powdered gelatin
  • 2 TBSP water
  • pinch of salt
  • chocolate curls (optional)

Directions –

For the Crust – 

In a medium-sized bowl or a food processor, add the Oreo cookies and blend until the texture of coarse meal or crumbs. Add the melted butter and blend until well combine. Place the ground crumb mixture into a 9- or 10-inch deep-dish pie pan and press onto the bottom and up the sides evenly. Try to make the crust about 1/8 inch (1/3 cm) evenly all around. Refrigerate the crust for at least an hour before you add the filling of your choice.

For the Filling – 

1)Place the chopped chocolate, butter, and vanilla extract in a 2-quart mixing bowl; set aside.

2) In a medium saucepan away from heat, whisk together the sugar, cornstarch, cocoa, espresso powder, and salt. Whisk in 1/4 cup of cold heavy cream until the mixture is smooth, with no lumps. Repeat with another 1/4 cup of the cream. Whisk in the egg yolks.

3) Place the saucepan over medium heat, and gradually whisk in the remaining cream and milk.

4) Bring to a boil, whisking constantly as the mixture thickens; boil for 1 minute.

5) Remove the pan from the heat and pour the mixture over the reserved chocolate and butter.

6) Whisk until the chocolate is melted and the mixture is smooth.

7) Pass the filling through a strainer into a bowl to remove any lumps.

8. Place plastic wrap or buttered parchment paper on the surface to prevent a skin from forming, and chill thoroughly.

9. Pour the chilled pudding into the chilled Oreo crust and top with whipped cream and chocolate curls.

For the topping – In bowl sprinkle gelatin over cold water. Scald 2 tablespoons of whipping cream and pour over gelatin. Stir until dissolved. Refrigerate about 15 minutes. Then whisk until smooth. Mix remaining cream, sugar and salt. Mix in smooth gelatin mixture stopping to scrape bowl twice.

Stromboli

WP_20140114_18_33_54_Pro

If you couldn’t tell, this family loves pizza and “pizza-ish” recipes! This is a simple and satisfying meal and makes for easy school lunches 🙂 Thanks for reading, enjoy!

Stromboli – adapted from The Spiffy Cookie

**I made two with this recipe**

  • 2 lbs pizza dough, divided (I used this one)
  • 1/2 cup pizza sauce, plus more for dipping
  • 2 cups grated cheeses (*I used mozzarella, Monterey jack, Romano and Parmesan*)
  • 5 ounces pepperoni (*I used Applegate Farms*)
  • 4 ounces of deli ham (*I used Applegate Farms*)
  • Olive oil, garlic powder, pizza seasonings and salt for topping, optional

Directions:

  1. Preheat oven to 400 degrees. Line large rimmed cookie sheet with parchment paper or spray lightly with non-stick cooking spray.
  2. Spread pizza dough out on baking sheet to be approximately 10×16. Spread pizza sauce over 2/3′s of the dough lengthwise, leaving a 3×16 rectangle of plain dough along one of the edges. Top sauce with half the grated cheese, pepperoni and ham.
  3. Roll up like a jelly roll lengthwise starting along the long edge of dough topped with all the fillings and ending with the plain strip of dough on the bottom of the roll. Repeat for the second dough ball.
  4. Brush the entire Stromboli with oil and sprinkle the top with seasoning if desired, and gently cut slats in the top of the dough every 1-2 inches. Bake 20-25 minutes or until bubbly and golden. Remove from oven, cool 5 minutes and slice into pieces. Serve with more pizza sauce.

Hungry for more? 

veggiepizza

Portobello and Kale Pesto Pizza

1

Pizza Bites

Pancake Mini-Muffins

WP_20140305_07_12_46_abc

Planning ahead saves time, right? I love when I find recipes that make life a little easier, especially school mornings! There are far more mornings than I care to admit when I have had to force my eyes to open; and the last thing I want to do is think about breakfast. These are so quick, easy and the kids love them 🙂

The best thing about these is that I don’t have to stand over a hot stove and flip each one! I made some minor changes by replacing all the AP flour with half whole wheat pastry flour, and buttermilk because I had plenty on hand. When ever I use this muffin tin, the baked goods love to stick; so instead of adding the chocolate chips to the batter we added a few to the tops. Once they finished baking/cooling completely, I bagged them and placed them in the freezer. In the morning, we microwave them for about 3 minutes at 50% power so they don’t dry out or become rocket hot. Once they’re all gone, I will make another batch because I’m sure they’ll fight over the last 6… Thanks for reading, enjoy! 🙂

WP_20140303_18_46_57_Pro

Pancake Mini-Muffins – adapted from The Pioneer Woman

  • 1 1/2 cups AP flour
  • 1 1/2 cups whole wheat pastry flour
  • 1 Tablespoon Baking Powder
  • 3 Tablespoons Sugar
  • 3/4 teaspoons Salt
  • 2 1/2 cups buttermilk
  • 2 whole Eggs
  • 1 Tablespoon Vanilla Extract
  • 4 Tablespoons Butter, Melted
  • Chocolate chips, optional
  • coconut oil to prep the tin (or whatever you prefer)

Preparation Instructions

Preheat oven to 400 degrees

Sift together flour, baking powder, sugar, and salt. Set aside.

In a large bowl, combine buttermilk, eggs and vanilla

Combine dry ingredients and wet ingredients, then stir in melted butter. If batter is too thick, stir in a little milk.

Spray a mini-muffin pan generously with coconut oil. Fill cups 2/3 full. If using chocolate chips, drop 2 to 3 onto each cup.

Bake for 8 to 10 minutes, or until golden brown on top. Let sit in the pan for 1 to 2 minutes, then turn them out of the pan. (Use a small knife if any are stubborn.)

Serve warm with warm syrup!

Tres Leches Rice Pudding

WP_20140304_18_56_56_Pro

Rice pudding is the nostalgic comfort food of my childhood. My dear Gram would often make a big pot of arroz con leche for breakfast, which I happily ate then and will continue to enjoy – even if the pot is all for me. Sadly, (and strangely) my family doesn’t have an appreciation for this kind of treat. Last night, I did get my girl to try two small tastes of this (she’s the picky one), and she said it was pretty good. I will make a believer out of her yet! 😉

Most recipes call for chilling the pudding for a couple of hours in the fridge – forget that! Why wait when this stuff begs to be eaten hot with just a pinch of cinnamon on top? This pudding was luxurious and creamy and not too sweet. Near perfect! Gram’s will always be the standard, but I think she’d approve of this 😉 Thanks for reading, enjoy!

Tres Leches Rice Pudding – adapted from Smitten Kitchen Cookbook

  • 1 cup (180 grams) long- grain white rice
  • 3/4 teaspoon table salt
  • 1 large egg
  • One 12- ounce can (11/2 cups or 355 ml) evaporated milk
  • One 13.5- ounce can (1 cups or 415 ml) unsweetened coconut
  • One 14- ounce can (11/4 cups or 390 grams) sweetened
  • 1 teaspoon vanilla extract
  • Ground cinnamon, to finish

Cook the rice: Put the rice, 2 cups of water, and the salt in a medium saucepan with a tight- fitting lid. Bring to a boil- you should hear the pot going all a flutter under the lid and puffing steam out the seam. Reduce to a low simmer, and let the rice cook for 15 minutes, until the water is absorbed. Remove the rice pot from the heat.

Once the rice is cooked, whisk the egg in a medium bowl, and then whisk in the evaporated milk. Stir the coconut and sweetened condensed milks into the rice, then add the egg mixture. Return the saucepan to heat and cook the mixture over medium- low heat until it looks mostly, or about 90 percent, absorbed (the pudding will thicken a lot as it cools), about 20 to 25 minutes. Stir in the vanilla, then divide the pudding among serving dishes. Chill your puddings for at least an hour if desired – I love mine warm with a sprinkling of cinnamon 🙂

Hungry for More??

arroz2

Coconut Milk and Vanilla Bean Rice Pudding

110

Arroz con Leche

One Big Pizza

WP_20140207_17_50_58_Pro

As I rolled out this batch of dough, I realized it would not fit on my stone. Rather than split it in two, I pushed it into the perfect sized rectangle for my half sheet pan. I’m glad I did, and this pizza was so stinkin’ good. I used this Italian chicken sausage that I crisped up in a large skillet, while the crust was par-baking in the oven. I used at least four types of Italian cheeses on this and flavored the crust with olive oil and other seasonings. My family loved this pizza and my son requested it for his birthday dinner 🙂 Thanks for reading, enjoy!

One Big Pizza – 

For topping the crust:

  • olive oil
  • garlic powder
  • kosher salt
  • dried oregano

*Optional Equipment – pizza stone and a silicone pastry brush

Directions –

Preheat oven to 475. Place a pizza stone on a rack placed on the lowest level of the oven.

Roll out dough onto parchment lined sheet pan, drizzle with olive oil and bake for 5 minutes.

Top the crust with pizza sauce and bake for another 5 minutes.

Spread about 1/2 the shredded cheese on the top, and bake for another 5-7 minutes.

Using a pastry brush, paint the crust with olive oil, sprinkle with garlic powder and kosher salt, sprinkle with oregano all to taste. Top with browned sausage and the remaining cheese, bake until golden brown and bubbly – about another 7 minutes. Take a peek at the bottom of the crust to make sure it’s golden brown – if not, continue baking until it’s done.

Simple Rice Pilaf

WP_20140115_18_25_07_Pro

Quick Post: Years ago, before I was a food snob, I bough boxed rice and pasta sides without thinking twice. This is a great substitute for a basic Rice-a-Roni side and it has way more flavor, not to mention ingredients that I can pronounce 😉 Thanks for reading, enjoy!

Simple Rice Pilaf – adapted from Simply Scratch

  • 2 TBSP unsalted butter
  • 1 TBSP olive oil
  • 1 cup Orzo pasta
  • 1 cup long grain white rice
  • 2.5 cups chicken stock
  • salt and pepper to taste

Directions – 

Melt butter in a 2 quart saucepan until hot and bubbly. Add the orzo and toast until it becomes lightly golden. Add the cup of rice, stir. Pour in the chicken stock and bring back to a boil. Reduce heat to low, cover and simmer for 18-20 minutes or until the liquid is absorbed. Remove from heat and let it sit for 5 minutes. Fluff with a fork and serve.

Cookie Dough Brownie Bombs

WP_20140210_20_50_04_Pro

These are a perfect special occasion (ahem, Valentine’s Day), treat that any chocolate lover would appreciate. My husband was pretty excited about these because the original is one of his favorites, so how bad could the addition of brownie be? The brownie bakes up thin, chewy and fudgy and it sticks really well to the frozen dough ball. As I rolled the brownies around the cookie dough I decided that these win the prize for messiest dessert ever – my hands were coated in sticky brownie, but in the end these were worth the effort. Thanks for reading, enjoy!

Cookie Dough Brownie Bombs – adapted from Handle the Heat

For the cookie dough:
1 stick unsalted butter, at room temperature
1/2 cup lightly packed light brown sugar
2 tablespoons granulated sugar
1 – 3 tablespoon milk (any kind)
1/2 teaspoon vanilla extract
1 1/2 cups all-purpose flour
1/8 teaspoon fine salt
3/4 cup miniature chocolate chips

For the brownies:
1 stick unsalted butter, melted
1 cup granulated sugar
1 cup unsweetened natural cocoa powder
1/4 teaspoon salt
1/2 teaspoon vanilla
2 large eggs
1/2 cup all-purpose flour

For the chocolate coating:
16 ounces semisweet chocolate, chopped
4 teaspoons coconut oil (or more if needed )

Directions –

For the brownies:

WP_20140210_18_31_36_Pro

Meanwhile, make the brownies. Preheat the oven to 325°F. Line an 8×8-inch pan with foil, leaving an overhang.

In a large bowl combine the butter, sugar, cocoa powder, and salt. Stir until well combined, mixture will be thick. Let cool if the butter is still hot. Stir in the vanilla and then the eggs, one at a time, stirring very well after each addition. Stir until the batter is very well blended. Add the flour and stir again until very well blended. Spread into prepared pan.

Bake for 20 minutes, or until cooked through but still very moist and fudgy. Let cool.

For the cookie dough:

WP_20140210_17_09_03_Pro

In the bowl of an electric mixer beat the butter, brown sugar, and granulated sugar on medium-high speed until very well combined and fluffy. Add in the milk and vanilla. On low speed gradually add the flour and salt. Stir in the miniature chocolate chips.

Scoop the dough into 2 teaspoon-sized balls and place on a parchment lined baking sheet. Freeze for an hour, or until firm.

To assemble:

Cut the brownies into 1-inch squares. Flatten a square with the palm of your hand. Place a cookie dough ball into the middle of the flattened brownie and wrap the brownie around the cookie dough ball. Don’t worry if it’s not perfect, just try to get as much of a round shape as possible, rolling the ball between your palms. Repeat with the remaining brownie and cookie pieces. Freeze the balls for 30 minutes.

For the chocolate coating:

WP_20140210_20_09_43_Pro

Combine the chopped chocolate and coconut oil in a microwave-safe bowl and microwave on high for 1 minute. Stir, and continue heating in 30-second bursts, stirring between bursts, until the chocolate is melted.

Dip each brownie ball into the chocolate to coat completely. Allow the excess to drip off then return to the baking sheet. Refrigerate for at least 10 minutes, or until set. Store in an airtight container in the fridge.

Chicken and Potato Soup

WP_20140120_18_12_26_Pro

Quick Post: Florida is experiencing 80 degree temps lately with ridiculously high humidity – but I know you Northerners could still use some warming soups. This is perfectly comforting, rich and creamy; and I wish that it was cooler here so I have a good excuse to make some. Thanks for reading, enjoy!

Chicken and Potato Soup – adapted from Damn Delicious

  • 1/4 cup unsalted butter
  • 1 onion, diced
  • 3 carrots, peeled and diced
  • 2 stalks celery, diced
  • 1 teaspoon dried thyme, (*fresh if you have it*)
  • 1/4 cup all-purpose flour
  • 3 cups chicken broth (*I used homemade chicken stock*)
  • 2 cups milk
  • 2 russet potatoes, peeled and cubed
  • 2 cups diced cooked chicken breast
  • 1 1/2 cups shredded sharp cheddar cheese
  • Kosher salt and freshly ground black pepper, to taste
  • 2 tablespoons chopped fresh parsley leaves

Directions –

  • Melt butter in a large stockpot or Dutch oven over medium heat. Add onion, carrots and celery. Cook, stirring occasionally, until tender, about 3-4 minutes. Stir in thyme until fragrant, about 1 minute.
  • Whisk in flour until lightly browned, about 1 minute. Gradually whisk in chicken broth and milk, and cook, whisking constantly, until slightly thickened, about 1-2 minutes. Stir in potatoes.
  • Bring to a boil; reduce heat and simmer until potatoes are tender, about 12-15 minutes. Stir in chicken and cheese, a handful at a time, until smooth, about 1-2 minutes; season with salt and pepper, to taste. If the chowder is too thick, add more milk as needed.
  • Serve immediately