Caesar Dressing

caesarsalad1

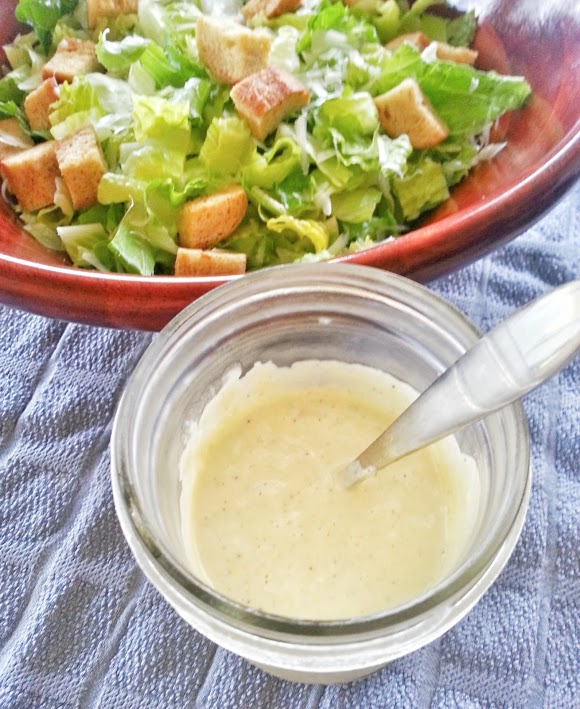
Whenever we go out to restaurants, he always orders a Caesar salad…always! I have only tasted a bite or two during my lifetime and I never understood the hype. I knew that one day I would have to make my own dressing, and I was sure that it would make all the difference. Homemade beats bottled any day, right? Well, I was pleasantly surprised with the savory, bold and tangy flavor of this dressing. I’m used to the oil/vinegar based dressings and I rarely make creamy ones.

First I made the homemade mayonnaise which is so easy to make and you don’t even need a stick blender. I whisked it by hand – not the quickest way of course, but easy. I mixed most of the Caesar ingredients in a small bowl before pouring into the mayo bowl to make sure that it wouldn’t separate. My husband liked the flavor and he told me it’s right up there with his favorite Caesar dressing – not too bad for a first time! Also, make your own croutons! 😉 They only take about 40 minutes in the oven and store bought can’t beat the flavor of homemade. Thanks for reading, enjoy! 🙂

Homemade Mayonnaise – adapted from Epicurious 

  • 1 large egg yolk*
  • 1 1/2 teaspoons fresh lemon juice
  • 1 teaspoon white wine vinegar
  • 1/4 teaspoon Dijon mustard
  • 1/2 teaspoon salt plus more to taste
  • 3/4 cup canola oil, divided (*I used 1/2 cup grapeseed oil and 1/4 cup olive oil*)

Directions –

Combine egg yolk, lemon juice, vinegar, mustard, and 1/2 teaspoon salt in medium bowl. Whisk until blended and bright yellow, about 30 seconds.

Using 1/4 teaspoon measure and whisking constantly, add 1/4 cup oil to yolk mixture, a few drops at a time, about 4 minutes. Gradually add remaining 1/2 cup oil in very slow thin stream, whisking constantly, until mayonnaise is thick, about 8 minutes (mayonnaise will be lighter in color). Cover and chill. do ahead Can be made up to 2 days ahead. Keep chilled.

caesarsalad2

Homemade Caesar Dressing – adapted from Once Upon a Chef

  • 1 clove garlic, minced
  • 1 teaspoon anchovy paste (found near the tuna fish in the supermarket)
  • 2 tablespoons lemon juice
  • 1 teaspoon Dijon mustard
  • 1 teaspoon Worcestershire sauce
  • 3/4 cup homemade mayonnaise
  • 1/2 cup freshly grated Parmesan cheese
  • 1/4 teaspoon salt
  • 1/4 teaspoon freshly ground black pepper
 Directions –
In a medium bowl, whisk together the garlic, anchovy paste, lemon juice, Dijon mustard and Worcestershire sauce. Add the mayonnaise, cheese, salt and pepper and whisk until well combined. Taste and adjust to your liking.
Advertisement

And now for something completely different…

In an effort to rid my home of chemicals, I made these. All the ingredients were easy to find, some of them are probably already in your home. The essential oil and the Dr. Bronner’s Castile soap are kind of spendy if you’re cheap like me 😉 Thankfully these two ingredients are used sparingly and it seems that a little goes a long way. I actually enjoyed cleaning with these! They smell great, rinse off easily, aren’t harsh, and best of all – they actually work! Speaking of the smell – you can buy a different castile soap and essential oil to create your favorite scent combination. I love lavender and the tea tree oil soap combo, but next time I may buy peppermint soap to go with the lavender. I also like that the kids can help me clean, and I don’t have to worry about them breathing in fumes, getting this on their clothes or on their skin. If you’re interested in learning more about these recipes, go here. The post is really informative! Thanks for reading!

Homemade Fudge Pops

Quick Post: The kids couldn’t wait for these to freeze solid 🙂 They’re a little grainy, but the flavor is nice – not too sweet either. Thanks for reading, enjoy!

Homemade Fudge Pops – adapted from Brown Eyed Baker

  • Âź cup semisweet chocolate chips
  • 2/3 cups granulated sugar
  • 2 tablespoons cornstarch
  • 3 tablespoons natural unsweetened cocoa powder
  • 2½ cups whole milk
  • 1 teaspoon vanilla extract
  • 1 tablespoon unsalted butter

Directions:

1. Melt the chocolate chips in the microwave on 50% power in 30-second increments, stirring after each, until melted and smooth.

2. Combine the melted chocolate, sugar, cornstarch, cocoa powder, and milk in a medium saucepan over medium heat and cook, stirring frequently, until the mixture thickens, about 10 minutes. Remove from heat, add the vanilla and butter, and stir until well combined.

3. Let the mixture cool slightly (it should still be warm but not hot to the touch), and then pour into popsicle molds. Freeze for 30 minutes, and then insert sticks. Freeze completely before serving.

Vanilla Bean Coffee Creamer

Quick Post: It’s not too sweet,  perfectly creamy and it has the floral, fruity flavor of real vanilla bean. It’s classic and simple but also rich and indulgent. After adding quite a bit of this to my coffee, I add a little vanilla sugar for some extra sweetness. It makes about 3 cups of creamer and lasts up to two weeks in the fridge, so it’s good to share with your friends. I gave a jar to my neighbor because it was her birthday and she loved it. Who doesn’t appreciate food gifts? 😉 Now that teacher appreciation week is coming up, this would be a new favorite for them I’m sure! Thanks for reading, enjoy 🙂

Homemade Coffee Creamer – adapted from Piece of Cake

  • 1 14-ounce can sweetened condensed milk
  • 1 1/2 cups milk, half-and-half, or heavy cream
  • 1 whole vanilla bean, split lengthwise
  • Pinch of salt

In a small saucepan, combine all the ingredients. Set the pot over medium heat and slowly heat the mixture until it is hot and steaming, but not simmering. Cover the pot and let steep for 15 minutes. Strain into a jar or another container with a tight-fitting lid. Store in the refrigerator for up to 2 weeks.

Rainbow Cupcakes

I have seen this recipe all over the place! It’s so fun and easy, especially if you’re using a mix. Well, I did use a mix, but a homemade one, but it’s worth making for the piece of mind it brings knowing what is in it. In order to make sure I had an equal amount of each color for these, I weighed out the amount in cups (8 ounces) and used my smallest disher to make sure I put roughly the same amount of each color batter in the cups. These were a lot of fun to make, and the kids enjoyed helping add the color to the batter. I liked the flavor of these and the almond extract tastes kind of like cherry to me for some reason. Next time I will try the same recipe, but with cake flour because I think all the stirring made the cupcakes more dense than I expected. I’m sure if I left the batter white, that wouldn’t have been a problem.
The buttercream was so fluffy, light and not too sweet. I found a recipe that I knew I needed to cut in half and it worked out perfectly. I’m not a “frosting” lover, but this buttercream was spoon licking good!

Overall, I’m really pleased with how these turned out. It was my first white cake I have ever made. I had never used almond extract before either, but I liked the flavor that it gave to these cupcakes. Thanks for reading, enjoy!

Rainbow Cupcakes – 

  • One batch of white cake mix
  • 3/4 cup of unsalted butter, at room temp
  • 5 egg whites (or 1 cup of Egg Beaters pure egg whites)
  • 1 cup milk
  • 2 tsp. vanilla extract
  • 1/2 tsp almond extract
  • *equipment – five cups, five spoons, gel food coloring, #60 disher, and muffin papers
Directions –
1. Cream butter. Add egg whites, one at a time until mixed, (mine never became a cohesive batter, but don’t worry). Add milk, vanilla and almond extract then slowly add the dry mixture in batches. Be sure to scrape down the sides of your bowl and do not overmix.
2. Divide the batter into five cups, then add a one color into each cup, (*I used pink, yellow, green, blue and purple gel colors. Liquid tends to thin out batters or icing, and you’ll use less of the gel vs. liquid) until your desired shade is achieved.
3. Prep your muffin tin by adding white muffin papers (you can see the colors through the white) Using a small disher (size 60) or a tablespoon measure, add your colored batter to each muffin cup in your desired pattern.
4. Bake in a preheated 350 degree oven for 17-20 minutes or until done. Cool in the pan for about five minutes, then remove the cupcakes and place them on a wire rack to cool.

Vanilla Buttercream – adapted from Apron Days

  • 4 cups confectioners sugar, sifted
  • 2 cups butter, room temp
  • 2 teaspoons vanilla extract
  • 4 tablespoons whipping cream
  • a good pinch of salt
 Directions –
1. Cream butter and sugar on low-speed until combined, then beat on medium speed for several minutes (the time here is crucial in order to obtain a lighter frosting, so don’t skimp.)
2. Add vanilla, cream, and salt and beat on medium speed for another couple of minutes, adding more cream if you want an even lighter consistency (here’s where you would add food coloring, too, if you’d like).

White Cake Mix

My daughter’s birthday is this week! Why can’t she stop aging? 😉 I know that is impossible, but looking back at pictures makes me sad – she was so little! Now she’s a giant-almost-6-year-old. Anyway, I decided I would bring her class some cupcakes, and what’s more fun than those rainbow cupcakes that are all over Pinterest?? At first I thought I would take the easy way out and use a white cake box mix, but after reading the ingredient list I couldn’t justify it! Hydrogenated this and high fructose that…garbage! Ignorance is bliss sometimes, but now that I know better I have to choose better – even if it is for a group of kindergarteners that could care less! 😉 Of course it’s easier to throw a box cake together, but this is loads cheaper – easily pennies on the dollar for these pantry staples. I made my own superfine sugar – if you have a food processor you should if you don’t have it on hand. I put a piece of plastic wrap over the work bowl so the sugar dust didn’t fly all over the place. Once the sugar was finished and measured, I added all the other ingredients to the bowl and pulsed it a few times. That was it – couldn’t be easier! The next post will be on the super fun and festive rainbow cupcakes!! Thanks for reading, enjoy!
White Cake Mix – adapted from I Am Baker
  • 2 3/4 cup flour (343 grams)
  • 1 3/4 cups SUPER fine sugar (you can buy this or make it)
  • 2 teaspoon baking powder
  • 3/4 tsp salt

Directions – 

Sift all the ingredients together and store in an air tight container.

To Use: 

  • 3/4 cup unsalted butter
  • 5 egg whites ( I used Egg Beaters, pure egg whites, about 1 cup)
  • 1 cup milk
  • 2 tsp. vanilla extract
  • 1/2 tsp. almond extract
Directions –

1. Cream butter and add egg whites one at a time until mixed. (*The batter separated terribly and never emulsified, but it still worked out once the dry ingredients were added*). Add milk, vanilla and almond extract. Add the dry ingredients in about three additions, making sure to scrape down in between and being careful not to overmix.

2. Fills two 8-inch rounds, or 16-18 cupcakes. Bake 325-350 degrees for 20-30 minutes; and cupcakes 17-22 minutes or until done.

Honey Chipotle Barbeque Sauce

I decided to make this because I thought my husband would appreciate a spicy barbecue sauce to go along with these chicken strips. Woo – this was spicy! Not so much that it cleared our sinuses, but it has a kick to it. The future chili head, Little Boy didn’t break a sweat. Sometimes I wonder if he’s covering it up, but he didn’t even flinch! I guess it has something to do with his love of all things spicy for the past 5 years of his 8! 😉 Next time I would cut down on the amount of chipotles, maybe two instead of the three large ones I used. I love that I have such a wide variety of spices in my cupboard 🙂 Ancho and smoked paprika are hard to find so I end up purchasing them online. I love online shopping because it’s always a treat to get a package in the mail 😉 Thanks for reading, enjoy!

Honey Chipotle Barbecue Sauce – adapted from Crumb

  • 1 cup finely diced onion
  • 2 cloves garlic, minced
  • 2 tbsp olive oil
  • 3/4 cup ketchup
  • 1/4 cup brown sugar
  • 1/4 cup honey
  • 2 tbsp apple cider vinegar
  • 1 1/2 tbsp unsulfured molasses
  • 3-4 chipotle peppers in adobo sauce, chopped
  • 1 1/2 tsp Worcestershire sauce
  • 2 tsp ancho chile powder
  • 1 tsp smoked paprika
  • 1 tsp cayenne pepper
  • 1/2 tsp dry mustard powder
  • Salt and pepper to taste
Directions –
1. In a small saucepan set over medium-high heat, saute the onions and garlic in olive oil for 8-10 minutes, or until onions are very soft and lightly golden. Stir in the remaining ingredients. Bring the mixture to a simmer, then reduce heat to low and cook, stirring occasionally, for 20 minutes to blend the flavours.
2. Using an immersion blender or food processor, puree the mixture until very smooth. If the sauce is too thick or chunky, add a little water (a tablespoon or two at a time), until the desired consistency has been reached.

Three Ingredient Crock Pot Dinner…(and it’s good, too!)

Quick Post: Easiest.Dinner.Ever. Crock Pot meals are so convenient and this one is no exception. If you want to use the store bought ingredients, it’s even easier. I had some carrots that I needed to use up so I roasted them in a 400 degree oven for 20 minutes seasoned with kosher salt, pepper, and some olive oil. I didn’t roast any garlic for the potatoes described on the blog, so I just mashed my potatoes with Parmesan, some butter, half and half, milk, salt and pepper. They’re really basic, but that’s okay because the pork makes its own gravy – yum! Thank for reading, enjoy!

Ranch House Crock Pot Pork Chops – adapted from Picky Palate

Directions –

Place all ingredients in a crock pot – cook on high for 4 hours or low for 6 hours.

Homemade Condensed Cream of Chicken Soup…(yes, I am a bit of a food snob)

Why make this when you can just buy it, you ask? I’ll tell you why – after reading the ingredient list does it sound appetizing? Nope – so why not give your family the very best and make it at home? It’s quick, easy and cheap!

I’m using this for a crock pot meal that only has three ingredients and one of them is pork chops. I thought why not up the flavor and make sure I’m not giving my family something with way too much salt and chemicals. That thought inspired me to make the other two ingredients at home. This ranch mix smells fresh and this condensed soup tastes great and I can’t wait to try the end result. I used fresh onion and garlic for this which requires a little more cooking, but it will equal lots of fresh flavor. Thanks for reading, enjoy!

Yield: 3 cups (about 2 cans)

Ingredients – adapted from Tammy’s Recipes
  • 1 1/2 cups chicken broth*
  • 1/2 teaspoon poultry seasoning
  • 1/4 teaspoon onion powder**
  • 1/4 teaspoon garlic powder***
  • 1/8 teaspoon black pepper
  • 1/4 teaspoon salt (or less; taste to test)
  • 1/4 teaspoon parsley
  • dash of paprika
  • 1 1/2 cups milk
  • 3/4 cup flour
Instructions:

1. In medium-sized saucepan, boil chicken broth, 1/2 cup of the milk, and the seasonings for a minute or two (longer if using fresh onions or garlic).

2. In a bowl, whisk together the remaining 1 cup of milk and flour. Add to boiling mixture and continue whisking briskly until mixture boils and thickens.

Additional Notes:

*I use the broth from my oven-roasted chicken. Refrigerate broth and then take fat off the top. If you’re using chicken bouillon + water for your broth, you may want to add a little extra seasonings, such as lemon pepper, extra garlic, or seasoned salt, since my broth normally has bits of those in it. You can also add bits of chicken, but if you have good rich chicken broth, you probably won’t need any chicken in it.

**Or, diced onions (boil with broth for a few minutes)

***Or, fresh minced garlic (boil with broth for a few minutes)