Homemade Crescent Rolls

rolls4

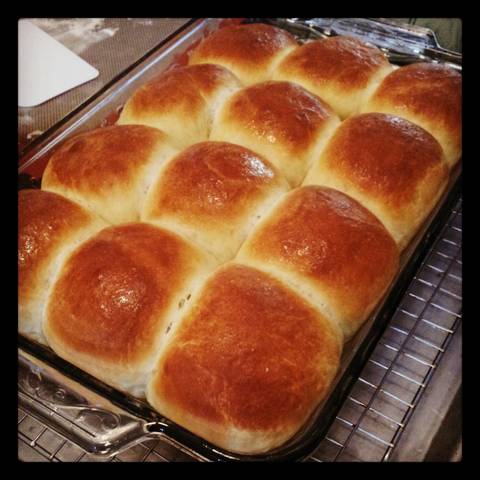
Pictured with Broccoli Cheese Soup II – I’ll be sure to share this with you soon! It’s a new favorite 🙂

These rolls are soft, buttery and so much better than canned! I haven’t had a canned crescent roll in ages, but these more than make up for the wait! I had to make some modifications to the recipe (posted below), but if you live in a drier climate,  you might want to stick with the original amounts of water and flour. When I started making these, I knew that this dough was going to be much too loose for my tastes – loose dough is sticky, aka a pain in my ‘tox to work with. First, I reduced the water by 1/4 cup, but had to add about 3/4 cup more flour than called for to make this a workable dough. After kneading, my dough was tacky, not sticky, soft and smooth. In my experience with bread making, I have learned that recipes are a guideline more than a hard and fast rule to be followed. There are so many variables to consider, so don’t be afraid to make changes when they’re needed. This recipe makes a large batch so it’s perfect for big holiday meals or for freezing. To warm them up again, bake at 325 degrees for about  for about 5 minutes. Thanks for reading, enjoy!

Best Dinner Rolls – adapted from Nomemade

  • 1 3/4 c warm water
  • 2/3 c nonfat dry milk powder
  • 2 Tbsp dry yeast
  • 1/4 c sugar
  • 2 tsp salt
  • 1/2 c butter
  • 1 egg
  • 5 1/2 – 6 cups all-purpose flour

Directions –

Mix all ingredients in a bowl until combined, holding back about 1/4 of flour.

Knead 5-7 minutes. Add more flour 1 TBSP at a time if needed. Dough should be soft, smooth and not too sticky

rolls

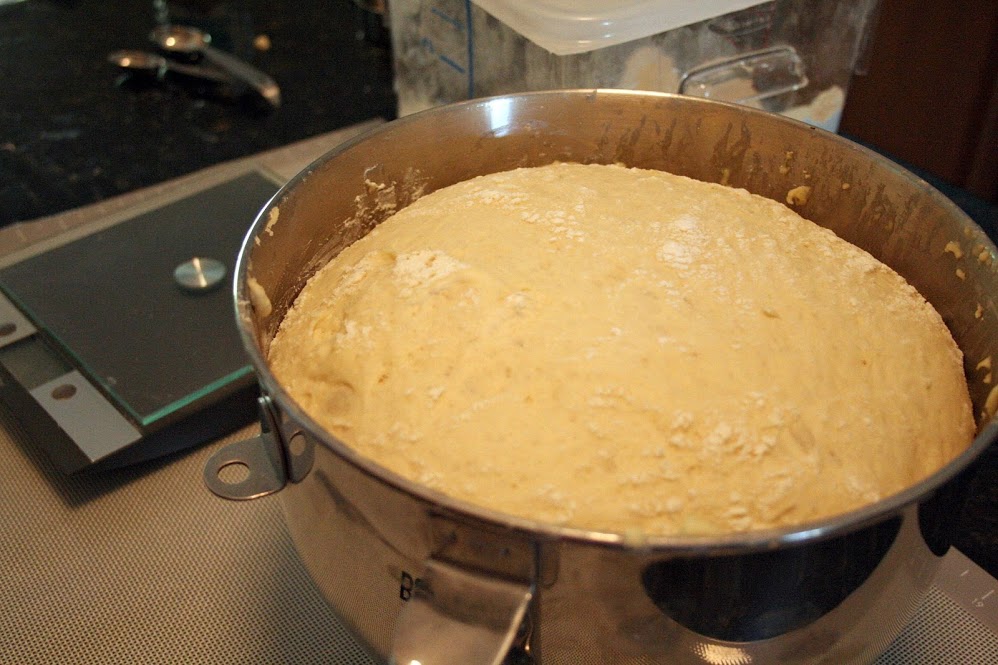
Cover and let rise for an hour or until doubled in volume.

rolls1

Punch the dough down, weigh and divide in half. Roll the first half of dough on a lightly floured surface into a large circle (mine was about 15 inches in diameter). Using a pizza cutter, cut the dough into 16 slices. Begin to roll the slice of dough in, starting from the wide and tuck the small point underneath.

rolls2

Place the rolls on a parchment lined baking sheet. Lightly spray the tops with oil and cover with plastic wrap to rise until doubled. Repeat these steps on the second half. Preheat your oven to 375.

rolls3

Bake the rolls for 15-20 minutes or until lightly golden brown. Brush tops with melted butter.

Tried and True Family Favorites

I have nothing new to share…sorry! But these are some of the meals we enjoyed during these past couple of weeks. All the pictures have links to previous posts, thanks for stopping by!

IMG_20130220_173552 (1)

It was my son’s 10th birthday over a week ago and he requested this cake. It really is perfect 🙂

IMG_20130228_184311 (1)

Fish tacos with homemade tortillas and pico de gallo. This is my second time making them and the DH can’t get enough.

IMG_20130227_174936 (1)

The kids love these pretzel dogs almost as much as I do! 😉

IMG_20130226_180449 (1)

Buffalo chicken sandwiches! I have been making these for years and they’re a big hit every time!

IMG_20130303_095914 (1)

Sky high buttermilk biscuits and sausage gravy are my husband’s favorite for breakfast.

Zuppa Toscana and Breadsticks

zuppatoscana

Is there anything more comforting than a rich soup and fresh baked bread? This is seriously good, and even my picky daughter loved this. That’s always a win in my book when I don’t have to tell/nag her to eat more of dinner. Thanks for reading, enjoy!

Zuppa Toscana – adapted from Annie’s Eats

  • 1 pound Italian sausage (I used chicken sausage)
  • 1 onion, chopped
  • 3-4 cloves garlic, minced
  • 1/2 cup white wine for deglazing
  • 1/2 tsp. red pepper flakes
  • 2 russet potatoes, peeled and cut into 1/2-inch chunks
  • 2 cups fresh kale, chopped
  • 4 cups chicken stock
  • 1.5 cups water
  • 1 cup heavy cream
  • salt and pepper

Directions –

Place a large stock pot on the stove over medium heat. Crumble the sausage into the pan and cook until well browned. Remove the cooked sausage from the pot with a slotted spoon and transfer to a bowl; set aside. Add the chopped onion to the pan and saute until tender, about 5-7 minutes. Add the garlic and red pepper flakes to the pan and cook for a minute more, just until fragrant. Add the wine to the pot and stir, scraping the bottom of the pan to loosen any browned bits. Add the potatoes, kale, chicken stock and water to the pot. Increase the heat to med-high, bring to boil and the reduce to a simmer. Cover and let simmer for about 20 minutes, or until the potatoes are fork-tender and cooked through. Stir in heavy cream and season with salt and pepper to taste. Serve immediately.

breadstick

Almost Famous Bread Sticks – adapted from Food Network

  • 1 package yeast
  • 4 1/4 cups AP flour, plus more for dusting
  • 2 tablespoons unsalted butter,softened
  • 2 tablespoons raw sugar
  • 1 tablespoon fine salt

For the Topping:

  • 4 tablespoons unsalted butter, melted
  • 1/2 teaspoon kosher salt
  • 1/8 to 1/4 teaspoon true garlic powder
  • Pinch of dried oregano

Directions –

Make the dough: Place 1/4 cup warm water in the bowl of a mixer; sprinkle in the yeast and set aside until foamy, about 5 minutes. Add the flour, butter, sugar, fine salt and 1 1/4 cups plus 2 tablespoons warm water; mix with the paddle attachment until a slightly sticky dough forms, 5 minutes.

Knead the dough by hand on a floured surface until very smooth and soft, 3 minutes. Roll into a 2-foot-long log; cut into 16 1 1/2-inch-long pieces. Knead each piece slightly and shape into a 7-inch-long breadstick; arrange 2 inches apart on a parchment-lined baking sheet. Cover with a cloth; let rise in a warm spot until almost doubled, about 45 minutes.

Preheat the oven to 400 degrees. Make the topping: Brush the breadsticks with 1 1/2 tablespoons of the butter and sprinkle with 1/4 teaspoon kosher salt. Bake until lightly golden, about 15 minutes. Meanwhile, combine the remaining 1/4 teaspoon salt with the garlic powder and oregano. Brush the warm breadsticks with the remaining 1 1/2 tablespoons melted butter and sprinkle with the flavored salt.

Challah

I had a hankerin’ for some rich, fluffy French toast, but there is a shortage of bread in my house. I failed miserably (twice) trying to braid the dough, so I baked off two 8×4 loaves instead. The dough held up well to being manipulated more than I intended 😉 With its medium density, and tight crumb it soaks up custard like a sponge without falling apart; and the resulting French toast is creamy and not too sweet. Thanks for reading, enjoy!

Challah – adapted from Williams-Sonoma

  • 2 packages (5 tsp.) active dry yeast
  • 1 cup warm water (105° to 115°F)
  • 1/2 cup sugar (*I used vanilla sugar*)
  • 3 eggs, plus 1 egg, beaten, for glaze
  • 5 cups all-purpose flour (625 grams)
  • 2 tsp. salt
  • 8 Tbs. (1 stick) unsalted butter, at room
    temperature

Directions –

To make the dough with a stand mixer, in the 5-quart bowl of a mixer, dissolve the yeast in the warm water and let stand until foamy, about 5 minutes. Add the sugar, 3 eggs, 4 1/2 cups of the flour, the salt and butter. Place the bowl on the mixer, attach the dough hook and knead on low speed, working in the remaining flour as necessary to keep the dough from being too sticky, until the dough is smooth and elastic, 5 to 7 minutes. Do not be tempted to add too much flour. The dough should stay soft and will become less sticky with kneading. Remove the dough from the bowl.

Form the dough into a ball and transfer it to a lightly oiled bowl. Cover the bowl with a damp kitchen towel and let the dough rise in a warm, draft-free spot until it doubles in bulk, about 2 hours.

Line a half-sheet pan or rimless baking sheet with parchment paper. Punch down the dough. Using a plastic pastry scraper, scrape the dough out onto a clean work surface. To make a 4-strand braid, cut the dough into 4 equal pieces with a sharp knife or a bench scraper. Using your palms, and starting in the center and working outward, elongate 1 piece by rolling it gently against the work surface with even pressure until you have formed a rope as long as the prepared pan. Repeat with the remaining 3 pieces.

Line up the 4 strands in front of you horizontally. Cross the strand farthest from you across the other 3 strands so that it is nearest you. Cross the strand that is now next to it across the other 2 strands away from you. Position the outside strands so that they are away from the center ones, and position the center 2 strands perfectly horizontal. Bring the strand nearest you down between the 2 horizontal strands. Bring the strand farthest from you up and across to the opposite side. Again, bring the strand farthest from you down between the 2 straight strands. Bring the strand nearest you up and across to the opposite side. Starting from the strand nearest you, repeat the braiding until you reach the ends of the ropes. Pinch them together at the top and at the bottom, and tuck the strands under at the ends.

Place the braided loaf on the prepared pan, cover with a dry kitchen towel, and let rise again in a warm, draft-free spot until the loaf doubles in size and is spongy to the touch, 45 to 60 minutes.

Position a rack in the lower third of an oven and preheat to 350°F.

Brush the braid gently with the beaten egg and sprinkle with the seeds. Bake the braid until it is nicely browned and sounds hollow when tapped on the bottom, 30 to 35 minutes. Transfer to a wire rack and let cool completely. Makes 1 large braided loaf.

Honey Yeast Rolls

rolls1

These were a perfect addition to our TG table! They are substantial enough to handle all the leftover ham and turkey sandwiches and tasty enough on their own. The dough is easy to work with and makes a dozen medium-sized rolls. Thanks for reading, enjoy!

rolls

Honey Yeast Rolls – adapted from Cooking with the Big Dogs
  • 2¼ teaspoons instant yeast
  • 1 cup water (105-115 degrees Fahrenheit)
  • ¼ cup honey
  • 3 tablespoons canola oil
  • 1¼ teaspoon salt
  • 1 egg, lightly beaten
  • 4 cups bread flour (508 grams)
  • 1 tablespoons butter, melted
  • 1 tablespoons honey
Directions –
1. In the bowl of an electric mixer fitter with the paddle attachment, stir together the yeast and warm water – let sit for three to five minutes. Add the honey, oil, salt and egg to the yeast mixture and mix well. Add three cups of flour and mix until the dough comes together in a sticky mass. Switch to the dough hook and with the mixer on low, incorporate the remaining 1 cup of flour.
2. Continue kneading on low-speed for 8-10 minutes, until the dough is smooth and elastic. Sometimes, depending on the time of year (during the winter, especially), the dough is a bit drier, and I add in water, a few tablespoons at a time, until the dough is smooth and elastic. The dough should feel soft (not sticky) and pliable when you are finished kneading it.
3. Transfer dough to a lightly oiled bowl, turn once to coat, and cover with plastic wrap or a clean kitchen towel. Let it rise in a warm, draft-free spot until it is doubled in bulk, about 2 hours.

honey4. Turn the dough out on a lightly floured work space and knead about 30 seconds. Cover and let the dough rest for another 10 minutes. Punch the dough down and divide it into 10-12 equal sized pieces. Shape each into a smooth ball and place into a greased 9×13 inch dish, spacing evenly. Cover and let rise in a warm, draft-free spot for 20-30 minutes.

5. Preheat oven to 400 degrees Fahrenheit. Mix together melted butter and honey and brush the mixture over top of the unbaked rolls. Bake for 15-20 minutes or until the tops are golden brown and the rolls are baked through. Let cool slightly before serving.

Croutons

These are so easy to make and dangerously tasty! “Yes, I would like some salad with my croutons” kind of good. I hogged them all tonight, but my husband told me I could have his share – that is real love in action, people! 😉 I need to make more of these ASAP, who knew that it was these croutons that my salads had been missing all along? Thanks for reading, enjoy!

Croutons – adapted from Annie’s Eats

  • 1 baguette or about 4 cups 1/2 – inch bread cubes
  • 1 1/2 TBSP olive oil
  • 1 1/2 TBSP melted butter
  • 1/4 tsp. garlic powder
  • 1/4 tsp. dried parsley
  • kosher salt and fresh cracked pepper

Directions – 

Preheat the oven to 300 degrees. Place the bread cubes in a medium mixing bowl. Stir in the melted butter and olive oil and toss to coat. Season to taste with garlic powder, dried parsley, salt and pepper. Toss once more until everything is evenly combined. Spread the croutons in a single layer on a rimmed baking sheet. Bake, stirring once every 10 minutes, until the croutons are light golden and crisp and no chewiness remains. They will bake about 40 – 50 minutes total but the time may vary depending on the size of cubes and type of bread. Remove to a cooling rack and let cool completely. Store in airtight container.

Buttertop Bread

I waited too long to blog about this one, so I don’t have much to tell about it 😉 Thanks for stopping by!

Buttertop Bread – adapted from King Arthur Flour

  • 3 cups King Arthur AP flour
  • 1 1/2 teaspoons salt
  • 1/3 cup dry potato flakes
  • 2 tablespoons sugar
  • 2 1/2 teaspoons instant yeast
  • 1 large egg
  • 2 tablespoons soft or melted butter
  • 3/4 cup to 7/8 cup lukewarm milk

Directions –

1) Mix and knead all of the dough ingredients together until you’ve made a smooth, though somewhat sticky dough. If you’re uncertain about the amount of milk to use, start with the lesser amount; you can always add more as you go along.

2) Place the dough in a lightly greased bowl. Cover, and allow the dough to rise for about 90 minutes; it should become quite puffy, though it may not double in bulk.

3) Gently deflate the dough, and shape it into a 9″ log. Place it in a lightly greased- 9×5 inch loaf pan.

4) Using a sharp knife, cut the loaf vertically down the middle from one end of the pan to the other, almost but not quite to the bottom of the pan.

5) Cover the loaf with lightly greased plastic wrap (or a shower cap), and allow it to rise until its top has crowned about 1″ over the rim of the pan, about 45 to 60 minutes. Towards the end of the rising time, preheat the oven to 350°F.

6) Bake the bread for 35 to 40 minutes, until it’s golden brown. Tent it lightly with aluminum foil after about 15 minutes of baking; because of its somewhat higher sugar content, this bread tends to over-brown if not covered.

7) Remove the bread from the oven, and brush it with melted butter. Cool completely before slicing.

8) Store bread, tightly wrapped, for several days at room temperature; freeze for longer storage.

Rustic Italian Bread

Lots of waiting with this recipe…hopefully it’s worth it!

It’s kind of my thing to go the extra mile when we have company – and 2012 seems to be the year of overnight guests! Nothing wrong with that, and it’s definitely a nice change from our normal routine. My SIL is coming into town and my plan is to make this bread to go along with spaghetti sauce that will cook while I am away, (slow cookers are a lifesaver in this kind of situation).

I loathe working with wet dough, but I have learned to use my rubber scraper to knead instead of both hands. In the end, the loaf was so big that it barely fit on my half sheet pan. Overall, this is obviously time consuming – but not too much work on your part. The finished product was flavorful (thanks to the overnight fermentation), with a crisp crust of an artisan type loaf. It served as a crunchy base for our all time favorite garlic bread and would be perfect for pressed sandwiches (I need to try one of those!) Thanks for reading, enjoy!

Rustic Italian Bread – adapted from  The America’s Test Kitchen Family Baking Book via Bless This Mess

For the sponge:

  • 2 cups bread flour
  • 1 cup warm water
  • 1/4 tsp instant yeast

For the dough:

  • 3-3 1/2 cups bread flour
  • 1 tsp instant yeast
  • 1 1/4 cups warm water
  • 2 tsp salt

Directions –

To make the sponge:
Mix the flour, water, and yeast together in a medium bowl until it resembles dough. Cover the top of the bowl with plastic wrap and let it sit at room temperature for 6 to 24 hours.

To make the dough:
Add 3 cups of the flour and yeast to the bowl of your stand mixer. With the dough hook attached, turn the mixer on to low and slowly add the water while the mixer is running. Let this mix for 2 minutes until the dough starts to come together. Lift the head of your stand mixer and place a piece of plastic wrap tightly over the bowl. Let the dough rest for 20 minutes.

After the 20 minute rest, remove the plastic wrap and add your sponge and salt. Mix on medium low speed for 8 minutes. After 4 minutes, if the dough is sticking to the side of the bowl add the last 1/2 cup of flour a little at a time until the dough stops sticking to the edges of the bowl but is still sticking to the bottom (you do want it to stick to the bottom). Turn the dough out onto a lightly floured surface and form into a smooth round ball.

Place the dough in a large, lightly oiled bowl, and cover tightly with plastic wrap. Let the dough rise in a warm spot until doubled, about an hour.

After the dough has doubled, remove the plastic wrap. Using a large spatula gently fold the dough into itself by pulling the edge of the dough into the middle. Do this a few times all around the edge of the bowl. Cover the bowl and let the dough rise for 30 minutes..

Repeat the previous step after the 30 minutes are up and then let it rise for a second 30 minutes.

After the second 30 minutes of rising, it’s time to form the loaf. Remove the dough from the bowl and gently press it into a 10-inch square without tearing it. Fold each corner into the middle and then gently roll the dough into a tornado shape. Place the dough, seam down, on a rimless baking sheet (or one that is upside-down) that is lined with parchment paper. Gently tuck the dough into place on the parchment. You should end up with a long thin loaf that is 16 inches long. Lightly mist the dough with cooking oil and then loosely cover with plastic wrap. Let the dough rise in a warm place until doubled, 1 to 1 1/2 hours.

While the dough is rising, prep the oven and your baking stone. Preheat the oven to 500 degrees. Let the baking stone heat for 30 minutes (but not longer than an hour).

When the dough has doubled, score the top with a razor blade, diagonally and 1/2 inch deep and spray lightly with water. CAREFULLY slide the loaf and the parchment onto the hot baking stone in the oven and bake for 10 minutes.

After 10 minutes reduce the oven temperature to 400 degrees. Bake for 30 to 35 more minutes until the crust is a deep golden brown. Let the loaf cool on a wire rack until it is room temperature before serving (about 2 hours cooling time).

Pretzel Dogs

These are seriously good! My sister made these for our 4th of July party this summer and they were a big hit with kids and adults alike. In an effort to redeem these nutritionally (every little bit helps), I used half white whole wheat and half all-purpose flour for these. Also, the hot dogs are uncured, grass-fed beef…yes, I am a food snob! 😉

This dough is so easy to work with and easily rolled, and shaped without that annoying snap-back of some other doughs I have worked with. Be careful when you add the baking soda to your pot of boiling water, as it will boil more aggressively. Use a slotted spoon to carefully add the dogs to the pot and, again watch for the crazy boiling water!  We’re going to experiment with these in the kid’s lunch for school tomorrow – here’s hoping for no soggy pretzel dogs! 😉

UPDATE: The kids took one each in their lunch yesterday, and they didn’t become soggy! It helps that I didn’t refrigerate the leftovers, and I ate some for lunch too and they still tasted great. I’m really happy with these, and no one could tell that they’re nearly half whole wheat! Thanks for reading, enjoy!

Pretzel Dogs – adapted from Fake Ginger

  • 1 tablespoon sugar
  • 1½ cups warm water
  • 2 teaspoons kosher salt
  • 1 package dry active yeast
  • 2 1/2 cups all-purpose flour (312 grams)
  • 2 cups white whole wheat flour (240 grams)
  • 2 tablespoons unsalted butter, melted and cooled
  • 10 cups water
  • â…” cup baking soda
  • 1 large egg yolk, beaten with 1 tablespoon water
  • Pretzel salt (or kosher salt), for topping
  • 8 hot dogs, cut in half (*I used these*)

Directions:
Combine the warm water, sugar and kosher salt in the bowl of a stand mixer and sprinkle the yeast on top. Let the mixture sit for about 5 minutes, until the yeast is foamy and begins to smell of yeast.
Add the flour and butter to the yeast mixture. Attach the dough hook to the stand mixer and, on medium-low speed, combine the mixture until the dough pulls away from the sides of the bowl and appears shiny, roughly 4 to 5 minutes.
Spray a large bowl with non-stick spray (or lightly grease with vegetable oil) and place dough in greased bowl. Cover with plastic wrap. Place bowl in a warm area and let dough rise for about 1 hour, or until doubled in size.
Preheat oven to 450 degrees. Line two cookie sheets with parchment paper. Spray parchment paper with non-stick spray. Set aside.
In a large pot, bring the 10 cups of water and the baking soda to a roiling boil.
Place the dough on a greased surface, and divide into 16 equal pieces. Roll each piece into a long rope, roughly 12 inches long. Carefully wrap each piece around a half hot dog. Pinch the ends together to seal the dough.
Boil the shaped pretzels and pretzel dogs, one at a time, in the baking soda water for 30 seconds each. Using a slotted spatula, remove each pretzel dog from the water and place it on a drying rack to allow any extra baking soda mixture to drip off.
Place the boiled pretzel dogs back on a parchment lined baking sheets.
Brush with beaten egg yolk and sprinkle with pretzel or kosher salt.
Bake until golden brown, roughly 14 to 15 minutes. Transfer pretzel dogs to a cooling rack for a few minutes before serving. Serve with a variety of mustards.

Flour Tortillas

Hallelujah! I found the best, most authentic tasting, not to mention easiest flour tortilla recipe out there. What makes it even more amazing is that the dough is very forgiving and really easy to roll out. Recipes that call for milk, baking powder or oil cannot come close to the awesomeness of shortening (or lard), sorry! I used this non- hydrogenated vegetable shortening instead of Crisco.

Last night I made chimichangas, which my family loved – but the star of the meal was definitely the tortillas. The batch I made didn’t last long – in fact, my son requested a wrap for his lunch using the last one 😉 I made another batch today that is half white whole wheat, half all-purpose flour in an attempt to redeem these a little. They are still as pliable and soft as the all white flour tortillas and just as tasty! Thanks for reading, enjoy! 🙂

Flour Tortillas – adapted from The Urban Spork

  • 2  3/4 cups all-purpose flour, plus a little extra for rolling the tortillas
  • 5 tablespoons vegetable shortening, lard or 2 1/2 tablespoons of each (for the most authentic version)
  • 3/4 teaspoon salt
  • 3/4 cup very warm tap water

Directions

Combine the flour and shortening in a large mixing bowl and work the shortening into the flour with your fingers until completely incorporated.  If this isn’t done thoroughly (until no particles of shortening remain visible), the tortillas will have an irregular texture.  Dissolve the salt in the water and pour about 2/3 cup over the dry ingredients and immediately work it in with a fork; the dough will be in large clumps.  If all the dry ingredients haven’t been dampened, add the rest of the liquid (plus a little more, if necessary).  Scoop the dough onto your work surface and knead until smooth.  It should be a medium-stiff consistency – not firm, but not quite as soft as most bread dough either.

Divide the dough into 12 portions and roll each into a ball.  Set them on a plate, cover with plastic wrap and let rest for at least 30 minutes – this makes the dough easier to roll.

Heat an ungreased griddle or heavy skillet over medium to medium-high heat.

Flatten a ball of dough, flour it, then roll forward and back across it; rotate a sixth of a turn and roll forward and back again; continue rotating and rolling until you reach a 7-inch circle, lightly flouring the tortilla and work surface from time to time.

Lay the tortilla on the hot griddle (you should hear a faint sizzle and see an almost immediate bubbling across the surface).  After 30 to 45 seconds, when there are browned splotches underneath, flip it over.  Bake 30 to 45 seconds more, until the other side is browned; don’t overbake the tortilla or it will become crisp.  Remove and wrap in a cloth napkin placed in a tortilla warmer.  Roll and griddle-bake the remaining tortillas in the same manner – stack them one on top of the other in the warmer.