Reese’s Peanut Butter Cup Cheesecake

WP_20131225_12_39_16_Pro20131225124856

Yeah – definitely not something you would want to make more than once a year! The crust starts out with 24 Oreo cookies and a half stick of butter  – not to mention the roasted peanuts!  There are also 16 Reese’s cups in and on this cake, 2 pounds of cream cheese, 1 cup of peanut butter…Thankfully, there will be at least 10 people who might be willing to try this. I don’t know many people who would turn down a Reese’s 😉

WP_20131225_17_26_05_Pro20131225173457

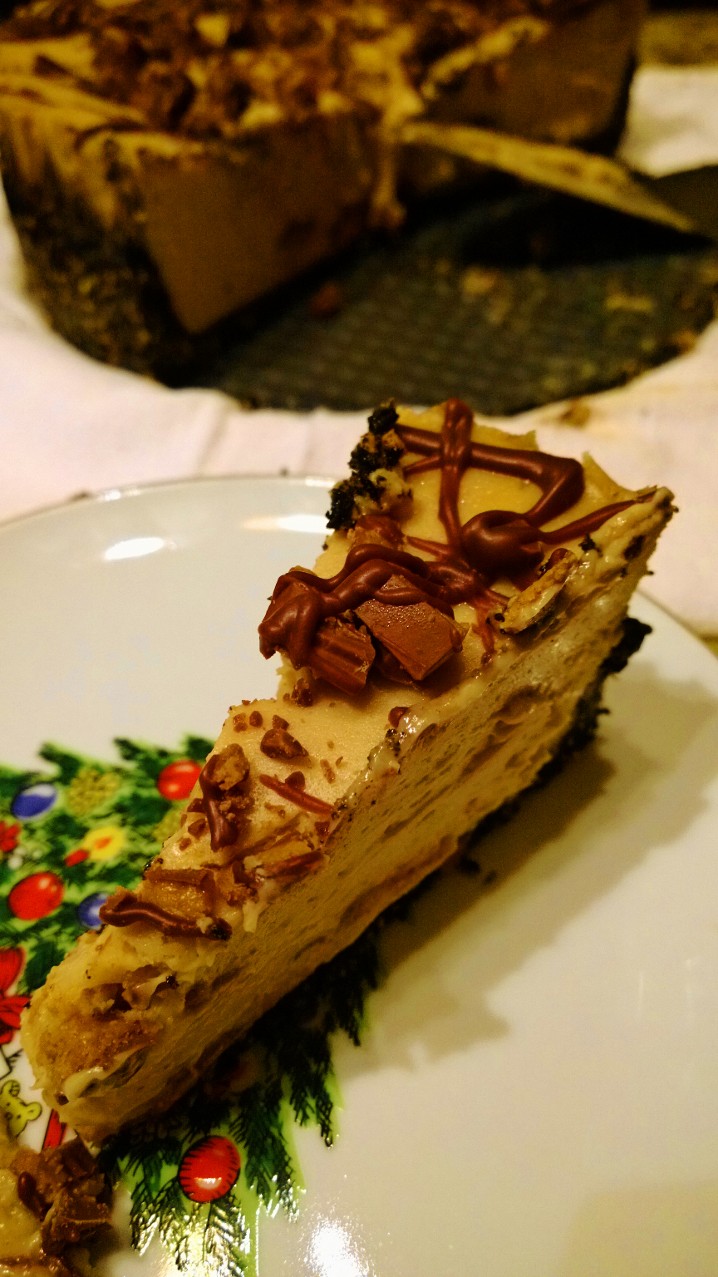
Verdict: It’s a little too sweet for my taste, but no one else complained 😉 We have half a cake left, but I have several people in mind to share this with 😉 Thanks for reading, enjoy!

Ruggles Reese’s Peanut Butter Cup Cheesecake – adapted from Food.com **Plan ahead–cheesecake needs to chill for at least 4 hours**

For the Crust:

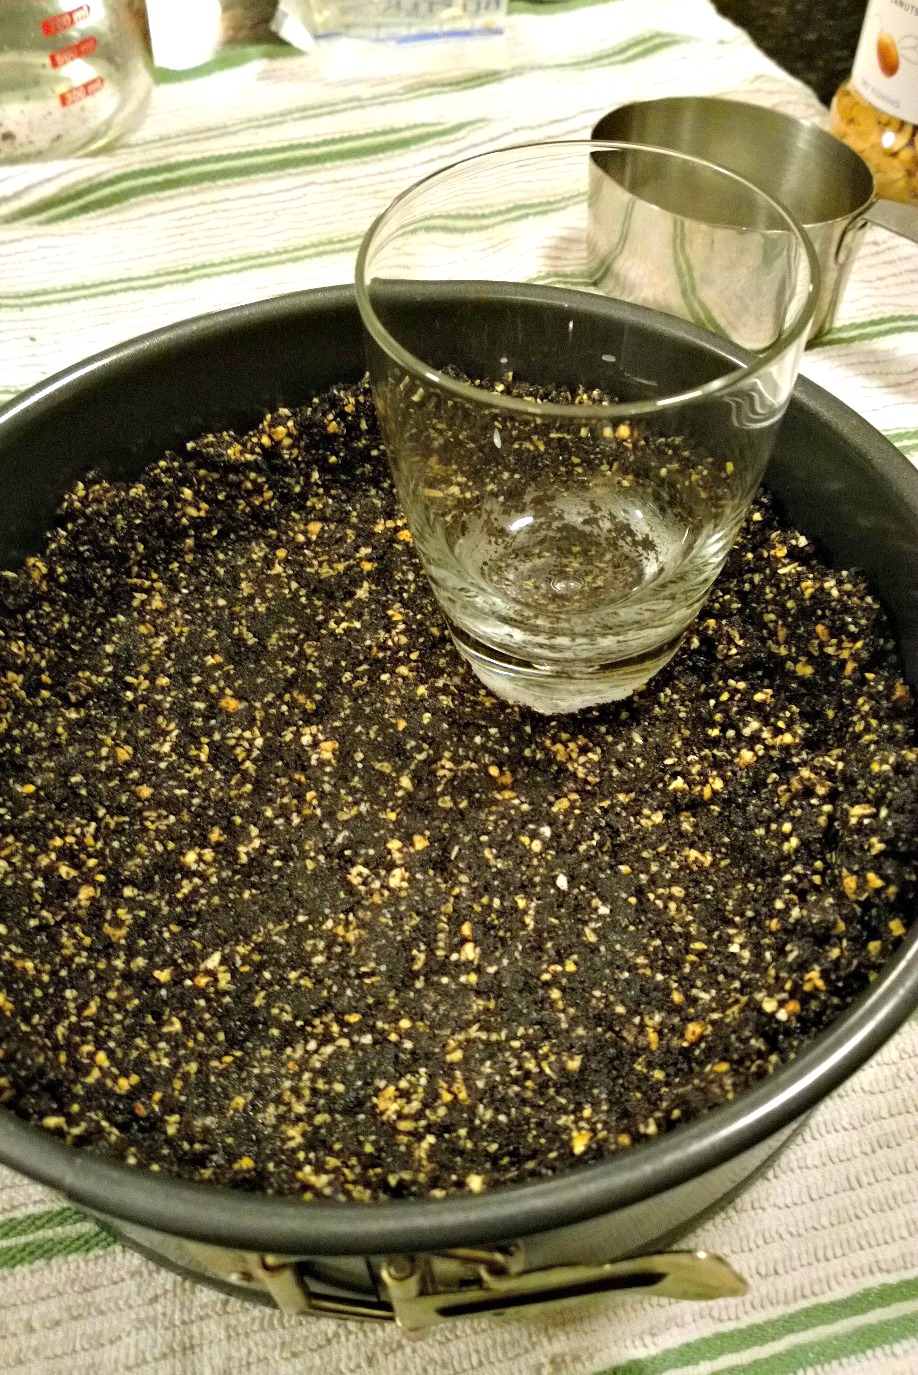
  • 4 1/2 cups crushed Oreo cookies
  • 1 cup chopped roasted peanuts
  • 1/2 cup butter, melted

For the Filling:

  • 2 lbs cream cheese, softened
  • 5 eggs, at room temperature
  • 1 1/2 cups firmly packed brown sugar
  • 1 cup smooth peanut butter ( not natural-style)
  • 1/2 cup whipping cream
  • 1 teaspoon vanilla extract
  • 12 Reese’s Peanut Butter cups, broken into small pieces

For the Topping:

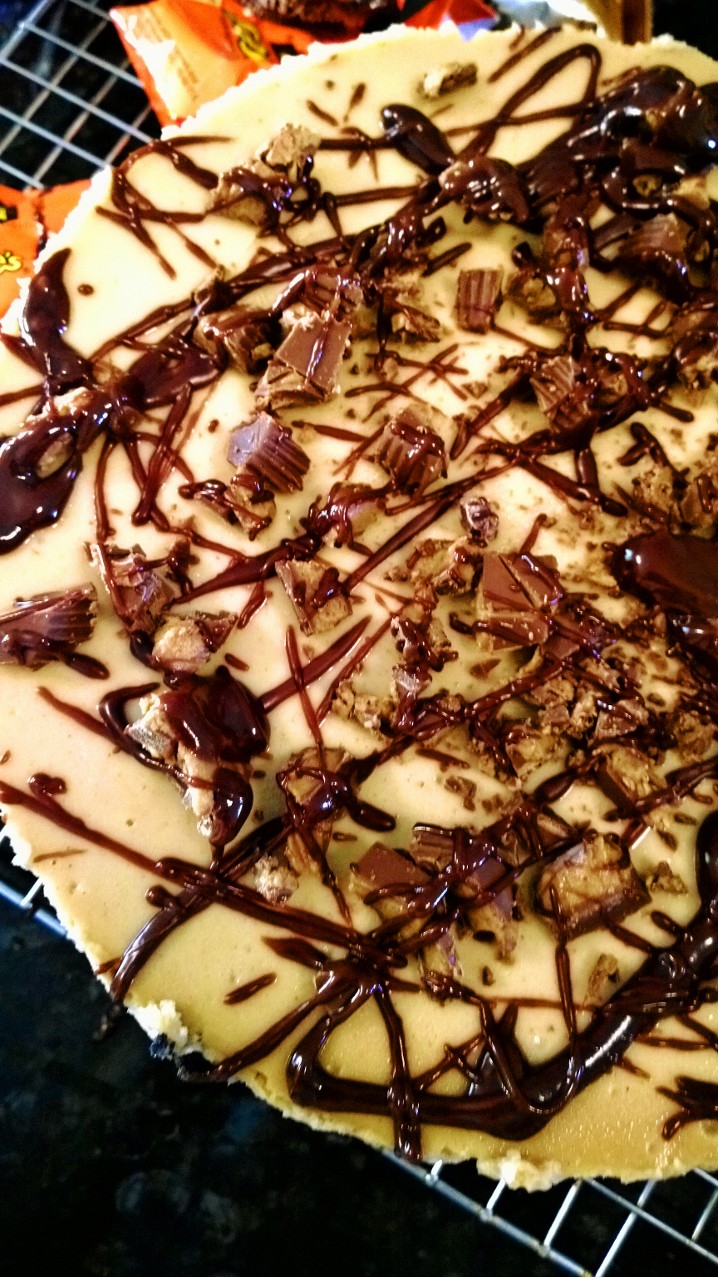
  • 1/2 cup Reese’s Peanut Butter chips
  • 1/2 cup semi-sweet chocolate chips
  • 1/4-1/2 cup heavy cream
  • 4 Reese’s Cups, chopped

Directions –  

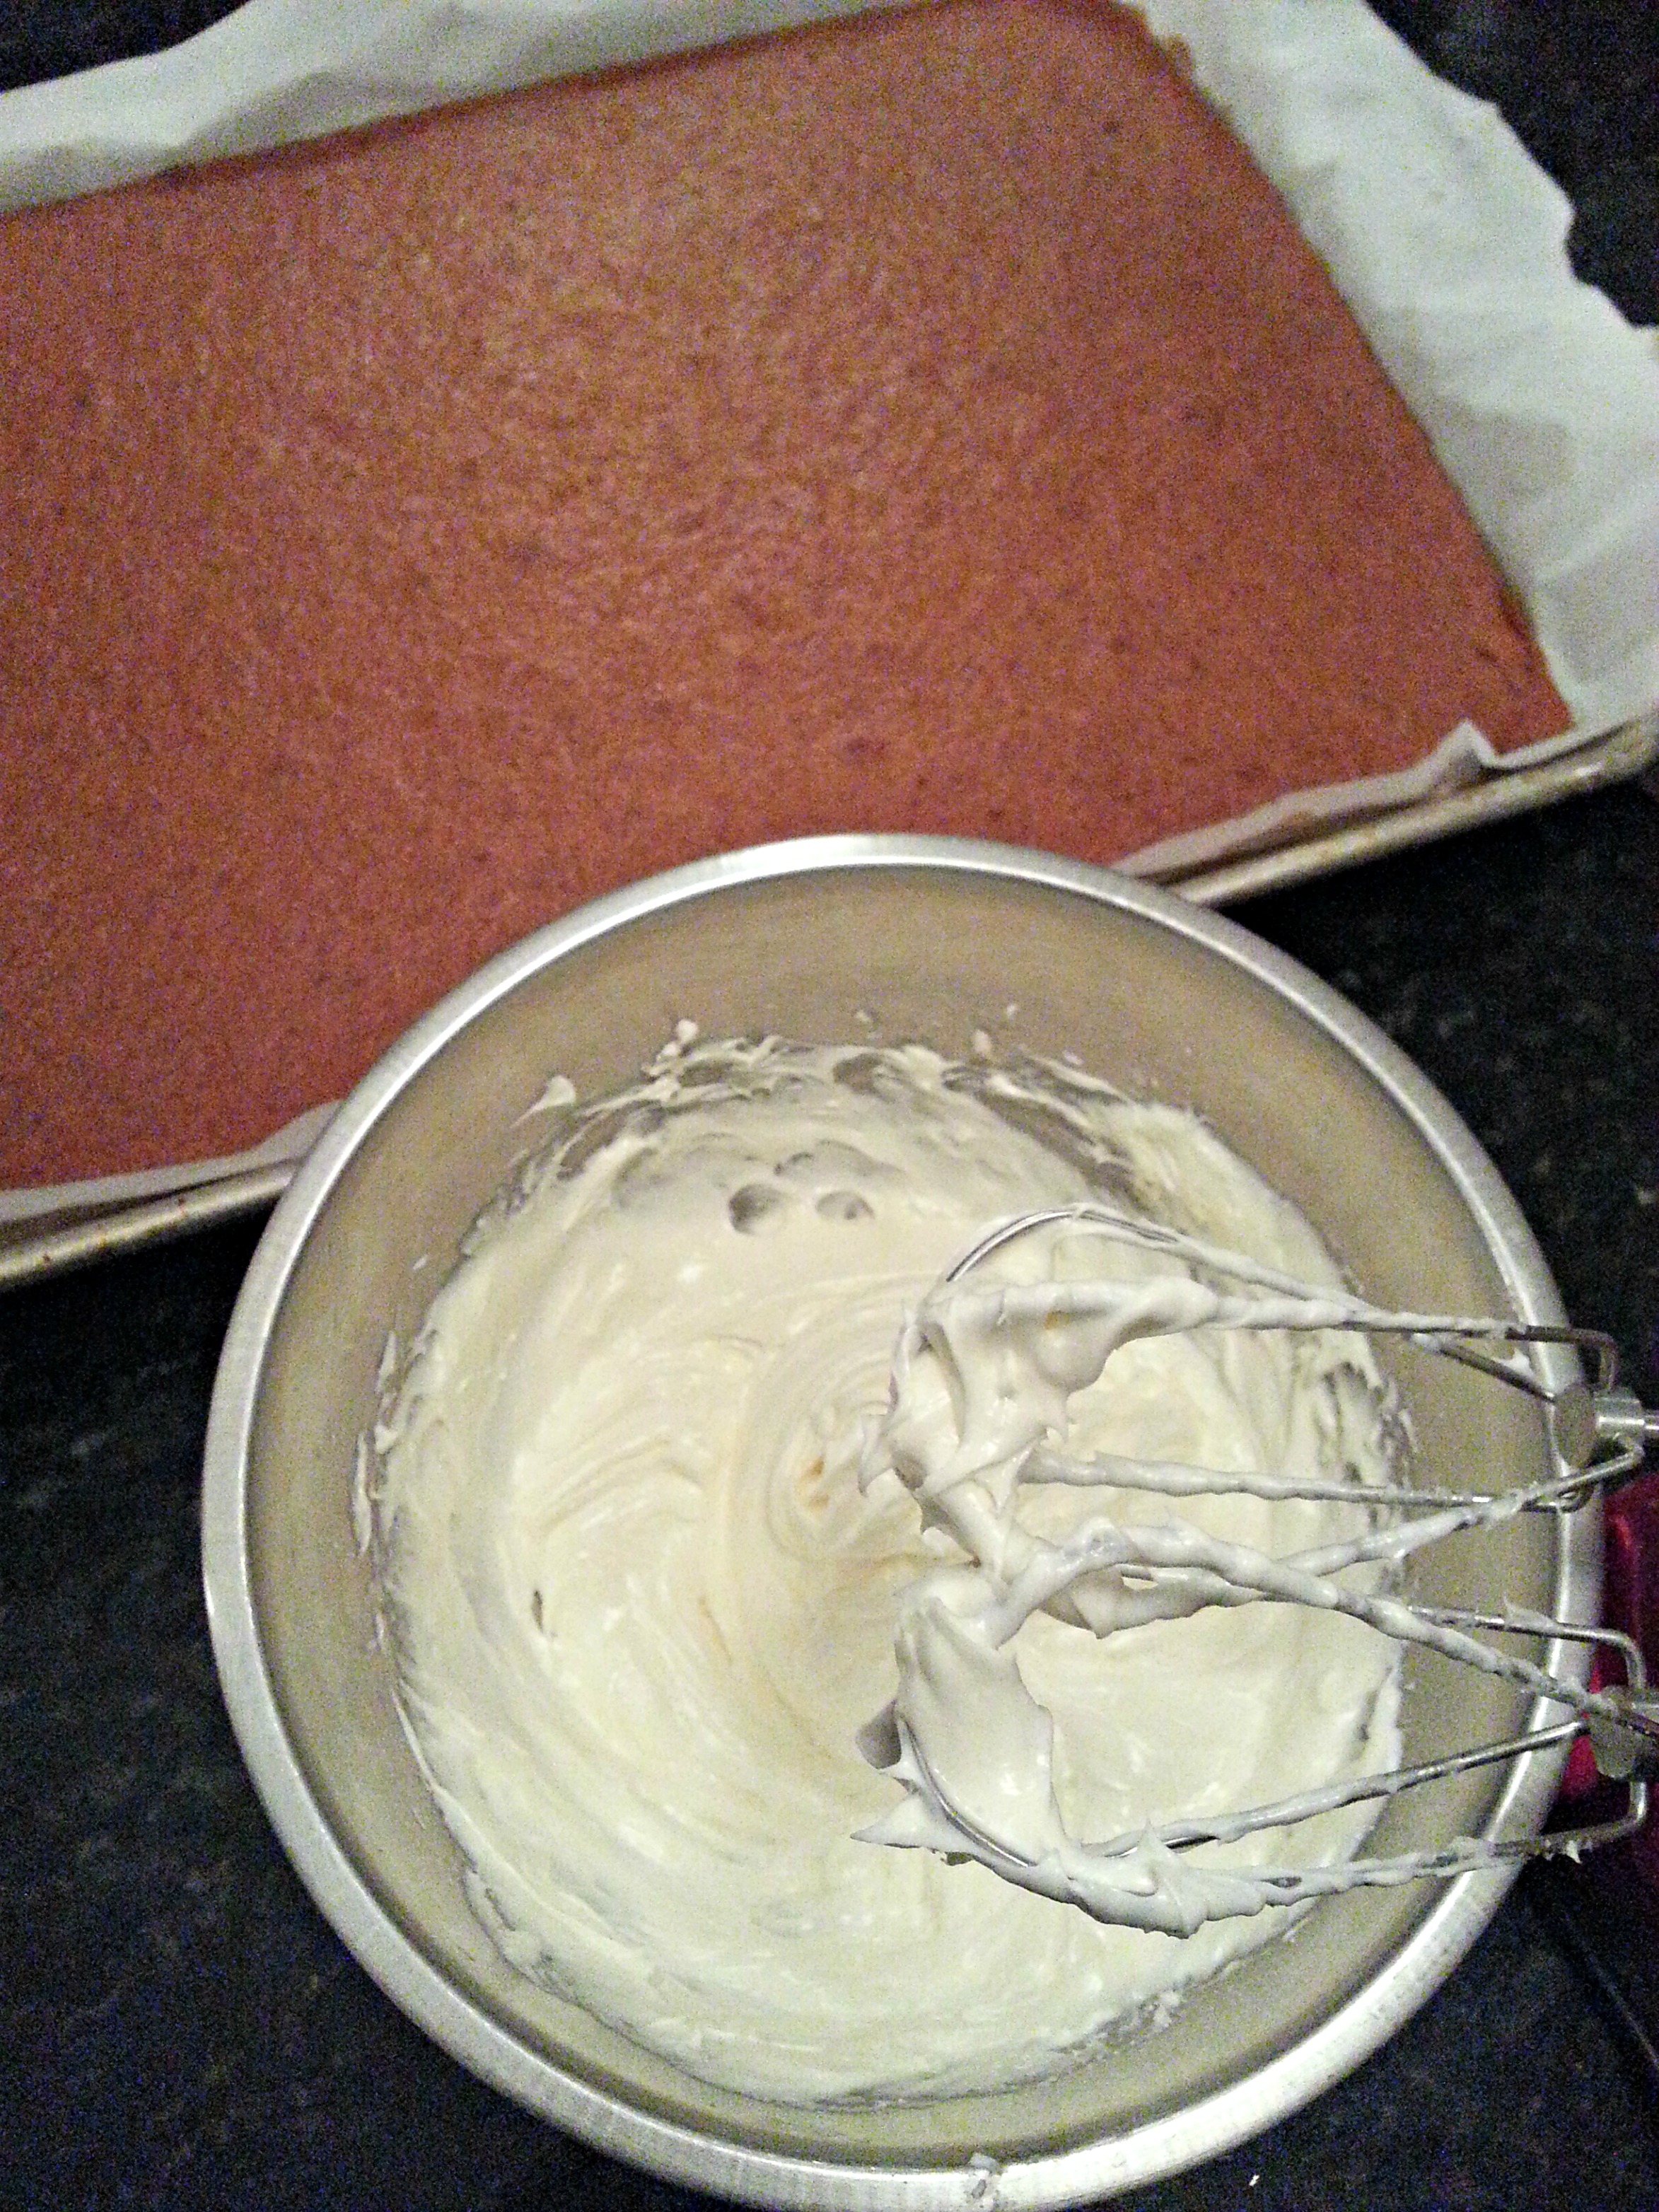
To Make The Crust: Combine crushed Oreo cookies and peanuts that have been ground in a food processor with the melted butter. Pat the crust mixture onto bottom and sides of a 10-inch springform pan.

WP_20131223_18_54_31_Pro
To Make The Filling: Beat cream cheese in bowl of electric mixer until smooth. Add eggs, one at a time, beating well after each addition. Add sugar, peanut butter and cream; mix until smooth. Stir in vanilla, then fold in peanut butter cup pieces with a rubber spatula.

WP_20131223_19_37_11_Pro

Pour filling into prepared crust. Place springform pan into a larger baking pan. Pour hot water into the larger pan so that the water comes 1 inch up the sides of the springform pan.

WP_20131223_19_31_56_Pro

Bake at 275°F 1-1/2 hours, or until firm and lightly browned. Remove from the oven and allow to cool on a wire rack for one hour. You may run a knife along the edge of the cake to loosen it from the pan somewhat. Refrigerate for at least 4 hours.

For the Topping: Pour the cream into a microwave safe cup for about 45 seconds. Pour the hot cream over the peanut butter and chocolate chips and don’t stir for about three minutes. Stir with a whisk until smooth and shiny to break up any pieces and emulsify cream and chocolate. Add more hot cream to thin out the ganache if needed. Add chopped Reese’s to the cheesecake and then drizzle the ganache over all.

Advertisement

Double Chocolate Deep Dish Cookies

20131219_191016

Quick Post: I decided to change-up my usual deep dish cookie recipe and kick it up a notch with some extra chocolate. How bad could that be? These were so rich, and I could only eat about half of it! It didn’t help that I added hot fudge sauce to the already sweet vanilla ice cream…

Thanks for reading, enjoy!

Double Chocolate Deep Dish Cookies – adapted from Lavain Bakery via Annie’s Eats

  • 1 stick (1/2 cup) unsalted butter, cubed
  • 3/4 cup sugar
  • 1 egg
  • 1/4 cup cocoa powder
  • 1 cup +2 TBSP AP Flour
  • 1/8 tsp. salt
  • 1 1/4 cup semi-sweet chocolate chips

Preheat oven to 350 degrees, and prepare 4 – 6 ounce ramekins for batter. In a large bowl, combine butter and sugar. Beat together until light and fluffy, 2-3 minutes. Blend in the egg, scraping down the bowl as needed. Mix in the cocoa powder until well blended, add the flour, salt and baking powder to the bowl and mix on low speed until well incorporated. Fold in the chocolate chips with a spatula. Divide the dough into four equal parts and lightly press down into buttered ramekins. Bake for 18-20 minutes, remove from oven and cool slightly. Top with a generous scoop of vanilla ice cream.

Turkey Tetrazzini

turkey

This was a great use for the leftover turkey breast  from Thanksgiving and it was so good! I might have to roast another turkey to make this again soon 🙂 This recipe makes at least 8 to 10 servings, but it reheats really well. Thanks for reading, enjoy! 🙂

Turkey Tetrazzini – adapted from Brown Eyed Baker

  • 12 ounces mushrooms, sliced
  • 11 tablespoons (5½ ounces) unsalted butter, divided
  • ¼ cup all-purpose flour
  • 12 ounces egg noodles
  • 1½ cups whole milk
  • ¼ cup heavy cream
  • 2 cups turkey stock (can substitute chicken stock/broth)
  • ¼ cup white wine (can substitute stock or broth)
  • 3 cups chopped cooked turkey
  • 1 cup frozen peas
  • 6 ounces Gruyère cheese, shredded (about ¾ cup shredded), divided
  • 3 ounces grated Parmesan cheese (about ⅔ cup), divided
  • Salt and pepper, to taste
  • 1 cup panko bread crumbs

DIRECTIONS:

1. Preheat oven to 375 degrees F. Butter a 9×13-inch baking dish; set aside. Fill a large pot with water and put it over high heat to boil.

2. In a large, 12-inch skillet with sides, melt 3 tablespoons of the butter over medium heat. Add the mushrooms and cook, stirring occasionally, until all of the liquid has evaporated, about 10 minutes. Transfer the mushrooms to a bowl and set aside.

3. In the same skillet, melt 4 tablespoons of the butter over medium heat. Whisk in the flour and cook, whisking occasionally, until the flour is browned and has a nutty aroma, about 3 minutes.

4. While the flour cooks, add the noodles to the boiling water and cook to al dente. While the noodles are cooking, continue on with the recipe.

5. Slowly whisk the milk, cream, turkey stock and wine into the butter/flour mixture. Bring to a simmer, then reduce the heat to medium-low and cook, stirring constantly, until the sauce is thickened, 6 to 8 minutes.

6. Drain the pasta when it is finished, then add the cooked pasta, mushrooms, turkey and peas to the sauce in the skillet, tossing everything together until it is evenly coated. Add half of the Gruyere and half of the Parmesan cheese, stirring until the cheese is melted. Add salt and pepper to taste. Pour the mixture into the prepared baking dish.

7. Melt the remaining 4 tablespoons unsalted butter. In a small bowl, toss together the bread crumbs, remaining Gruyere, remaining Parmesan and the melted butter. Toss with a fork until the bread crumbs and Parmesan are evenly moistened. Sprinkle the mixture evenly over the top of the tetrazzini.

8. Bake for 30 to 40 minutes, or until the filling is bubbling and the top is golden brown. Let sit for 10 minutes before serving.

Turkey Stock and Turkey Noodle Soup

**I’m a slacker and planned on posting this weeks ago! **

I usually intend to make stock with the turkey bones, but never get around to it…this year I was determined not to waste a bit of that free range bird 😉 After removing all of the meat, I double wrapped the bones in plastic wrap and stored it in my refrigerator – not the freezer this time! A couple of days later, I threw all the ingredients in my giant 12 quart pot and simmered the contents for about four hours. Once the stock was finished, I strained it and then prepared my veggies for the simple soup that I planned for dinner. I was so pleased with how the soup turned out that this will have to become a new tradition for my family…this and the turkey tetrazzini that I will share with you all later. Thanks for reading, enjoy!

20131204_071523

**This recipe made a very large batch or rich and flavorful stock, and what is pictured is what was left over after making turkey noodle soup.

Basic Turkey Stock – inspired from Brown Eyed Baker

  • 1 turkey carcass
  • 10 quarts water
  • two onions
  • 4 carrots
  • 4 celery
  • 1 TBSP peppercorns
  • 2 TBSP kosher salt or more to taste
  • 2 TBSP apple cider vinegar
    *special equipment – 12 quart pot

Place all in a 12 quart stock pot. Bring to a boil, then reduce to a simmer and cook for at least 4 hours, skimming the foam off the top as necessary. Strain through a fine mesh strainer into large heatproof containers. Let cool to room temperature, then refrigerate or freeze.

turkeysoup

Turkey Noodle Soup –

  • 2 quarts turkey stock (*more or less depending on how “soupy” you like it)
  • 2 cups roasted, and chopped turkey (*I used the dark meat*)
  • 1 small onion, diced
  • 2 – 3 carrots, diced
  • 2 – 3 celery ribs, diced
  • 2 TBSP olive oil
  • 2 cups egg noodles
  • kosher salt and pepper
Directions –
Heat a large soup pot to medium and add olive oil. Once the oil is warmed, add all your diced veggies to the pan. Saute for 10 minutes or until vegetables are tender. Add the turkey stock and chopped turkey to the pot. Bring to boil, season to taste and add the egg noodles. Cook until the egg noodles are tender, about 8 to 10 minutes. Taste again, season if needed – enjoy the soup with a crusty loaf of bread…yum!

Easy, Stove Top, No-Roux Macaroni and Cheese

stovetop

This couldn’t be easier and it’s so tasty, quick, creamy and surprise – there is no butter in this recipe! Thanks for reading, enjoy!

Creamy No-Roux Stove Top Macaroni and Cheese – adapted from The Kitchn

  • 1 pound pasta, any shape
  • 1 1/2 cups milk
  • 2 tablespoons all-purpose flour
  • 3 cups shredded cheese, like cheddar, monterey jack, or colby
  • 1/2 teaspoon salt
  • 1/2 teaspoon powdered mustard
  • 1/4 tsp paprika
  • 1/4 tsp cayenne
  • fresh cracked black pepper to taste

Directions –

1. Bring about 4 quarts of water to a boil over high heat in the pasta pot. Add the pasta and a tablespoon of salt. Cook until the pasta is al dente, about 8 minutes. Drain and set aside.

2. When the pasta has finished cooking, prepare the cheese sauce. Begin warming 1 cup of the milk in the saucepan over medium heat. Whisk together the remaining 1/2 cup of milk and the flour until there are no lumps. When you just start to see tendrils of steam rising from the warming milk, whisk in the milk-and-flour mixture. Continue whisking gently until the milk thickens slightly to the consistency of heavy cream, 3-4 minutes.

3.Turn the heat to low and begin mixing handfuls of cheese into the milk. Stir in the salt and mustard. Stir until all the cheese has melted and the sauce is creamy. Taste and adjust the seasonings as desired. Remove the sauce from heat.

4. In a large serving bowl, combine the pasta and 1/2 of the cheese sauce. Stir to coat the pasta evenly. Add the second half of the sauce and any extra add-ins.

Woodstove Season

green3


Another finished cardigan – and a lovely one at that. This wasn’t the easiest pattern to follow at times, but thankfully I had my sister knitting along/ahead of me to bounce ideas off of. We decided to modify this pattern a bit, especially through the body where we did less decreases; and after we added those stitches back at the hips, we incorporated the chevron pattern instead of plain stockinette. I love the way it turned out, but I wish it would get cold enough in Florida to wear! All this week it has been at least 80 degrees – there is something so wrong about having to run your air conditioner in December. Thanks for reading! 🙂


green

Details:

Pattern – Woodstove Season by Alicia Plummer

Yarn: Queensland Collection Kathmandu DK

Needles: US 8 and US 9

green2

Date Started: October 28, 2013

Date Finished: December 3, 2013

Pictures by: My boy and my girl 🙂


Minimalist Cardigan

cardigan

And now for something completely different…and crafty!

I started this cardigan three years ago. I got lazy and distracted and I loathe finishing garments 😉 This yarn is so soft and shows the moss stitch so beautifully – I lurve it! 😉

cardigan1

Details:
Pattern – Minimalist Cardigan by Ruthie Nussbaum

Yarn: Rowan RYC Cashsoft in 505

Needles: US 7

minicardi_medium2

Date Started: October 4,2010

Date Finished: November 25, 2013

Pictures by: My girl 🙂

cardigan2

Apple Crumble Pie II

apple

Instead of my preffered pumpkin pie, I decided to make something that we could all enjoy since my husband doesn’t like pumpkin anything. This reminds me of when we were dating and we would often go to Marie Callender’s to have their Dutch apple pie.

Verdict: Yum! I used Fuji and Gala apples for this and the crust recipe below was flaky, buttery and crisp where it needed to be. I have another disk of pie dough in my fridge that I can’t wait to use for more of this pie. 🙂 Follow the link for a video tutorial if you’re a visual learner like me – I rarely read through directions cause I’m lazy like that 😉 Thanks for reading, enjoy!

Apple Crumble Pie – adapted from Let’s Dish Recipes

  • Prepared crust for single crust pie
  • 5-6 apples, peeled, cored and thinly sliced
  • 3/4 cup white sugar (*I think I’ll use less next time*)
  • 2 tablespoons lemon juice
  • 2 tablespoons cornstarch
  • 3 tablespoons all-purpose flour
  • 1 teaspoon ground cinnamon
  • 1/2 teaspoon freshly ground nutmeg

Topping:

  • 1/2 cup all-purpose flour
  • 1/2 cup brown sugar
  • 1/4 cup butter

Directions –

  1. Preheat oven to 350 degrees.
  2. In a large bowl, toss peeled and sliced apples with lemon juice.
  3. Mix together white sugar, cornstarch, 3 tablespoons flour, cinnamon, and nutmeg. Sprinkle over apples and toss to coat.
  4. Spread apple mixture evenly in unbaked pie shell.
  5. Using a pastry cutter (or your hands), mix together 1/2 cup flour, brown sugar and the butter until evenly distributed and crumbly in texture. Sprinkle over apples.
  6. Bake for about 1 hour, until apples are tender and topping is golden brown.

dough

**Flaky Pie Crust – adapted from Inspired Taste

  • 2 1/2 cups (360 grams) all-purpose flour
  • 1 teaspoon kosher salt
  • 1 tablespoon sugar, optional
  • 1 cup (227 grams) very cold unsalted butter, cut into 1/2-inch cubes (2 sticks)
  • 6 to 8 tablespoons ice water
Directions –
1. Add 1 1/2 cups flour, salt and sugar (optional) to a food processor. Pulse 2 to 3 times until combined.

dough1

2. Scatter butter cubes over flour and process until a dough or paste begins to form, about 15 seconds. (There should be no uncoated flour).

3. Scrape bowl, redistribute the flour-butter mixture then add remaining 1 cup of flour. Pulse 4 to 5 times until flour is evenly distributed. (Dough should look broken up and a little crumbly).

4. Transfer to a medium bowl then sprinkle 6 tablespoons of ice water over mixture. Using a rubber spatula, press the dough into itself. The crumbs should begin to form larger clusters. If you pinch some of the dough and it holds together, it’s ready. If the dough falls apart, add 1 to 2 tablespoons of extra water and continue to press until dough comes together.

5. Remove dough from bowl and place in a mound on a clean surface. Work the dough just enough to form a ball. Cut ball in half then form each half into discs. Wrap each disc with plastic wrap and refrigerate at least 1 hour, and up to 2 days. You can also freeze it for up to 3 months (just thaw it overnight in the fridge before using).

Pumpkin Bars with Cream Cheese Frosting

bars2

Quick Post: The kids love it and I thought the flavor was just okay; but once I tried a piece straight from the fridge it was so much better…weird, but I’m okay with that 😉 Thanks for reading, enjoy!

Pumpkin Bars – adapted from Deliciously Yum

  • 4 eggs
  • 3/4 cup oil
  • 3/4 cup sugar
  • 3/4 cup brown sugar
  • 2 cups pumpkin
  • 2 teaspoons baking powder
  • 1 1/2 teaspoons pumpkin pie spice
  • 1 teaspoon baking soda
  • 1/2 teaspoon salt
  • 2 cups flour (250 grams)
pumpkinbar
Frosting –
  • 4 ounces cream cheese, softened
  • 1/2 cup butter, softened
  • 1 1/2 cups powdered sugar
  • 1 teaspoon vanilla
Directions –
Preheat oven to 350 degrees F.
In a stand mixer, beat 4 eggs. Add oil, sugar, and pumpkin and mix together.
Next, mix in baking powder, cinnamon, baking soda, salt and flour. Make sure all ingredients are well combined and no lumps remain.
Pour into ungreased 11″ x 17″ jelly roll pan and bake for 30-35 minutes. Let the bars cool completely.

bars

Meanwhile, blend together the cream cheese, butter, powdered sugar and vanilla until smooth and creamy. Spread frosting evenly over the bars and put into fridge for 30 minutes.

Creamy Garlic Shells

shells

Quick Post: This pasta dish is full of garlic flavor and a great substitute for any boxed pasta mix. I served it alongside this roast chicken and this roasted broccoli – thanks for reading, enjoy!

Creamy Garlic Shells – adapted from Iowa Girl Eats

  • 8oz mini shells pasta
  • 1 Tablespoon extra virgin olive oil
  • 1 Tablespoon butter
  • 2 garlic cloves, minced
  • 2 Tablespoons flour
  • 3/4 cup chicken broth
  • 3/4 cup milk (I used skim)
  • salt & pepper
  • 1/4 cup grated parmesan cheese
  • 1/2 teaspoon garlic powder (not garlic salt)
  • 2 teaspoons parsley flakes

Directions: 

  1. Cook pasta in a pot of salted, boiling water until al dente. Drain then set aside. Let pot cool off the heat for several minutes.
  2. Return pot to stove over medium heat then melt butter in olive oil. Add garlic then saute until golden brown, about 30 seconds, being very careful not to burn. Sprinkle in flour then whisk and cook for 1 minute. Slowly pour in chicken broth and milk while whisking until mixture is smooth. Season with salt & pepper then switch to a wooden spoon and stir constantly until mixture is thick and bubbly, about 4-5 minutes.
  3. Take pot off the heat then stir in parmesan cheese, garlic powder, and parsley flakes until smooth then add cooked pasta and stir to combine. Taste then adjust salt & pepper if necessary