Grilled Portobello Mushroom “Burger”

M requested hamburgers, homemade buns and baked beans (with bacon, of course) for dinner…not health food by any stretch of the imagination! The other day, I saw portobello mushroom caps for sale at Publix which started the wheels turning in my brain…”what could I do with those?” I typed “portobello” in the TasteSpotting search for inspiration – it never fails me! There were several recipes for burgers using marinated caps, some topped with caramelized onions, others with pesto, brie or roasted red bell pepper. I combined a few different ideas to come up with what sounded good to me. Mine will have the roasted (on the grill) red bell pepper, pesto and some traditional burger toppings. I know the hubbs is going to look at me like I have a third eye or something, but I’m not making him eat it!;o)

Anyway, this meal was so tasty and I didn’t feel like I was missing out on the beef. Portobello mushrooms are pretty hardy and it absorbed the marinade perfectly. I would definitely make this again, although I would be the only one eating them next time too. M hates mushrooms and bell peppers, so I don’t think I could pay him enough to try them. Thanks for reading, enjoy!

Marinated Portobello Mushroom “Burger” – a Mom Makes Origional

  • 2 Portobello Mushroom caps, gills removed and brushed clean
  • 2 TBSP olive oil
  • 1-2 TBSP balsamic vinegar
  • 1 TSP Italian seasoning
  • 1 clove garlic, minced
  • salt and pepper to taste

Toppings –

  • 1/2 roasted red bell pepper
  • 2 TBSP Arugula pesto
  • small handful of salad greens
  • fresh mozzarella cheese
  • 1 split Parmesan cheese bun

Directions –

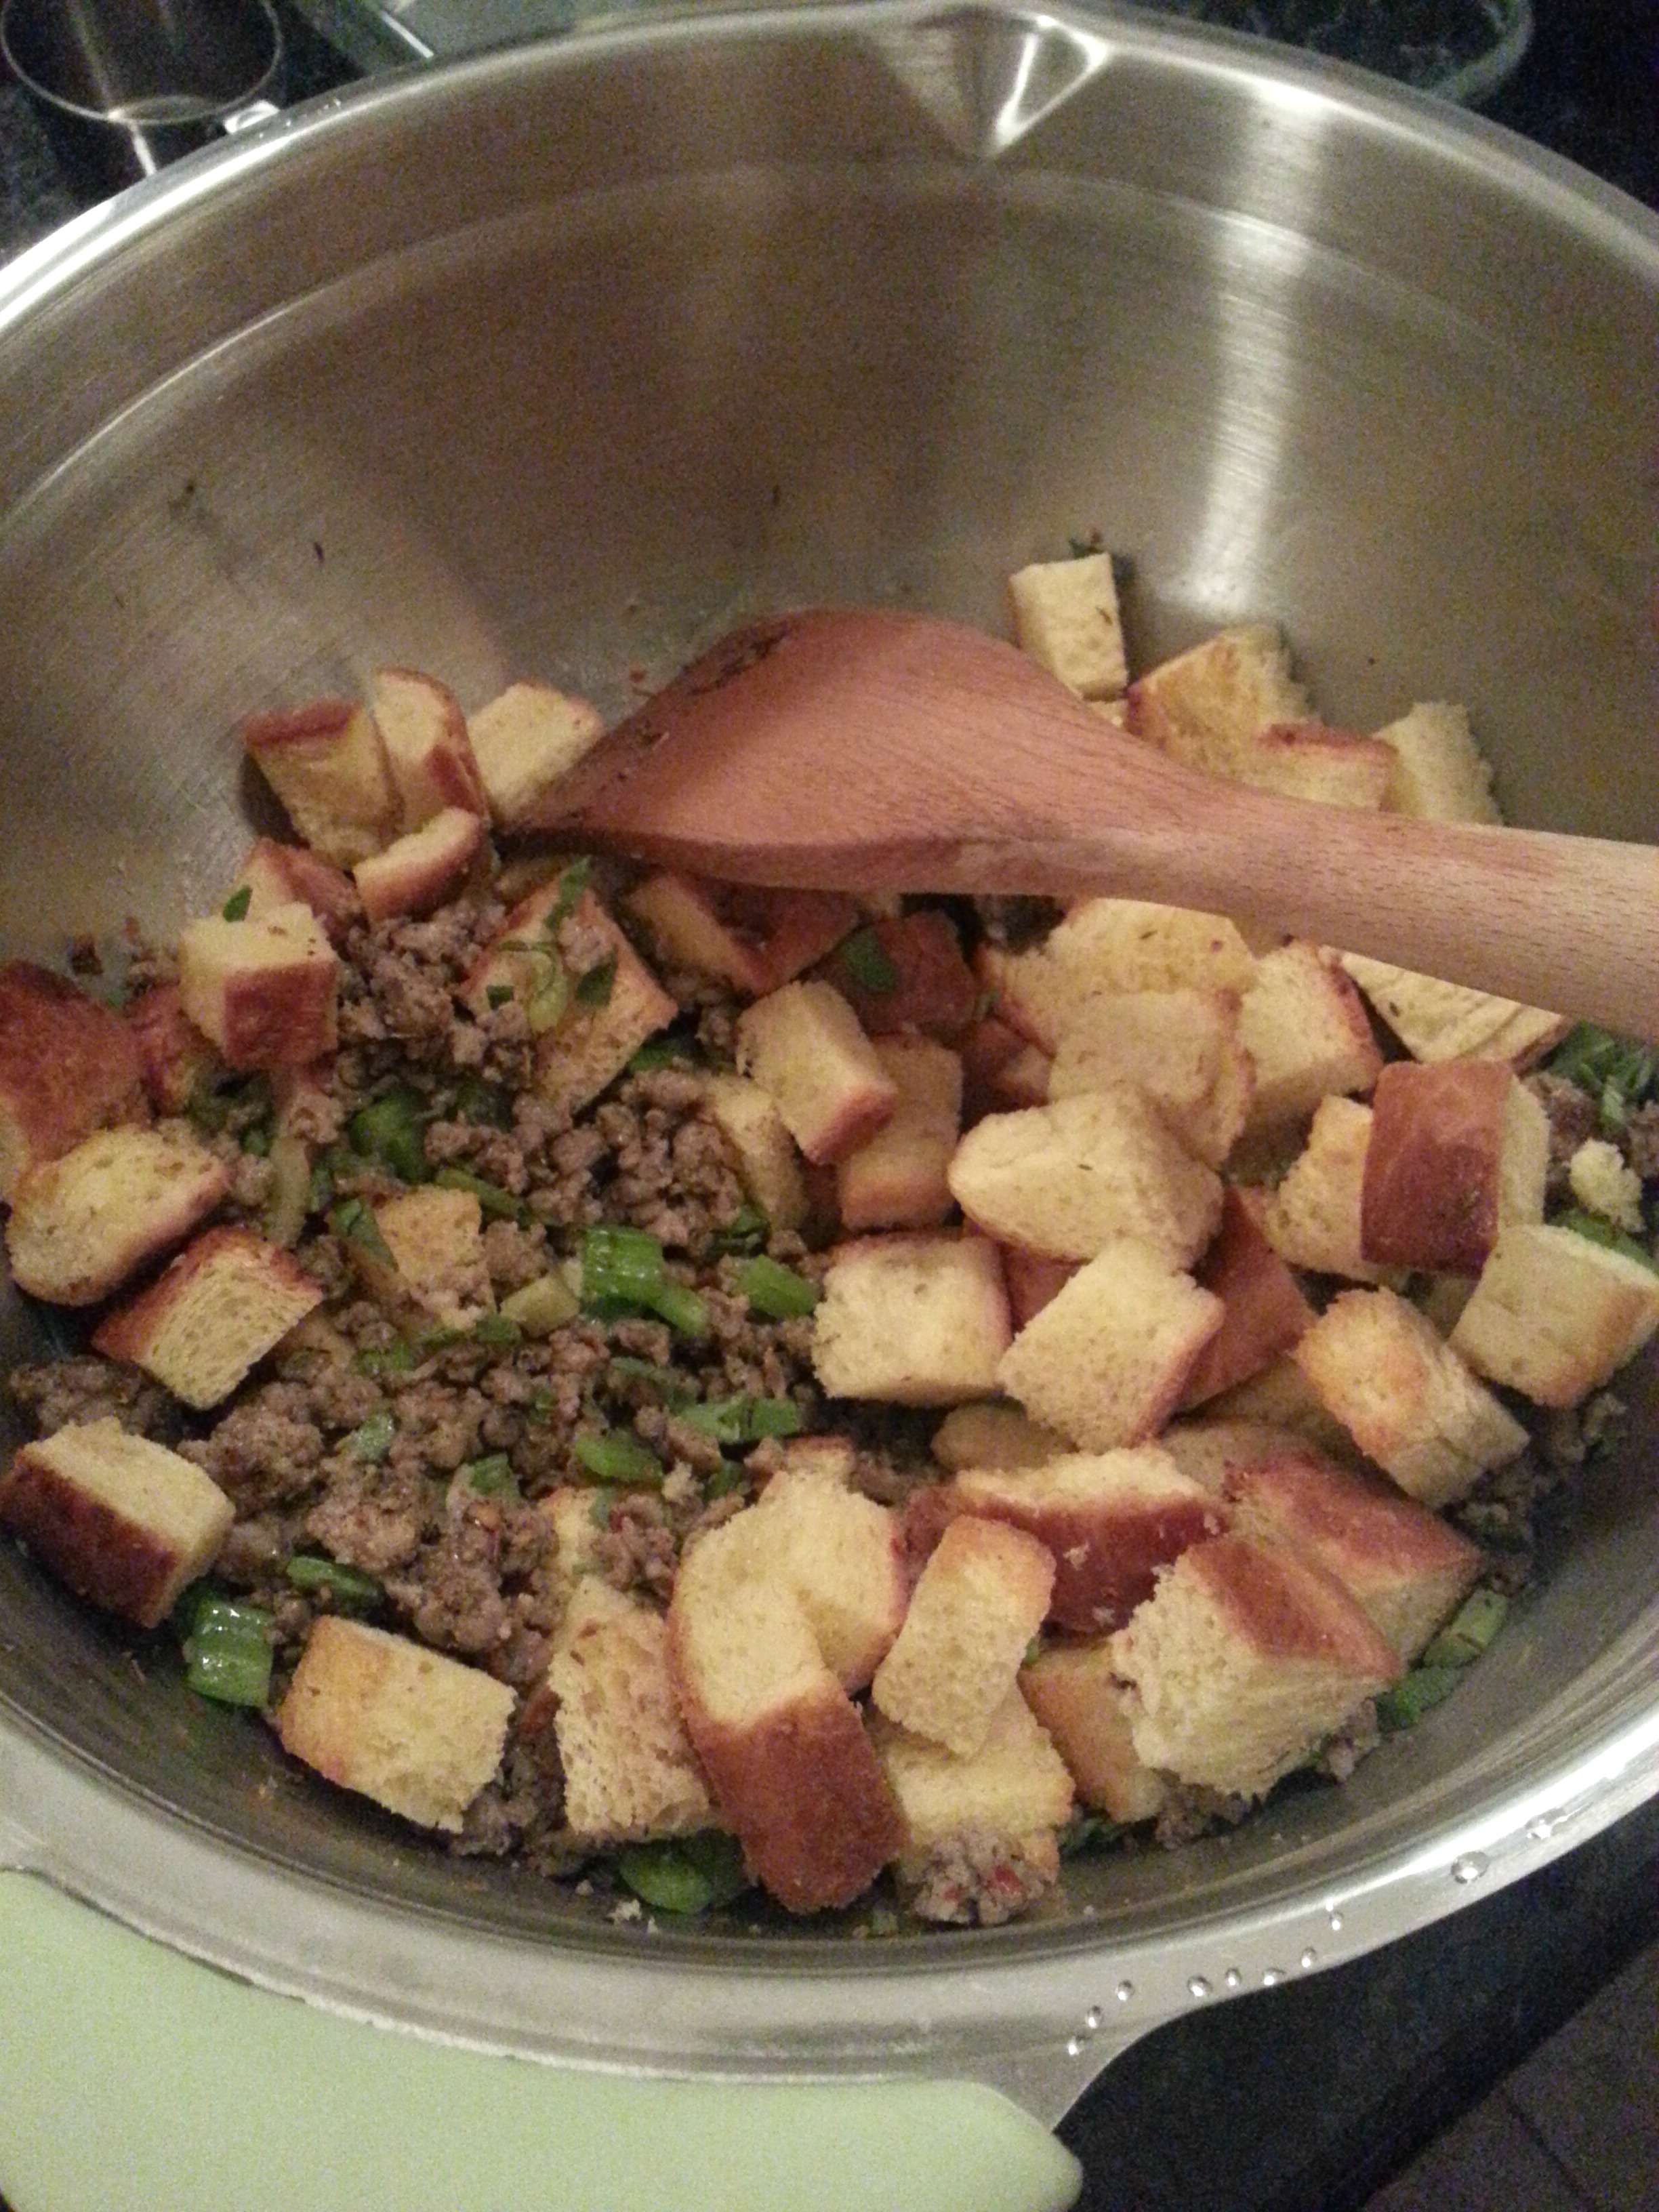
Place the mushroom caps in a zip top bag, mix all the remaining ingredients and pour over the caps. Let marinade in the fridge for at least 30 minutes. Grill the mushrooms for 2-3 minutes a side add cheese half way through cooking time if desired.

Toast your bun, spread pesto on both sides, add a slice of beefsteak tomato, some salad greens, half a roasted bell pepper then top with your mushroom cap. Enjoy!

Arugula Pesto Ingredients – adapted from Simply Recipes

  • 2 cups of packed arugula leaves, stems removed
  • 1/2 cup of walnuts
  • 1/2 cup fresh Parmesan cheese
  • 1/2 cup extra virgin olive oil
  • 6 garlic cloves, unpeeled
  • 1/2 garlic clove peeled and minced

Directions –

Brown 6 garlic cloves with their peels on in a skillet over medium high heat until the garlic is lightly browned in places, about 10 minutes. Remove the garlic from the pan, cool, and remove the skins.

Toast the nuts in a pan over medium heat until lightly brown, or heat in a microwave on high heat for a minute or two until you get that roasted flavor. In our microwave it takes 2 minutes.

Food processor method (the fast way): Combine the arugula, walnuts, roasted and raw garlic into a food processor. Pulse while drizzling the olive oil into the processor. Remove the mixture from the processor and put it into a bowl. Stir in the Parmesan cheese.

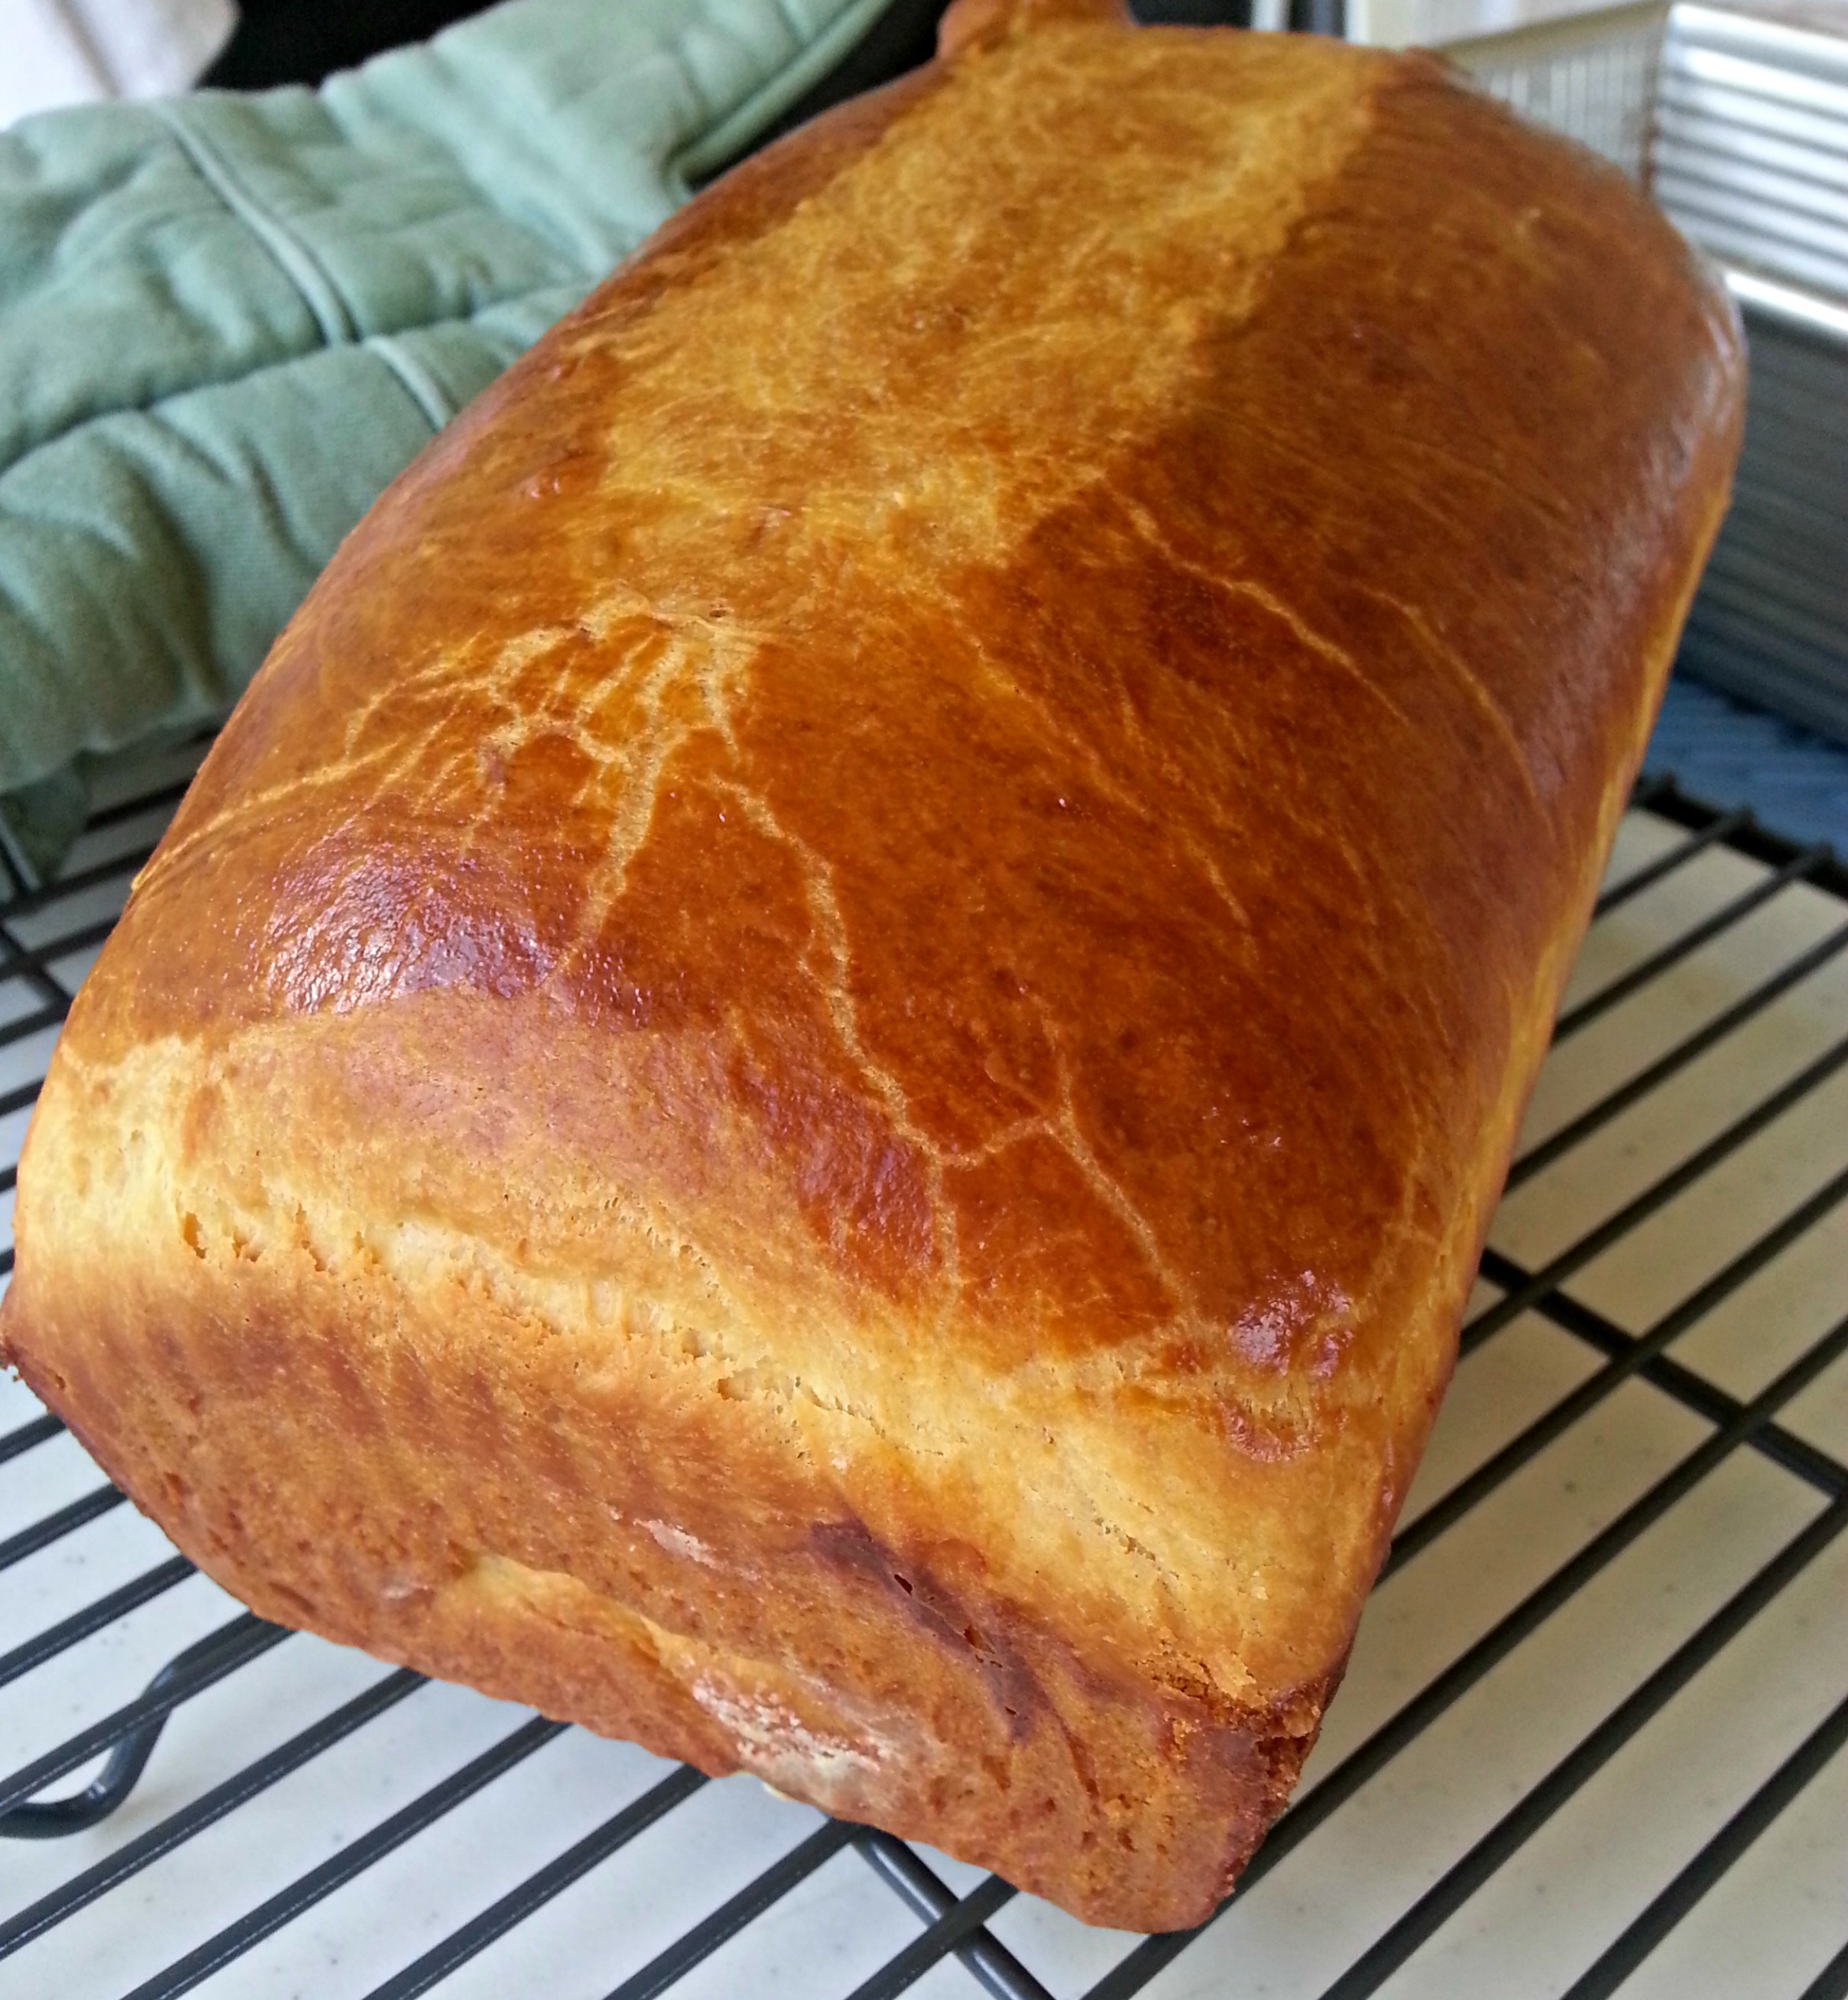
Cheese Burger Buns – adapted from King Arthur Flour

  • 6 ounces lukewarm water
  • 2 ounces butter
  • 1 large egg
  • 14 3/4 ounces King Arthur Unbleached All-Purpose Flour
  • 7/8 ounce sugar
  • 3 ounces grated Parmesan cheese or the finely grated cheese of your choice
  • 3/4 to 1 1/4 teaspoons salt*
  • 1 teaspoon onion powder, optional but good
  • 2 1/2 teaspoons instant
  • butter for brushing on top
  • *Use 3/4 teaspoon salt if you use cheese powder, 1 1/4 teaspoons salt if you use grated fresh cheese

Directions –
To make the dough: Combine all of the dough ingredients, and mix and knead them — by hand, mixer, or bread machine — to make a soft, somewhat tacky dough.

Place the dough in a lightly greased bowl or other container large enough to allow it to at least double in bulk, cover, and let it rise for about 60 to 70 minutes, till it’s just about doubled.

Transfer the dough to a lightly greased work surface, and divide it into 8 pieces.

Round each piece into a smooth ball, and place on a lightly greased or parchment-lined baking sheet. Gently flatten the balls to about 3″ diameter

Cover the buns and let them rise till they’ve expanded nicely, about 1 hour. Towards the end of the rising time, preheat the oven to 350°F.

Brush each bun with melted butter.

Bake the buns till they’re a light, golden brown, about 18 minutes.

Remove buns from oven, and brush with melted butter again. Place them on a rack to cool.

Yield – 8 big buns

Brioche and Sausage Dressing

Wow – this was more work than I anticipated…brioche takes time, especially the recipe I ended up using. If there is anything I have learned this year it’s plan ahead. I thought I did a pretty good job until I realized the brioche I needed could take up to 4 days to make if I chose. This is baking in the oven now, and it smells divine! I’m hoping that it is worth all the extra effort I put into it.

Update: Wow – was this ever tasty! Be sure to use a good quality butter when making this bread, because it is such an important component and flavor in this. The dressing was so flavorful and moist, and I am happy to report that it was completely worth the head ache and effort to make. I will not forget the lesson I learned this Thanksgiving about planning. Next time this is on the menu, I will be sure to bake it off or just start it a week before it’s needed. Thanks for reading, enjoy!

briochea

*Basic Brioche – The Bread Bible

Dough Starter –

  • 2 TBSP room temperature water
  • 1 TBSP sugar
  • 1/4 tsp. instant yeast
  • 1/2 cup (2.5 ounces) all-purpose flour
  • 1 large egg

*Make the starter one to two days ahead. In a mixing bowl, add ingredients and mix until very smooth. Cover with plastic wrap.

Flour Mixture –

  • 5.5 ounces all-purpose flour
  • 2 TBSP sugar
  • 1 1/4 tsp instant yeast
  • 1/2 tsp
  • 2 eggs
  • 8 TBSP room temperature butter

1. Combine first four ingredients and pour on top of the starter, cover with plastic wrap and let sit at room temperature for 1 1/2 to 2 hours.

2. Using a standing mixer, add eggs and mix on low speed for about a minute until evenly moistened. Raise speed to medium and beat for two minutes. Scrape the sides of the bowl with an oiled rubber scraper, then continue beating for five minutes longer or until the dough is smooth and shiny but very soft and sticky. It wont pull away from the bowl completely.

3. Add the butter one TBSP at a time until all incorporated. The dough will be soft and sticky. Lightly oil top and cover with plastic wrap. Let rise until doubled, about 1 1/2 to 2 hours.

4. Chill – refrigerate for one hour, then gently deflate with rubber spatula, then return it to the refrigerator for another hour.

5. Deflate/Chill – turn the dough out onto a well floured surface. Press or roll into a rectangle, flour as needed. Give the dough a business letter turn, brushing off excess flour. Rotate 90 degrees so the closed side faces left. Make a second business turn and round the corners. Dust it lightly on all sides with flour. Wrap loosely but securely with plastic wrap and place in a large ziploc bag. Refrigerate of at least six hours and up to two days.

6.  Shape/Rise – remove from fridge and gently press down to deflate. Roll/press into a 7 1/2″ by 5″ wide rectangle. Roll down from top in three turns, being sure to brush off the excess flour. Place seam side down in a prepared 8×4 inch loaf pan pressing down firmly. Cover lightly with plastic wrap and allow to rise until the dough reaches the top of the pan – about 1 1/2 to 2 hours.

7. Preheat oven to 350 degrees with a rack on the lowest position of the oven and place a baking stone or a baking sheet on the rack.

8. Glaze/Slash/Bake – glaze the top of the loaf with a mixture of one egg yolk and a splash of cream or milk. Slash the top of the loaf 1/4″ to 1/2″ deep lengthwise down the loaf, making sure to leave 1″ at each end. Set on hot stone and bake 35 to 40 minutes or until the internal temperature reaches 190 degrees.

9. Cool – un-mold loaf to cool on a wire rack at least two hours before cutting.

dressing

*Sausage Brioche Dressing – adapted from Food Network

  • 1 brioche loaf, cubed into 1-inch pieces
  • 1 pound pork breakfast sausage
  • 4 celery ribs, halved lengthwise and cross cut into 1/4-inch pieces
  • 4 cups chicken stock
  • 1/4 cup chopped sage leaves
  • Kosher salt and fresh ground black pepper

Directions –

Preheat the oven to 400 degrees F.

Spread the brioche on a baking sheet and put it in the oven until lightly toasted, about 10 minutes. Set aside in a large bowl.

In a large skillet over medium-high heat, add the sausage and break it into pieces with a spoon. Cook until browned, then transfer it to the bowl with the brioche. Add the celery to the sausage drippings and cook until softened, about 4 to 5 minutes. Put the sausage into the brioche bowl. Stir in the stock and sage and mix until the brioche absorbs most of the liquid. Season, to taste, with salt and pepper.

dressing2

Transfer the dressing to a 13 by 9-inch baking dish and cook, uncovered for 20 minutes. Cover with foil and bake until golden brown on top, another 20 to 25 minutes.

Lion House Dinner Rolls

I tried out these rolls on Little Miss S’ class last week. They were quickly snatched up by all the parents – I even saw someone make two turkey sandwiches to take home! These were buttery, fluffy, slightly sweet and reminiscent of Hawaiian rolls. I told M I would make these for Thanksgiving which I plan on making a few days in advance. All the breads I have ever made freeze really well with no noticeable change in flavor or texture.  Now that I’ve successfully made them once, I know what to expect, and maybe I will actually get a full 24 mostly equally sized rolls out of this recipe. Thanks for reading, enjoy!

Lion House Dinner Rolls – adapted from My Kitchen Cafe

  • 2 tablespoons active dry yeast
  • 2 cups warm water
  • 1/3 cup sugar
  • 1/3 cup butter, softened
  • 1 egg
  • 2 1/2 teaspoons salt
  • 2/3 cup nonfat dry milk
  • 5-6 cups flour

Directions –

In a large bowl, combine the yeast and water. Let stand 5 minutes (no need to do this if using instant yeast – just add the yeast and water together with the other ingredients). Add sugar, butter, salt, dry milk, 2 cups flour and egg. Beat together until very smooth. Add remaining flour gradually (about 1/2 cup at a time) until a soft but not sticky dough is formed. Knead the dough for at least five minutes if using an electric mixer and for at least 10 minutes if mixing the dough by hand. When the dough is smooth, supple and elastic, place it in a lightly greased large bowl covered with greased plastic wrap and let it rise until doubled.

Separate the dough into two portions. Roll each section out to an 11X14-inch rectangle. Brush the top with melted butter. Using a pizza cutter or sharp knife, cut the dough into two pieces, the long way (see photos below). Then slice the dough into five or six strips across so you end up with 10 to 12 small rectangles. Roll each small rectangle up like a snail and place on a silpat-lined or lightly greased baking sheet with the roll resting on it’s open edge. Repeat with the second portion of dough.

Cover the rolls with lightly greased plastic wrap and let them rise until doubled. Bake at 375 degrees for 12-14 minutes until they are nicely browned

Overnight Cinnamon Rolls

I love being able to make treats like these! I haven’t made them in at least a couple months…for good reason. They are too darn good! What I love about this recipe the most is that you prepare the dough the day before you want to bake them off, because who wants to wake up at 4am to have fresh from the oven cinnamon rolls at 10am?? Not this girl! Thanks for reading, enjoy!

Overnight Cinnamon Rolls – adapted from Alton Brown

Dough:

  • 4 large egg yolks, room temperature
  • 1 large whole egg, room temperature
  • 2 ounces sugar, approximately 1/4 cup
  • 3 ounces unsalted butter, melted, approximately 6 tablespoons
  • 6 ounces buttermilk, room temperature
  • 20 ounces all-purpose flour, approximately 4 cups, plus additional for dusting
  • 1 package instant dry yeast, approximately 2 1/4 teaspoons
  • 1 1/4 teaspoons kosher salt
  • Vegetable oil or cooking oil

Filling:

  • 8 ounces light brown sugar, approximately 1 cup packed
  • 1 tablespoon ground cinnamon
  • Pinch salt
  • 3/4-ounce unsalted butter, melted, approximately 1 1/2 tablespoons

Icing –

  • 2 1/2 ounces cream cheese, softened, approximately 1/4 cup
  • 3 tablespoons milk
  • 5 1/2 ounces powdered sugar, approximately 1 1/2 cups

Directions –

For the dough: in the bowl of a stand mixer with the whisk attachment, whisk the egg yolks, whole egg, sugar, butter, and buttermilk. Add approximately 2 cups of the flour along with the yeast and salt; whisk until moistened and combined. Remove the whisk attachment and replace with a dough hook. Add all but 3/4 cup of the remaining flour and knead on low speed for 5 minutes. Check the consistency of the dough, add more flour if necessary; the dough should feel soft and moist but not sticky. Knead on low speed 5 minutes more or until the dough clears the sides of the bowl. Turn the dough out onto a lightly floured work surface; knead by hand about 30 seconds. Lightly oil a large bowl. Transfer the dough to the bowl, lightly oil the top of the dough, cover and let double in volume, 2 to 2 1/2 hours.

Combine the brown sugar, cinnamon and salt in a medium bowl. Mix until well incorporated. Set aside until ready to use.

Butter a 9 by 13-inch glass baking dish. Turn the dough out onto a lightly floured work surface. Gently shape the dough into a rectangle with the long side nearest you. Roll into an 18 by 12-inch rectangle. Brush the dough with the 3/4-ounce of melted butter, leaving 1/2-inch border along the top edge. Sprinkle the filling mixture over the dough, leaving a 3/4-inch border along the top edge; gently press the filling into the dough. Beginning with the long edge nearest you, roll the dough into a tight cylinder. Firmly pinch the seam to seal and roll the cylinder seam side down. Very gently squeeze the cylinder to create even thickness. Using a serrated knife, slice the cylinder into 1 1/2-inch rolls; yielding 12 rolls. Arrange rolls cut side down in the baking dish; cover tightly with plastic wrap and store in the refrigerator overnight or up to 16 hours.

Remove the rolls from the refrigerator and place in an oven that is turned off. Fill a shallow pan 2/3-full of boiling water and set on the rack below the rolls. Close the oven door and let the rolls rise until they look slightly puffy; approximately 30 minutes. Remove the rolls and the shallow pan of water from the oven.

Preheat the oven to 350 degrees F.

When the oven is ready, place the rolls on the middle rack and bake until golden brown, or until the internal temperature reaches 190 degrees F on an instant-read thermometer, approximately 30 minutes.

While the rolls are cooling slightly, make the icing by whisking the cream cheese in the bowl of a stand mixer until creamy. Add the milk and whisk until combined. Sift in the powdered sugar, and whisk until smooth. Spread over the rolls and serve immediately.


Golden Pull-Apart Butter Buns

I made these lovely little rolls to accompany the chicken noodle soup that I made Friday night. These tasted good, but I’m sure that if I could smell better (I’ve been stuffed up for the past week and a half…lack of smell always messes up my sense of taste), I could judge the flavor accurately. M and the kids seemed to enjoy them, but I’m still on the hunt for rolls that taste like Texas Roadhouse rolls – those are our favorites! Thanks for reading, enjoy!

Golden Pull-Apart Butter Buns – adapted from King Arthur Flour

  • 3 1/2 cups King Arthur Unbleached All-Purpose Flour
  • 2 teaspoons instant yeast
  • 2 tablespoons potato flour or 1/4 cup instant potato flakes
  • 3 tablespoons Baker’s Special Dry Milk or nonfat dry milk
  • 2 tablespoons sugar
  • 1 1/2 teaspoons salt
  • 4 tablespoons soft butter
  • 2/3 cup lukewarm water
  • 1/2 cup lukewarm milk

1. Combine all of the dough ingredients in a large bowl, and mix and knead — using your hands, a stand mixer, or a bread machine set on the dough cycle — to make a soft, smooth dough.

2. Place the dough in a lightly greased container — an 8-cup measure works well here — and allow the dough to rise for 60 to 90 minutes, until it’s just about doubled in bulk.

3. Gently deflate the dough, and transfer it to a lightly greased work surface.

4. Divide the dough into 16 equal pieces, by dividing in half, then in halves again, etc. Round each piece into a smooth ball.

5. Lightly grease two 8″ round cake pans. Space 8 buns in each pan. Can you use 9″ round cake pans, or a 9″ x 13″ pan? Sure; the buns just won’t nestle together as closely, so their sides will be a bit more baked.

6. Cover the pans, and allow the buns to rise till they’re crowded against one another and quite puffy, about 60 to 90 minutes. Towards the end of the rising time, preheat the oven to 350°F.

7. Uncover the buns, and bake them for 22 to 24 minutes, until they’re golden brown on top and the edges of the center bun spring back lightly when you touch it. An instant-read thermometer inserted into the middle of the center bun should register at least 190°F.

8. Remove the buns from the oven, and brush with the melted butter. After a couple of minutes, turn them out of the pan onto a cooling rack.

9.  Serve warm. Store leftovers well-wrapped, at room temperature. Makes 16 buns.

My Favorite Pizza Dough

This is the best one I have tried so far! I didn’t have to search long for what I consider to be the best homemade dough out there. I love that it makes a huge four pound batch of dough because I portion the dough out into 16 ounce balls and freeze them to use for the next few weeks. It comes together easily, is tasty and economical – always a bonus! I have to use my giant 6 quart lidded containers to let it double in – those were a great buy. I found them at Sam’s Club in the restaurant supplies section. I have been eyeing some other items there…so tempting! I love shopping for kitchen supplies – I just wish that we had more money to blow on new toys for me…hey, those are the kind of “toys” that benefit everyone.  Our eight year anniversary is coming up, so maybe I will be able to get some things that I wouldn’t normally justify;o) Anyway, enough rambling on about that – here’s the recipe! The directions that Jamie Oliver gives are for hand kneading the dough. I use my standing mixer, so I will tell you how I make it. Thanks for reading, enjoy!

Pizza Dough Ingredients – adapted from Jamie Oliver

  • 5 cups bread flour
  • 2 cups semolina flour
  • 1 level tablespoon fine sea salt
  • 2 (1/4-ounce) packets active dried yeast
  • 1 tablespoon raw sugar
  • 4 tablespoons extra-virgin olive oil
  • 2 1/2 cups lukewarm water

Directions –

If you’re using active dry yeast, get it started proofing in about 1/2 cup of your lukewarm water, all the raw sugar and extra virgin olive oil. While waiting for the yeast to wake up, measure out all your dry ingredients – by weight for the flour is best, then combine them in a large mixer bowl.  Measure out 2 cups of lukewarm water, I always use bottled from our water cooler because of the added chlorine in tap water . Add the proofed yeast mixture and the 2 cups of water to the flour. I stir the mix with my dutch whisk, (you can use your hand or a wooden spoon) then once I have formed a rough dough, I hand knead for about a minute until it becomes a little smoother. Using your standing mixer with the dough hook, knead the dough for 5 to 7 minutes on low until the dough is smooth and springy. Place the kneaded dough in a large, lightly oiled container to rise, then lightly cover the container. Let rest until doubled in bulk – about 1 hour. Weigh and divide the dough as needed. I use Ziploc quart sized bags with a little extra virgin olive oil poured in to prevent sticking. It’s also helpful to write the date and weight of the dough on the bag.

No Knead Sandwich Bread

I decided to try a new bread recipe this week, so I searched this book for a sandwich bread recipe. I’ve never made a no knead bread dough in a loaf pan before, I’ve only made free form round crusty loaves. My usual sandwich bread recipe calls for butter and sugar – both of which are not in this recipe. I’m hoping the flavor isn’t laking and that it is worth trying out. This recipe makes 4 pounds of dough which is enough for two 8×4 loaves. All ingredients and mixing, storing and baking directions can be found at this website. It’s too much to even copy and paste. However, those instructions are for a free form loaf, not one baked in a loaf pan. Instead of shaping the dough and placing it on the pizza peel, shape it into an elongated oval and place it in a lightly oiled loaf pan. Follow the rising and “Baking Day” directions as written, but leave the loaf in the oven for 40 to 45 minutes. There seems to be way too many steps for this to be a simpler method of bread making, but once you get the hang of the technique it couldn’t be easier. Here’s hoping this a tasty bread recipe! Thanks for reading, enjoy!

Stromboli

This is my first time making a Stromboli, which is basically a giant pizza roll. It’s not from one recipe, more like bits and pieces of ones I have found online. M grilled a pound of the Italian sausage that was left of the giant package from Sam’s Club, and there is about a pound of Italian cheeses leftover from mac and cheese night. I guess you could use any leftover meats, vegetables and cheese that you need to re-purpose for a dish like this. Here’s the recipe I found that I’m using as a guideline.

These turned out so well – this recipe is definitely a new favorite for us. I served this with a green salad with tomatoes and bell peppers, and a side of marinara sauce for dipping. I’m always happy when a new recipe turns out well! Thanks for reading, enjoy!


Pepperoni and Sausage Stromboli Ingredients –

  • 2 – 1 pound balls of pizza dough, homemade or store-bought
  • 1/2 – 3/4 pound of Italian sausage, grilled and diced
  • 1/4 – 1/2 pound of deli sliced pepperoni, quartered
  • 1/2 – 3/4 pound of mixed Italian cheeses
  • 1 egg beaten with 1 TBSP of water
  • dried Italian seasoning
  • 2 TBSP Parmesan cheese

Directions –
1. Preheat oven to 400 degrees.
2. Roll out your pizza dough into a rectangle, about 14 inches by 8 inches – roughly. Layer your meats and cheeses, being careful to leave a one inch border on all sides. Make your egg wash and lightly bush it around the border, then start to roll your Stromboli. Make sure to pinch all seams and tuck the ends under, then place seam side down on a parchment lined half sheet pan. Brush remaining egg wash on the surface of the dough, then sprinkle the pizza seasoning and Parmesan cheese over the tops if desired. Bake for 30 to 35 minute until golden brown (and delicious!)

Sandwich Bread

With the appliance rebate we received a few months ago, I bought my KitchenAid standing mixer. Best. Appliance. Ever. M talked me into getting one of the largest models available – and this was it. I was hesitant at first thinking I would never need such a large capacity, but I’m glad I took his advice. I use it several times a week  – it’s so powerful and convenient, especially when it comes to bread making. I have only tried hand kneading once but when I use this, it takes all of the guess work out of the process. All the bread I have made since I started using the KitchenAid has come out perfectly. It’s so nice to let the machine do all the hard work because if I didn’t have it, I would have to hand knead for at least 10 minutes – no thanks! Since it’s purchase in July, I haven’t bought a loaf of bread! Let me tell you – the difference is like night and day when comparing taste and quality. I used to make this with plain bread flour but about a month ago I started adding white whole wheat in combination with it. White whole wheat is milled from white spring wheat rather than the traditional red wheat and it’s lighter in color and milder tasting. If you buy this type of wheat flour, it’s recommended that you store it in the freezer to prolong shelf life. I keep this, my whole wheat and my semolina flour all in the freezer just to be safe. On this blog I will be sure to post all the different recipes that I try. I have so many bookmarked from other blogs, like a cinnamon swirl bread, brioche, Challah, dinner rolls, oatmeal bread…the list goes on.

This is my go to recipe for sandwich bread and I often double it to freeze the other loaf for later on in the week. We easily go through these two loaves before the weekend, and I have found that freezing the bread doesn’t change the taste or texture. Thanks for reading! I look forward to sharing more bread recipes with you.

White Sandwich Bread – adapted from King Arthur Flour

  • 1 packet “highly active” active dry yeast; or 2 1/2 teaspoons active dry yeast; or 2 1/2 teaspoons instant yeast
  • 7 to 9 ounces lukewarm water
  • 12 3/4 ounces of unbleached all-purpose flour, bread flour or a combination of bread flour and white whole wheat flour (I use 5 1/4 ounces of whole white wheat and 7 1/2 ounces of bread flour)
  • 1 1/4 tsp of salt (I use bread salt)
  • 3 TBSP sugar (I use raw sugar)
  • 6 TBSP unsalted butter, room temperature
  • 1/4 cup Baker’s Special Dry Milk or non fat dry milk
  • 1/2 cup instant mashed potato flakes
  • 1/2 – 1 tsp of diastatic malt powder, optional (it helps prolong shelf life)

Directions –
1.  If you’re using active dry yeast, dissolve it with a pinch of sugar in 2 tablespoons of the lukewarm water. Let the yeast and water sit at room temperature for 15 minutes, until the mixture has bubbled and expanded. If you’re using instant yeast, you can skip this step.
2. Combine the dissolved yeast (or instant yeast) with the remainder of the ingredients. Mix and knead everything together—by hand, mixer or bread machine set on the dough cycle—till you’ve made a smooth dough. If you’re kneading in a stand mixer, it should take about 7 minutes at second speed, and the dough should barely clean the sides of the bowl, perhaps sticking a bit at the bottom. In a bread machine (or by hand), it should form a smooth ball.
3. Place the dough in a lightly greased bowl. Cover the bowl, and allow the dough to rise, at room temperature, for 1 to 2 hours, or until it’s nearly doubled in bulk. Rising may take longer, especially if you’ve kneaded by hand. Give it enough time to become quite puffy.
4. Gently deflate the dough and shape it into an 8″ log.
5. Transfer the log, smooth side up, to a lightly greased 8 1/2″ x 4 1/2″ loaf pan. Tent the pan loosely with lightly greased plastic wrap.
6. Allow the bread to rise till it’s crested about 1 1/4″ over the rim of the pan, about 1 hour. Again, it may rise more slowly for you; let it rise till it’s 1 1/4″ over the rim of the pan, even if that takes longer than an hour. While the dough is rising, preheat the oven to 350°F.
7. Bake the bread for 15 minutes. Tent it lightly with aluminum foil, and bake for an additional 20 to 25 minutes, till the crust is golden brown, and the interior temperature measures 190°F on an instant-read thermometer.
8. Remove the bread from the oven, and gently loosen the edges with a heatproof spatula or table knife. Turn it out of the pan, and brush the top surface with butter, if desired; this will give it a soft, satiny crust. Allow the bread to cool completely before slicing. As soon as it’s completely cool, wrap it tightly in plastic wrap; or in a plastic bag, air pressed and fastened securely at the top.