Key Lime Pie

keylimepie1
He is seriously spoiled…I don’t even like key lime pie, but he has been asking for it recently; and lucky for him I stumbled upon two pound bags of these cuties at my fave store.
wpid-13-1-5.jpg
Peruvian lime meets baby key lime 😉
wpid-13-1-6.jpg

Just when I thought they couldn’t possibly be any cuter, I cut them in half to juice them – I was wrong!
wpid-13-1-7.jpg

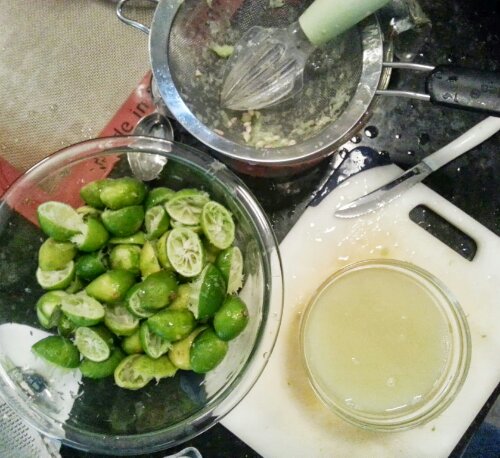
But those fuzzy feelings quickly disappeared when I proceeded to squeeze 1 3/4 pounds of these to produce the required 3/4 cup…owee. Other than squeezing all those limes, this is a super easy pie to make.

Verdict: This pie is smooth, creamy and the most tart dessert I have ever had. I loved decorating the pie the whipped cream rosettes, key lime slices and zest. I don’t usually break out the piping bag, but any proper key lime pie seems to have them so I went with it.

keylimepie2

Key Lime Pie – adapted from I Wash You Dry

  • 9″ graham cracker pie crust
  • 4 egg yolks
  • 1 egg white, lightly beaten
  • 3/4 cup key lime juice
  • 1 1/2 tsp grated lime peel
  • 1 ( 14 oz) can sweetened condensed milk
  • 1/2 cup sour cream
  • Whipped Cream (optional)

Graham Cracker Crust – adapted from Martha Stewart

  • 6 1/2 ounces graham crackers (12 crackers), finely ground (1 1/2 cups)
  • 2 1/2 ounces (5 tablespoons) unsalted butter, melted
  • 1/4 cup sugar
  • 1/8 teaspoon salt

Directions –

  1. Preheat oven to 350 degrees. Pulse graham cracker crumbs, butter, sugar, and salt in a food processor until combined
  2. Firmly press crumb mixture into bottom and up sides of a 9-inch pie dish. Bake until crust is fragrant and edges are golden, 12 to 14 minutes. Let cool completely on a wire rack.

For the Pie

  1. Heat oven to 375 degrees F.
  2. Brush the graham cracker pie crust with the lightly beaten egg white, then bake for 5 minutes. Remove from the oven and set aside.
  3. Reduce oven to 350 degrees F.
  4. Meanwhile combine the egg yolks, key lime juice, lime peel, sweetened condensed milk, and sour cream in a medium bowl. Whisk until smooth. Pour into the prepared crust.
  5. Bake for 15 minutes, then remove from oven and let cool to room temp.
  6. Chill in fridge for at least three hours, then serve with whipped cream if desired.

Re-Post: Italian Mac and Cheese

pasta

I haven’t made this in nearly three years, but it tasted better than I remembered it. The leftovers didn’t last long in our house and  we happily ate them for lunch two days in a row – yeah, it’s that good! 🙂 Thanks for reading, enjoy!

pasta1

Italian Mac and Cheese Ingredients – adapted from The Food Network

  • 1 pound penne, ziti or rigatoni pasta
  • 1 pound bulk Italian sausage
  • 2 TBSP olive oil
  • 1 TBSP butter
  • 12 ounces baby portobello mushrooms, cleaned and sliced
  • 3 – 4 garlic cloves, chopped
  • 2 TBSP all-purpose flour
  • 1 cup chicken stock
  • 1 cup whole milk
  • 2 cups shredded cheese blend ( I used Fontina, mozzarella, Pecorino Romano and Asiago)
  • 1 – 14 ounce can diced tomatoes, drained
  • 1 tsp hot sauce, optional *I used chili flake*
  • 1/2 cup Parmesan
  • salt and pepper to taste

Directions –

Bring a large pot of water to a boil. Salt water and cook pasta to a chewy al dente, about 8 minutes.  In a large skillet, brown and crumble the sausage. Drain cooked crumbles on a paper towel lined plate. Return pan to heat and add extra-virgin olive oil, butter, mushrooms and garlic.  Season with salt and pepper, to taste. Saute about 5 minutes, until garlic is fragrant and mushrooms become lightly browned.  Preheat oven to 350 degrees.  Add flour to skillet and stir, cooking 2 minutes. Whisk in stock, then stir in milk. Bring to a bubble, then stir in 2 cups of Italian cheese blend. When cheese has melted into sauce, add tomatoes. When sauce comes to a bubble, remove from heat and adjust seasonings, adding hot sauce if desired.  Combine cheese sauce with sausage and pasta and transfer to a large baking dish.  Sprinkle with the grated Parmesan.  Bake for 15-20 minutes or until cheese is browned and bubbly.

Buttermilk Oatmeal Bread

bread1

I love making bread – actually, I love that I know how to, and that it’s been three years since I tried it out for the first time. I remember feeling so intimidated by yeast (silly now that I think about it), but I’m so glad I got over that 🙂 When I see my daughter smiling as she’s smelling fresh from the oven bread, I know it’s something that she will always love and remember about me. I can’t wait to pass on what I have learned to her, so she can pass her knowledge onto someone else.

I had a homemade batch of buttermilk that I needed to use up, plus we were almost out of sandwich bread. Thankfully Pinterest came to my rescue again! I doubled this recipe  and my sweetener of choice was raw honey. When I took it out of the oven, I smelled the honey and oats – so perfect! It has a great slightly chewy bite and flavor is mild enough for sweet or savory toppings. Thanks for reading, enjoy!

bread

Buttermilk Oatmeal Bread – adapted from Buttered Side Up

  • 1/2 cup water
  • 1 cup buttermilk
  • 1 tablespoon instant yeast
  • 1/4 cup sugar, maple syrup or honey, divided
  • 1/4 cup butter, melted and cooled
  • 2 cups all-purpose flour (250 grams)
  • 2 cups whole wheat flour (262 grams)
  • 1/2 cup old-fashioned rolled oats
  • 2 teaspoons sea salt

Directions:

1) Gently warm the buttermilk in a 4 cup or larger measuring cup. Add the oats, hot water, melted butter, sweetener and salt. Stir to combine and set aside until it cools slightly.
2) In a standing mixer bowl, combine the flours, (I always hold back at least 1/2 cup). Add the yeast, and buttermilk mixture and mix to combine.
3) Using the dough hook, knead until smooth and elastic, about 5-7minutes. Add flour as necessary. Return to mixing bowl and let rise until doubled, about 1-2 hours, depending on how warm your house is.
4) Form risen dough into loaves, buns or whatever shape you wish. Place in greased pans (if making a loaf use a 9×5-inch pan) and let rise until nearly doubled, about 1 more hour.
5) During the last 15 minutes of rising, preheat your oven to 350, bake loaves for 35 -40 minutes or until the internal temp is 190 degrees. Remove from pan and allow to cool completely on a wire rack before slicing.

Portobello and Kale Pesto Pizza

veggiepizza1

I needed a vegetarian pizza that wasn’t plain cheese (boring!) for my friend who was coming over for dinner. Anytime we have company over I don’t like to make something that I haven’t made/tweaked/perfected; but I threw caution to the wind and made this amazing pizza. I found this recipe, (surprise, surprise!) on Pinterest! I immediately sent a text to her to see if she was up for it – thankfully she was game for anything! I love when I get to cook for people who aren’t picky 😉

veggiepizza2

Verdict: This was seriously good! My friend said it was the best thing she’s ever eaten – maybe that’s just because she’s pregnant and super sweet, but I’ll take it 😉 The kale pesto has rich flavor and a garlicky bite, and the sautéed mushrooms are savory, meaty and absolutely perfect! It’s a new favorite for the both of us, and I’m sure we’ll enjoy this one again soon. Thanks for reading, enjoy!

veggiepizza

Portobello and Pesto Pizza – adapted from Brown Eyed Baker

Pizza Dough –

  • 1 1/2 cups warm water
  • 2 1/4 tsp active dry yeast
  • 2 TBSP olive oil
  • 3 1/2 – 4 cups bread flour
  • 1 1/2 tsp salt

Topping –

  • 12 ounces portobello mushrooms, cleaned and sliced
  • 1/2 of an onion, sliced
  • 2 TBSP butter
  • 2 TBSP olive oil
  • salt and pepper to taste
  • 1 cup kale pesto
  • mozzarella cheese, shredded
  • grated parmesan cheese

Directions-

Pizza Dough –

In the bowl of your stand mixer, combine all of your ingredients, and stir until a loose dough forms. Attach the dough hook to your mixer and set the speed to 2, continue kneading adding more flour if necessary. You don’t want the dough to be too sticky, but a little tacky is good. Knead for 5-7 minutes or until smooth and elastic.

After kneading is finished, turn the dough out onto a lightly floured surface and gently shape it into a ball. Place the ball in a large, lightly oiled bowl and cover with plastic wrap. Let it rise until doubled in volume – about an hour. Divide the dough into two pieces; you only need one ball for this recipe.

Mushroom Topping –

Heat a large skillet over medium high heat. Add extra-virgin olive oil and butter. Add onions and cook 5 minutes, then add the mushrooms to the pan. Continue cooking until the veg is evenly browned and tender. Season with salt and pepper to taste, and continue to cook down for a few more minutes until the pan is mostly dry. Set aside.

To Assemble –

Place a pizza stone on a rack on the lowest part of your oven. Heat to 475 – 500 degrees.

Flatten your dough into a disk  until it’s as thin as you like it (I like mine around 1/4 inch, and about 12 -14 inches in diameter). Spread the pesto over the dough leaving about 1/2″ border uncovered. Sprinkle with cheese, then top with the mushroom  and onion mixture, and then top generously with more cheese. Bake in the oven for 8-10 minutes or until the crust is golden brown, remove from oven and let cool slightly before slicing.


kalepesto

Kale Pesto – adapted from Little Leopard Book

    • 4 cups kale (chopped)
    • 4 – 6 cloves garlic (crushed)
    • 1/4 cup cashews
    • 1/4 tsp black pepper
    • 1/2 tsp salt
    • 1/2 cup olive oil
    • 1/4 cup water
    • 1/4 cup parmesan

Directions –

Add the kale, garlic and cashews to a blender or food processor. Blend for 30 seconds. Add the salt, pepper, olive oil and water. Blend until all ingredients have been incorporated (30-60 seconds). Add the parmesan cheese and pulse for 5-10 seconds. Serve with pizza, pasta or your favorite dish.

Simple Brownies

brownie3

Woo! These are rich 🙂 They are thin but so fudgy and perfect with homemade vanilla ice cream, (*I’ll share the ice cream recipe soon*). Thanks for reading, enjoy!

Simple Brownies – adapted from Baked Bree

  • 10 TBSP unsalted butter
  • 1 1/4 cups sugar
  • 3/4 cup + 2 TBSP cocoa powder (*break out the good stuff for this!*)
  • 1/4 tsp salt
  • 2 tsp vanilla
  • 2 eggs
  • 1/2 cup all purpose flour

brownie2

Directions –

1 Preheat oven to 325°F with rack positioned in the lower third of the oven. Line the bottom and the sides of an 8-inch square baking pan with foil or parchment paper, leaving an overhang on two opposite sides to make it easier to lift the brownies out of the pan when they are done.
image

2 Combine the butter, cocoa, sugar, and salt in a medium heatproof bowl. Set the bowl in a wide skillet of barely simmering water. Stir the butter cocoa mixture from time to time until the butter is melted and the mixture is smooth and hot enough that you want to remove your finger quickly after dipping it in to test. Remove the bowl from the skillet and set aside briefly until the mixture is only warm, not hot.

3 Using a wooden spoon, stir in the vanilla extract. Add the eggs one at a time, stirring quickly after each one. When the batter looks shiny, thick, and well mixed, add the flour and stir until you cannot see it any longer, then beat for 40 strokes with the wooden spoon. Spread the batter evenly in the lined pan.

4 Bake until a tester inserted into the center comes out just slightly moist with batter, 20 to 25 minutes. Let the brownies cool completely on a rack. Lift up the ends of the foil or parchment paper liner, and transfer the brownies to a cutting board. Cut into 16 or 25 squares.

Buffalo Chicken Pizza

buffchick

My sister shared this simple and satisfying recipe while we were vacationing in California. We made four awesome pizzas together and this one was the standout! We used leftover pollo asada that Dad marinated and grilled the day before. Not even he knows what he threw together for it, so I improvised a super simple marinade for my chicken.  I will make this again next week for company – I hope they love it 🙂 Thanks for reading, enjoy!

Buffalo Chicken Pizza – 

For Marinade –

  • 1 pound boneless, skinless chicken breast
  • 1 tsp. sweet paprika
  • 1/4 tsp. cayenne
  • grapseed oil
  • juice of one lemon

Mix all ingredients together and pour over chicken breast. Let marinade for at least 1 hour. Cook chicken using your preferred method – we grilled ours. This is more than enough chicken for one pizza. (I used the leftover chicken for buffalo chicken salad)

For Pizza – adapted from Punky Purls

  • 1 ball of pizza dough – at least 14 ounces
  • 1 1/2 cup of cooked and shredded chicken
  • 1 cup shredded mozzarella cheese
  • blue cheese crumbles to taste
  • 2 – 3 TBSP Franks Red Hot
  • 2 TBSP butter

Directions – 

Preheat oven to 475 degrees and place a pizza stone on top of a rack set at the bottom of your oven.

Place a skillet over medium heat; add the butter and Frank’s Red Hot. Heat just until butter has melted, then add chicken and coat with buffalo sauce. Turn off heat and set aside. Press dough out into a pizza round about 13 inches in diameter and then dock center of pizza dough. With a slotted spoon remove chicken from skillet and place on pizza dough, making sure you don’t coat the bottom in a thick layer of sauce; unless you like soggy pizza 😉 Generously cover the chicken with your cheese. Bake for 8-10 minutes or until crust and cheese are golden brown. Serve and enjoy!

Multi-Grain Bread

multigrain

I’m always looking for new sandwich bread recipes, so when I came across this one (thank you Pinterest!), I knew it was going to be the next loaf on my long list of recipes to try. This loaf tastes nutty and slightly sweet; and I like that there is a boost in flavor and fiber with this Bob’s Red Mill 7-Grain Hot Cereal. I’m glad the loaves turned out so well, because now I don’t have to find other recipes to make sure this doesn’t go to waste. Thanks for reading, enjoy!

bobs

Multi-Grain Bread – adapted from Country Cleaver

  • 1 cup 7-grain Hot Cereal, such as Bob’s Red Mill
  • 2 ½ cups Boiling Water
  • ¼ cup Honey
  • 1 package Yeast
  • 1 Tbsp Salt
  • 3 cups All Purpose Flour, (15 ounces) *hold back at least 1/2 cup for kneading*
  • 1 ½ cup Whole Wheat Flour, 8 ¼ ounces
  • 4 Tablespoons Butter, melted and cooled
  • ½ cup Oatmeal

Directions –

1) Boil 2 ½ cups of water, pour over 7-grain hot cereal. Stir and let set until temperature cools to 100 degrees, about 1 hour.

2) Into stand mixer bowl fitted with dough attachment, pour in hot cereal. Add in honey and yeast. Turn on mixer and stir to combine. Lastly add in melted and cooled butter. Slowly add in flour. Knead until all ingredients combine. Cover with plastic wrap and let rest for 20 minutes. Add in salt. Knead again until salt has been combined – about 1 minute.

3) Remove dough from mixer bowl, and onto a lightly floured surface. Flatten and knead until dough shapes into a large ball. Pour a small amount of oil into a large bowl. Add dough to bowl and roll around bowl gently to ensure it is coated with oil. Cover with plastic wrap and towel to keep away light. Set aside in a warm place for one hour.

4) Remove risen dough from bowl and place on lightly floured surface. Pull and stretch dough into a 18×12 inch rectangle. Using a sharp knife divide in half so it measures 2 9″x12″ sheets. Starting from the top, tightly roll each dough sheet into a log. Flip and pinch all ends together with thumb and forefingers. Repeat with other dough log. Temporarily set aside.

5) Sprinkle oatmeal out onto surface and carefully set into two loaf pans. Gently cover with plastic wrap and set in warm place to rise a second time. Let rise for one hour.

6) Preheat oven to 350 degrees. If you do have a pizza stone, it is a good idea to put in oven and let come to temperature – not necessary, but does make crusts of bread extra crispy and helps distribute heat evenly in the oven.

7) Unwrap loaves and bake for 35-40 minutes or until the center of the loaves reaches 200 degrees. Remove from loaf pans and let cool on wire rack.

Copycat Panera Chewy Chocolate Chip Cookies

cookie1

I haven’t had any cookies other than homemade for quite some time now, but I make the exception for Panera’s chocolate chip cookies. They are huge and too hard to pass up, especially when the kid at the register asks me if I would like to add one to my order for 99 cents! They are my weakness along with the adult grilled cheese sandwich and the creamy tomato soup!

What did we ever do before Pinterest?? Seriously, I have collected some gems in the past year that I would probably not find if not for the convenient and genius site that is Pinterest! I just stumbled upon this recipe last night and made them today. These are the biggest cookies I have made to date, but there is really no way around the 1/4 cup serving 😉

cookie

(some complimentary cookie close-ups!)

cookie2

Verdict: Wow – perfection! I will make these again. I baked off six – for quality control sake, of course 😉 Slightly crispy edges and chewy middles with plenty of sticky, sweet flavor from the dark brown sugar. One is more than enough for this lady! 😉 Thanks for reading, enjoy!

*TIP: If you’re like me and you only buy light brown sugar, you can add one tablespoon of molasses per one cup of packed light brown sugar. Not to worry if you only have white sugar on hand; add 1/4 cup of molasses to one cup of white sugar.

*TIP: I use a disher to portion out the dough onto my cookie sheet, and then I use a fork to scrape the dome off the tops of each to flatten. They bake up as pictured – thanks to all the commenters! I hope this helps.

Copycat Panera Chewy Chocolate Chip Cookies – adapted from The Pinning Mama

  • 1 c butter, softened
  • 1/2 c shortening
  • 1 1/2 cup dark brown sugar
  • 1/2 cup granulated sugar
  • 2 large eggs
  • 4 teaspoon vanilla extract
  • 4 1/3 cup all-purpose flour (541 grams)
  • 2 tablespoon cornstarch
  • 2 teaspoon baking soda
  • 1 teaspoon salt
  • 1 – 12 ounce bag mini semi-sweet chocolate chips

Directions –

  1. Mix butter, shortening and sugars until light and fluffy.
  2. Add egg and vanilla and mix until well combined.
  3. Combine flour, cornstarch, baking soda, and salt and mix together.
  4. Mix dry ingredients slowly into wet ingredients and blend well.
  5. If the dough is crumbly, stir in water 1 teaspoon at a time until it just holds together. The dough should not be sticky.
  6. Add in chocolate chips and stir until evenly distributed.
  7. Using ¼ cup measure, scoop out dough and form into a ball. Continue until all dough is balled. Approx 24 cookies.
  8. Place dough in the freezer for 2 hours or up to 3 months.
  9. Place frozen cookie onto parchment lined baking sheet and bake at 350 degrees F for 15 min.
  10. Let cool 2 minutes.

Pork Carnitas

carnitas

Quick Post: My son loves taco night, and these definitely hit the spot.  I made the meat on a Friday and didn’t end up using it until a Monday. The advantage to letting it sit, is that the fat will rise to the top so you can remove it. The meat also tasted even better, and I was able to pull off even more fat off of the pieces of meat. Thanks for reading, enjoy!

Pork Carnitas – adapted from My Kitchen Escapades

  • 4 pound boneless pork butt, fat trimmed and cut into 2 inch cubes
  • 1 1/2 tsp salt
  • 3/4 tsp pepper
  • 1 tsp ground cumin
  • 1 onion, peeled and halved
  • 2 bay leaves
  • 1 tsp dried Mexican oregano
  • 2 Tb fresh lime juice
  • 2 C water
  • 1 medium orange, juiced and keep the spent halves

Directions –

1.  Adjust oven rack to lower middle position and heat to 300 degrees.  Combine all the ingredients in a large Dutch oven, including the spent orange halves and juice.  Bring the mixture to a simmer over medium-high heat, uncovered.  Once it simmers, cover pot and transfer it to the oven.  Cook until the meat falls apart when prodded with a fork, about 2 hours.
2.  Remove the pot from the oven and turn on the broiler.  Use a slotted spoon to remove the meat from the pan and place it on a large foil-lined jelly roll pan.  Remove and discard everything from the pot except for the cooking liquid.  Place pot over high heat on the stove and boil until thick and syrupy, about 20 minutes.  You should have about 1 C of liquid remaining when it is finished.
3.  While the liquid is reducing, use two forks to pull each cube of pork into three equal sized pieces.  Once the liquid has become a syrup, gently fold in the pieces of pork into the pot.  Try not to break up the pork any further.  Taste and add additional salt and pepper.
4.  Spread the pork back onto the foil lined pan and evenly spread the meat around so there is a single layer of meat.  Place the jelly roll pan on the lower middle rack of the oven and broil until the top of the meat is well browned and edges are slightly crisp, about 5 to 8 minutes.  Using a wide metal spatula, flip the pieces of meat and broil the other side until well browned and edges are slightly crisp, 5 to 8 minutes.  Serve immediately in a tortilla with all your favorite toppings.

Chocolate Peanut Butter Cookies

cookie1

These cookies are so good and easily in my top five! They’re cakey, fudgy, rich and chocolaty. I’m not usually a fan of softer cookies, but these are so perfect. I am really glad that I made two batches – not all for my family of course!  Once every few weeks, my husband serves as assistant director and I always send goodies for the production crew. I know they appreciate the baked goods, and I love hearing about it 😉 Eight people polished off nearly three dozen cookies! Thanks for reading, enjoy 🙂

Chocolate Peanut Butter Cookies – adapted from King Arthur Flour

  • 1 1/2 cups all-purpose flour
  • 1/2 cup Dutch-processed baking cocoa
  • 1/2 teaspoon baking soda
  • 1/4 teaspoon salt
  • 1/2 cup granulated sugar
  • 1/2 cup brown sugar
  • 1/2 cup (8 tablespoons) unsalted butter, softened
  • 1/4 cup smooth peanut butter
  • 1 teaspoon vanilla extract
  • 1 large egg
  • 2 tablespoons water
  • 1 1/2 cups mini peanut butter cups

Directions

1) Preheat the oven to 375°F. Lightly grease (or line with parchment) two baking sheets.

2) In a medium-sized bowl, whisk together the flour, cocoa, baking soda, and salt.

3) In another bowl, beat together the sugars, butter, and peanut butter until light and fluffy.

4) Beat in the vanilla, egg, and water, then stir in the dry ingredients, blending well.

5) Stir in the mini peanut butter cups.

6) Scoop rounded tablespoonfuls of dough onto the prepared baking sheets. Flatten each cookie to about 1/2″ thick.

7) Bake the cookies for 7 to 9 minutes, or until they’re set and you can smell chocolate. Remove them from the oven, and cool on a rack.