Shrimp Tacos with Adobo Sauce

taco

These were really good and I will definitely use this recipe again. Even my picky daughter ate her serving up! Thanks for reading, enjoy!

taco1

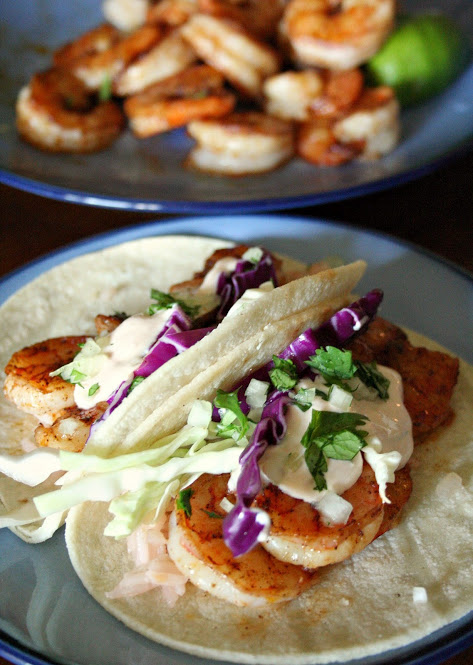
Shrimp Tacos with Adobo Sauce – adapted from Coupon Clipping Cook

  • 10 Corn Tortillas
  • 1 1/2 pounds large raw Shrimp, Deveined and Shelled
  • ½ teaspoon Chili Powder
  • ¼ teaspoon Garlic Powder
  • ¼ teaspoon Ground Black Pepper
  • ¼ teaspoon Ground Cumin
  • 3 dashes Sea Salt
  • 1 1/2 tablespoons Olive Oil
  • 3 tablespoons chopped Cilantro
  • 3 tablespoons chopped Red Onion
  • 1 cup shredded Green Cabbage
  • 1 cup shredded Purple Cabbage
  • 1 whole Lime

For the Adobo Sauce:

  • 5 teaspoons Adobo Sauce (from a can of chipotle peppers in adobo sauce; 11 ounce can)
  • ¼ cup Sour Cream
  • 1/2 of a whole Lime
  • 2 dashes Salt

Directions –

Chop the cilantro, and thinly slice the green and purple cabbage. Chop the onion and set the veggies and cilantro aside.

In a small bowl add the adobo sauce from the can of chipotle peppers, sour cream, lime juice, and salt. Mix and set aside.

Put the shrimp in a medium size bowl and add the chili powder, garlic powder, pepper, cumin, and salt. Mix together so that the shrimp is coated with the spices.

In a medium size skillet add the olive oil. Then add the shrimp. Turn the shrimp as they cook until each side is lightly browned (about 6 minutes). Reserve the olive oil in the pan, and remove the shrimp on to a cutting board or plate.

Cut the shrimp in half and put them in a bowl. Then add the remaining olive oil from the pan in with the pieces of shrimp and mix together.

Warm the corn tortillas in the microwave for about 10 to 12 seconds.Then top with the shrimp, onion, cilantro, and the green and purple cabbage. Drizzle the adobo sauce on top. Serve while the tortilla is still warm, and with a quarter piece of lime.

Broccoli Cheese Soup II (with Ham)

soup

Even before I baked ham the other day, I already had plans for the leftovers! I wanted to make ham and potato soup, but he had a different craving. M loves Panera Bread broccoli cheese soup – I like it too. That’s not the problem…when I have a plan, I’m not immediately flexible to accommodate different ideas! He doesn’t really like my version because it’s not as thick as Panera’s – but I have a feeling they accomplish this by adding processed cheese. After deciding to go ahead with his plan, I quickly looked for a recipe that called for the stuff, but I couldn’t find one. I was in the parking lot of the grocery store, using my slow phone and didn’t have a whole lot of time. This recipe makes a small batch of thick, rich soup – all that half and half kept the base nice and creamy. I usually double my go-to recipe and use whatever milk I have, so it’s much thinner.

Verdict: Okay…this recipe is better than the other one. It’s rich and creamy, thanks to all that half and half! Also, the addition of diced ham (from a new recipe I’ll share soon) was a tasty, meaty and a perfect complement. Everyone loved it and the rolls I paired with it. Thanks for reading, enjoy!

soup1

Panera Broccoli Cheese Soup – adapted from Cookbook-Recipes

  • 1 tablespoon butter, melted
  • ½ medium onion, chopped
  • ¼ cup melted butter
  • ¼ cup flour
  • 2 cups half-and-half
  • 2 cups chicken stock
  • ½ pound fresh broccoli
  • 1 cup carrots, julienned
  • salt and pepper, to taste
  • ¼ teaspoon nutmeg
  • 8 ounces grated sharp cheddar cheese
  • 1 heaping cup of diced ham, optional

Directions:

Saute onion in butter. Set aside. Cook melted butter and flour using a whisk over medium heat for 3-5 minutes. Stir constantly and slowly add the half-and-half (this is called making a roux). Add the chicken stock whisking all the time. Simmer for 20 minutes.

Add the broccoli, carrots and onions. Cook over low heat until the veggies are tender for 20-25 minutes. Add salt and pepper. The soup should be thickened by now. Pour in batches into blender and puree. Return to pot over low heat and add the grated cheese; stir until well blended. Stir in the nutmeg and serve.

Oven Roasted Chicken Thighs with Carrots and Potatoes

chicken1

I love a cheap, no-brainer dinner! This meal was finished in under an hour, so that makes it even more appealing to lazy people like me. Everyone enjoyed the flavor of this, and I’m not ashamed to say it – but the skin was the highlight of this meal! Normally, I would pull it off and not indulge; but it looked way to crispy to pass up. It was like a salty, chicken flavored chip! Even my picky eater happily finished her portion, and wanted everyone else’s crispy skin. Thanks for reading, enjoy!

chicken

Oven Roasted Chicken Thighs with Carrots and Potatoes – adapted from Epicurious

  • 3 tablespoons olive oil, divided
  • 6 large chicken thighs with skin and bones (preferably organic; about 2 1/4 pounds total)
  • 1 tablespoon coarse kosher salt
  • 2 teaspoons dried thyme
  • 1 1/2 teaspoons freshly ground black pepper
  • 1/4 teaspoon freshly grated or ground nutmeg
  • 2 pounds unpeeled medium Yukon Gold potatoes, scrubbed, cut into 2-inch-long, 1/2-inch-thick spears
  • 2 pounds medium carrots, peeled, cut into 2-inch-long, 1/2-inch-thick spears
  • 3 tablespoons chopped fresh chives

Directions –

Preheat oven to 450°F. Coat large rimmed baking sheet with 1 tablespoon oil. Place chicken on baking sheet. Turn to coat with oil and set skin side up. Mix salt, thyme, 1½ teaspoons pepper, and nutmeg in small bowl. Sprinkle half of mixture over chicken. Roast until chicken starts to brown and some fat has rendered, about 30 minutes. Transfer thighs to medium bowl; set aside.

Meanwhile, combine potatoes, carrots, 2 tablespoons oil, and remaining salt thyme mixture in large bowl. Transfer potato-carrot mixture to same baking sheet; turn to coat with drippings. Roast until vegetables soften, 30 minutes.

Place thighs on vegetables; pour accumulated juices from chicken over. Return sheet to oven. Roast until chicken is cooked and vegetables brown, 15 minutes longer.

Place chicken on platter; top with chives.

Lobster Macaroni and Cheese

lobster1

Just in case you didn’t think that macaroni and cheese could get any more decadent…you come across this gut busting concoction! Seriously though – it calls for four cups of cheese and four cups of heavy cream…in order to redeem this a tad, this Momma is going to use half and half instead of all cream. That’s how I roll, folks! 😉 I can’t justify it, even if it is a rare dish in this house. I learned something about myself while making this: handling lobster tails gives me the willies! This was my first time handling raw lobster and the shell grossed me out. My daughter thought the spots on the shell were its eyes! That was kind of funny, but she is always wary of trying new things. I told her lobster is like a huge shrimp, but tastes even better. She ended up eating her entire serving and proceeded to ask if she can take some leftovers to school 😉

Verdict: This came out good, but it could use some more spice. Make sure to season well and taste the sauce as you go. Thanks for reading, enjoy!

Lobster Macaroni and Cheese – adapted from The Neely’s

  • 4 tablespoons butter, plus 1 tablespoon for greasing dish
  • Kosher salt
  • 1 pound penne pasta
  • 2 small shallots, finely chopped
  • 2 cloves garlic, chopped
  • Freshly ground black pepper
  • 2 tablespoons tomato paste
  • 5 tablespoons all-purpose flour
  • 1/4 cup white wine
  • 4 cups heavy cream
  • 1/2 teaspoon sweet paprika
  • 1/4 teaspoon cayenne pepper
  • 1 bay leaf
  • 2 cups shredded sharp white Cheddar
  • 2 cups shredded Gruyere
  • 2 (8-ounce) raw lobster tails, defrosted if frozen, meat removed from shell, chopped
  • 1/4 cup panko bread crumbs
  • 1/4 cup freshly chopped parsley leaves

lobster

Directions –
Preheat the oven to 350 degrees F and adjust racks to the middle. Grease a 13 by 9-inch baking dish with butter.

In a large pot of boiling salted water over medium heat, add the pasta and cook until al dente. Drain the pasta and reserve.

Add 4 tablespoons butter to a large pot over medium heat. Once the butter shimmers, add the shallots and garlic and saute until translucent. Season with salt and pepper, to taste. Add the tomato paste and flour and stir to toast, about 3 to 4 minutes. Add the white wine and reduce, by half, about 2 minutes. Slowly add the cream, whisking well to remove any lumps. Add the paprika, cayenne, and bay leaf. Bring the cream up to a simmer and turn the heat to low. Let reduce until the cream is thick and can coat a spoon, about 5 to 10 minutes. When thickened, remove the bay leaves.

Stir in the grated cheeses, a handful at a time, combining well after each addition. Add the chopped lobster meat to the sauce and stir well. Add the pasta and stir. Add to the greased baking dish and sprinkle with the panko crumbs and parsley. Bake for 25 minutes. Remove from the oven and let rest for 10 minutes before serving. Sprinkle individual servings with parsley.

Chocolate Cobbler

cake1

Chocolate – okay. Cobbler – what?? Never heard of you!  This recipe seems to be a favorite among Tasty Kitchen members, and since I have this brand new bag of King Arthur Self-Rising flour waiting to be used, I figured this was a good place to start. What makes KAF Self-Rising flour (besides the quality), is that it is unbleached and the baking powder is aluminum free. I know my local grocery store does not carry a similar product, and now I’m hoping that it will stock this soon!

I thought about making a fruit cobbler, but I know the hubbs appreciates a good chocolate dessert. This one is so simple and because I’m so darn lazy and didn’t feel like making a special trip to the store for fruit, I went with it. The batter is different from most desserts, especially because you don’t stir the whole batter together before pouring in the baking dish. It’s super simple and requires pantry and kitchen staples, but it takes 40 long minutes to bake! Hopefully it’s worth the wait! 🙂

Verdict: Chocolatey, gooey goodness! Make sure to top it off with a generous scoop of vanilla ice cream! Thanks for reading, enjoy!

cake

Chocolate Cobbler – adapted from Tasty Kitchen

Directions:

Preheat oven to 350 degrees.

First stir together the flour, baking powder, salt, 3 tablespoons of the cocoa, and 3/4 cup of the white sugar. Reserve the remaining cocoa and sugar.

Stir in the milk, melted butter, and vanilla to the flour mixture. Mix until smooth.

Pour the mixture into an ungreased 8-inch baking dish. I prefer my 2 quart casserole from Princess House.

In a separate small bowl, mix the remaining white sugar (it should be 1/2 cup), the brown sugar, and remaining 4 tablespoons of cocoa. Sprinkle this mixture evenly over the batter.

Pour the hot tap water over all. DO NOT STIR!

Bake for about 40 minutes or until the center is set.

Let stand for a few minutes if you can hold yourself back. Serve with homemade ice cream using the gooey sauce to spoon over all.

Oatmeal Banana Muffins

IMG_20130306_171129 (1)

The kids love to get muffins in their lunch; and these are easy and much healthier than your average muffin – and the best part? They don’t seem to notice 😉 Thanks for reading, enjoy!

Banana Oatmeal Muffins – adapted from The Lemon Bowl

  • 1¼ cups old-fashioned oats
  • 1½ c oat flour**
  • ½ c milk
  • ½ c plain yogurt
  • 1 tsp baking soda
  • 2 tsp baking powder
  • ½ tsp nutmeg
  • 1 tsp cinnamon
  • ½ tsp salt
  • ⅓ c brown sugar – packed
  • ¼ c unsweetened applesauce
  • 2 tbsp canola oil
  • 2 large ripe bananas – mashed
  • 1 egg

Directions –

Pre-heat oven to 400 degrees. Line a muffin pan with 12 liners or spray with non-stick spray. In a large bowl, combine oats with plain yogurt and milk. Meanwhile, mix together oat flour (see note above), baking soda, baking powder, sugar, spices and salt; set aside. Add applesauce, oil, egg and mashed bananas to the oat/milk mixture and stir well. Combine dry mixture with the wet mixture and stir until incorporated. Divide batter evenly into muffin tins and bake for 18-20 minutes.

**Oat Flour: To make oat flour, simply pulse 2 cups old-fashioned oats in a food processor to create a fine meal. This should only take about 60 seconds!

White Chocolate Macadamia Nut Cookies

IMG_20130311_171328 (1)

AKA the most expensive homemade cookies ever! Seriously though – the chocolate can cost about 12 dollars, the nuts are $20.00 a pound! Even if my husband knew how much the ingredients cost, I don’t think he’d change his mind about asking for these. Food is definitely his weakness 😉

I bought a quarter pound of nuts which ended up being a cup, but I think the ratio of cookie to add-ins was just right. I weighed these out (cause I’m neurotic like that) and each ball was 4 ounces before I split it in half. I also didn’t have coconut extract, but it probably would have added a nice flavor to these.

To be honest, I didn’t care for the taste the first day…day two is a totally different cookie. The flavors have time to get to know one another; and they’re not so “one note” anymore. These would be amazing as an ice cream sandwich, maybe even with that fancy coconut milk ice cream! Thanks for reading, enjoy!

White Chocolate Chunk Macadamia Nut Cookies – adapted from Annie’s Eats

  • 3 cups all-purpose flour (375 grams)
  • 1 tsp. coarse salt
  • 1 1/4 tsp. baking powder
  • 1/2 tsp. baking soda
  • 1 cup unsalted butter, cold and cut into chunks
  • 1 cup granulated sugar
  • 1/2 cup brown sugar
  • 2 eggs
  • 1 tsp. vanilla extract
  • 12 oz. white chocolate chips
  • 1 1/2 cups coarsely chopped macadamia nuts

Directions

In a medium bowl, combine the flour, salt, baking powder, and baking soda. Whisk to blend.

In the bowl of a stand mixer, combine the cold butter and the sugars. Beat on medium-high speed until smooth and just combined, 1-2 minutes. Blend in the eggs on at a time, scraping down the bowl as needed. Blend in vanilla extract. With the mixer on low-speed, mix in dry ingredients just until incorporated. Fold in the white chocolate and macadamia nuts with a spatula. Cover and refrigerate the dough for about 30-60 minutes.

Preheat oven 350 degrees. Line baking sheets with parchment paper. Roll a scant half-cup of dough into a ball. Holding dough ball in fingertips of both hands, pull apart into two equal halves. Rotate the halves 90 degrees and with jagged surfaces facing up, place the formed dough onto cookie sheet, leaving ample room between each ball. (The fussy shaping seems well…fussy – but it gives the cookies nicer appearance after they are baked!)

Bake the cookies, rotating halfway through, until light golden and just set, about 14-16 minutes total. Let cool on the baking sheets for a few minutes, then transfer to a wire rack to cool completely. Store in an airtight container. Yield: 24 cookies


Tried and True Family Favorites

I have nothing new to share…sorry! But these are some of the meals we enjoyed during these past couple of weeks. All the pictures have links to previous posts, thanks for stopping by!

IMG_20130220_173552 (1)

It was my son’s 10th birthday over a week ago and he requested this cake. It really is perfect 🙂

IMG_20130228_184311 (1)

Fish tacos with homemade tortillas and pico de gallo. This is my second time making them and the DH can’t get enough.

IMG_20130227_174936 (1)

The kids love these pretzel dogs almost as much as I do! 😉

IMG_20130226_180449 (1)

Buffalo chicken sandwiches! I have been making these for years and they’re a big hit every time!

IMG_20130303_095914 (1)

Sky high buttermilk biscuits and sausage gravy are my husband’s favorite for breakfast.

Spinach Artichoke Pasta

Every once in a while I make something that isn’t worth making again, and this is a good example. It was bland and I forgot that I really don’t like the texture of wilted spinach – it grosses me out! I bet the hot spinach artichoke dip on the previous post would be amazing poured over pasta. I meant to try it; but when I make the dip, it’s meant for an appetizer and not an experiment 😉 If I ever do I’ll be sure to post about how it turned out. Thanks for reading!

Spinach Artichoke Pasta – adapted from The Pioneer Woman

  • 6 Tablespoons Butter
  • 4 cloves Garlic, Finely Minced
  • 2 bags Baby Spinach
  • 2 cans Artichoke Hearts, Drained And Halved
  • 3 Tablespoons Flour
  • 3 cups Whole Milk
  • 1/4 teaspoon Cayenne Pepper
  • Salt And Pepper, to taste
  • 1/2 cup Grated Parmesan Cheese
  • 1-1/2 cup Mozzarella Or Monterey Jack Cheese, Grated
  • 1/2 cup Low Sodium Chicken Broth (less Or More)
  • 12 ounces, weight Penne, Cooked Until Al Dente
  • 1/2 cup Seasoned Panko Breadcrumbs
  • Crushed Red Pepper, To Taste

Directions –

Melt 2 tablespoons butter in a large pot or skillet. Add garlic and throw in the spinach. Stir it around until it’s wilted, about 1 minute. Remove spinach from heat and set aside.

Add 2 tablespoons butter to the same pot and raise the heat to high. Throw in the halved artichokes and stir it around until they get a little color, 1 to 2 minutes. Remove the artichokes from the pot and set them aside.

Reduce the heat to low. Add 2 tablespoons butter to the pot. When melted, sprinkle in flour and whisk until it’s combined. Pour in milk and whisk to combine. Let it cook for 3 to 4 minutes, or until starting to thicken. Add Parmesan, Mozzarella/Monterey Jack, salt and pepper, and cayenne pepper. Stir to melt, and if it’s overly thick, splash in chicken broth.

Add artichokes and pasta, tossing gently to combine. Gently fold in spinach, then pour the pasta into a serving bowl. Sprinkle the top with crushed red pepper flakes and plenty of Panko breadcrumbs for crunch.

Repost: Hot Spinach Artichoke Dip

dip

Who doesn’t like spinach artichoke dip?? Seriously, this is the best I have tried and everyone loves it. This post shows all the modifications that I have made to the original recipe. For a big group, I pour it into a small crock pot to keep warm and serve with baguettes or scoop-shaped tortilla chips. Thanks for reading, enjoy!

Spinach Artichoke Dip – adapted from Allrecipes

  • 1 bulb garlic
  • 1 (10 ounce) package frozen chopped spinach, thawed and drained
  • 1 (14 ounce) can artichoke hearts, drained and chopped
  • 1 (10 ounce) container Alfredo-style pasta sauce
  • 1 cup shredded mozzarella cheese
  • 1/3 cup grated Parmesan cheese
  • 1 – 8 ounce package cream cheese, softened
  • fresh cracked pepper to taste

Directions –

1. Preheat oven to 400 degrees F (175 degrees C).

2. Prep the bulb for roasting: Peel away the outer layers of the garlic bulb skin, leaving the skins of the individual cloves intact. Using a knife, cut off 1/4 to a 1/2 inch of the top of cloves, exposing the individual cloves of garlic. Place the garlic heads in a baking pan; muffin pans work well for this purpose. Drizzle a couple teaspoons of olive oil over each head, using your fingers to make sure the garlic head is well coated. Cover with aluminum foil. Bake at 400°F for 30-35 minutes, or until the cloves feel soft when pressed.  Allow the garlic to cool enough so you can touch it without burning yourself. Use a small knife cut the skin slightly around each clove. Use a cocktail fork or your fingers to pull or squeeze the roasted garlic cloves out of their skins. (Directions with pictures at Simply Recipes)

3. In an 8×8 inch baking dish, spread the roasted garlic, spinach, artichoke hearts, Alfredo-style pasta sauce, mozzarella cheese, Parmesan cheese and cream cheese.

4. Cover and bake in the preheated oven 30 minutes, or until cheeses are melted and bubbly. Serve warm.


dip1