Oreo Brookies…or BrOreos?

oreobrookies

This insane dessert takes a little bit of planning, but it’s easy enough. Just don’t expect to be able to whip it up last minute because you need to allow the first layer to cool completely before you can continue with the other layers. My friend asked me if I could make her husband a special treat for his birthday – what a fun surprise! Of course I said yes. What better way to get the opportunity to make something so completely ridiculous and decadent? Birthdays are a great excuse to make something so butter, sugar, calorie and fat-filled and you don’t have to feel so bad about it cause, hey – we’re celebrating here! 😉

Verdict: Everyone loved these. They are so rich and gooey! I wasn’t a huge fan until the second day – wow…they reached another level of awesome! My health-nut friend thought she could get by on a tiny piece; but once she tried that she had to go back for more – something she rarely allows herself to do! I heard from more than one person that this was the best dessert they have ever eaten and have already received requests for this on their birthdays…so, yeah – this recipe is a keeper! Thanks for reading, enjoy!

Oreo “Brookies” – adapted from Brown Sugar

For the Cookie Crust –

  • 2 sticks unsalted butter, at room temp
  • 1 cup brown sugar
  • 1 cup white sugar
  • 2 eggs
  • 1 TBSP vanilla extract
  • 2 1/4 cups AP flour (281 grams)
  • 1/2 cup unsweetened cocoa powder
  • 1 tsp baking soda
  • 1 tsp salt
  • 12 ounce bag of semi-sweet chocolate chips

For the Brownie Layer –

  • 1 stick unsalted butter, room temp
  • 1 1/2 cups sugar
  • 4 eggs
  • 1 tsp vanilla
  • 3/4 cup AP flour (94 grams)
  • 1/4 unsweetened cocoa powder
  • 1/2 tsp salt
  • 8 ounces bittersweet chocolate, melted
  • 12 whole Oreo cookies

Directions –

For the Cookie Dough: Preheat your oven to 350 degrees. Lightly butter a 13×9 inch baking dish.

In a mixer bowl, beat the butter and sugars until light and fluffy. Add eggs one at a time, blending each one in before adding the next – periodically scrape the sides of the bowl down. Add vanilla extract.

In a separate bowl, add all your dry ingredients and whisk to combine. Add your dry ingredients to your butter/sugar mixture in three parts, scraping the sides of the mixer bowl if needed. Mix in your chocolate chips.

Place the finished dough in your baking dish and with a damp spatula (or your hand) pat the dough until flat and evenly distributed. Bake for 20-25 minutes, take out and allow to cool completely. (*I let it cool for an hour at room temp, and then I placed it in my fridge for another hour*)

For the Brownie: Preheat your oven to 350 degrees.

In a standing mixer bowl, beat together butter and sugar until light and fluffy. Add each egg to the mixer one at a time, being sure to mix in each addition before adding the next. Add in vanilla extract.

In a separate bowl, combine cocoa, flour and salt. Slowly add the dry ingredients to the butter/sugar mixture until blended. Fold in the melted chocolate until combined.

brookies1

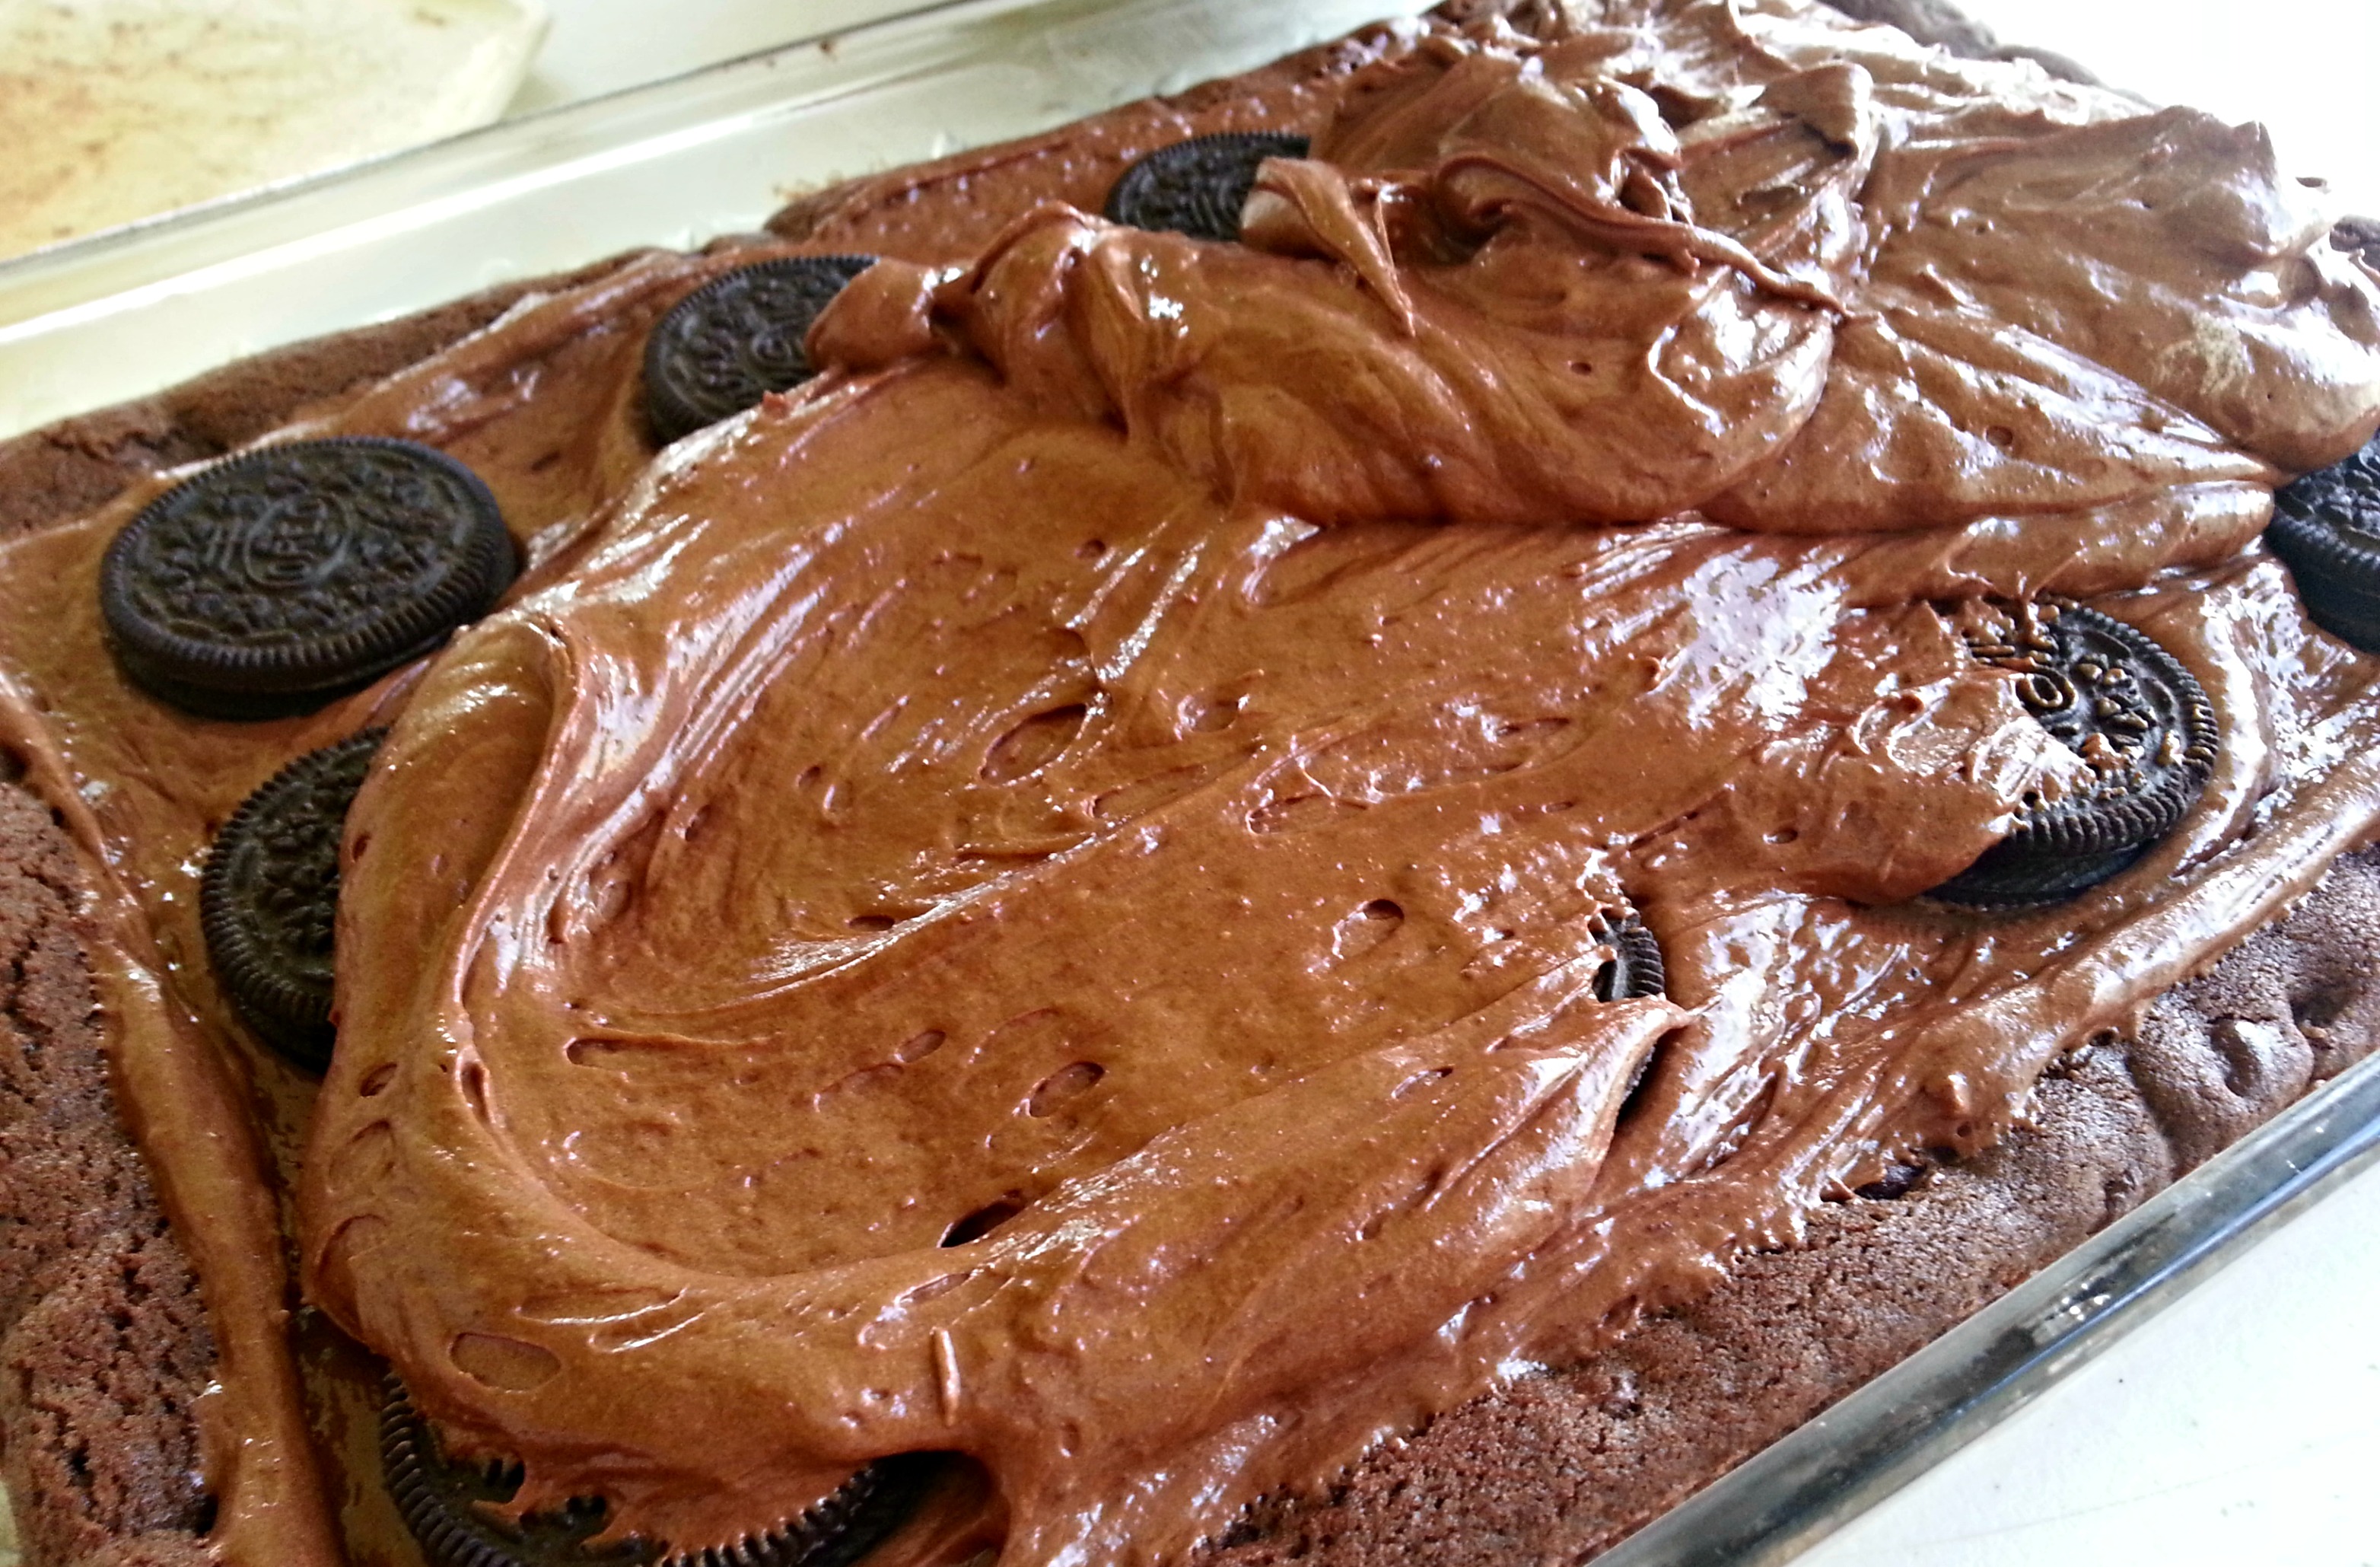
Pour half of the brownie batter on top of the cookie crust, then evenly space out the Oreo cookies; then pour the rest of the brownie batter over all and spread evenly across the top of the Oreos. Bake for 25-30 minutes.

Simple Brownies

brownie3

Woo! These are rich 🙂 They are thin but so fudgy and perfect with homemade vanilla ice cream, (*I’ll share the ice cream recipe soon*). Thanks for reading, enjoy!

Simple Brownies – adapted from Baked Bree

  • 10 TBSP unsalted butter
  • 1 1/4 cups sugar
  • 3/4 cup + 2 TBSP cocoa powder (*break out the good stuff for this!*)
  • 1/4 tsp salt
  • 2 tsp vanilla
  • 2 eggs
  • 1/2 cup all purpose flour

brownie2

Directions –

1 Preheat oven to 325°F with rack positioned in the lower third of the oven. Line the bottom and the sides of an 8-inch square baking pan with foil or parchment paper, leaving an overhang on two opposite sides to make it easier to lift the brownies out of the pan when they are done.
image

2 Combine the butter, cocoa, sugar, and salt in a medium heatproof bowl. Set the bowl in a wide skillet of barely simmering water. Stir the butter cocoa mixture from time to time until the butter is melted and the mixture is smooth and hot enough that you want to remove your finger quickly after dipping it in to test. Remove the bowl from the skillet and set aside briefly until the mixture is only warm, not hot.

3 Using a wooden spoon, stir in the vanilla extract. Add the eggs one at a time, stirring quickly after each one. When the batter looks shiny, thick, and well mixed, add the flour and stir until you cannot see it any longer, then beat for 40 strokes with the wooden spoon. Spread the batter evenly in the lined pan.

4 Bake until a tester inserted into the center comes out just slightly moist with batter, 20 to 25 minutes. Let the brownies cool completely on a rack. Lift up the ends of the foil or parchment paper liner, and transfer the brownies to a cutting board. Cut into 16 or 25 squares.

Dulce de Leche

IMG_20130212_165135

Would you believe that before today I had never even tasted dulce de leche? I have read rave reviews, and have seen countless recipes all over the place; but had yet to experience the sweet stuff. This was so easy to make, and probably the safest and cleanest method I have found. The directions told me that this would take 10 hours on low, but my two jars were caramelized to perfection in less than 6 hours. I’m sure I could have taken them out sooner, had I the nerve to do so. I’m happy to report that this wasn’t a waste of time or ingredient to make, because it does taste really good 🙂 I’m surprising my husband with a decadent dessert for Valentine’s Day that is right up his alley, and this dulce de leche is a pretty important to the final product. I hope he loves it!

Crock Pot Dulce de Leche – adapted from Your Homebased Mom

  • 1 – 14 ounce can of sweetened condensed milk
  • 2 half pint sized jars
  • crock pot (mine is 6 quarts)
  • enough water to cover the tops of the jars

Directions –

Open the can of sweetened condensed milk and divide evenly into the half pint jars. Put on lids and rings. Place jars in the crock pot and fill the crock pot with enough water to completely cover the top of the jars. Set your crock pot to low and cook until caramelized, about 6 hours. Carefully remove the jars and set aside, and once the jars are cool enough to handle; carefully open, stir and taste! Refrigerate leftovers.

**Also, if you’re looking for a crowd-pleasing goody for Valentine’s Day, make these and everyone will want the recipe!**

IMG_20130212_172049

Peanut Butter Cup Brownie Bites – adapted from Savory Sweet Life

  • 3/4 cup butter, melted
  • 3/4 cup white sugar
  • 3/4 cup brown sugar, packed
  • 2 teaspoons vanilla extract
  • 2 eggs
  • 3/4 cup all-purpose flour (125 grams)
  • 1/2 cup unsweetened cocoa powder (40 grams)
  • 1/2 teaspoon salt
  • 40 mini Reese’s Peanut Butter Cups (or hearts), unwrapped

DIRECTIONS –

Preheat oven to 350 degrees F.  Spray mini cupcake pan with non stick spray.  In a medium bowl, mix melted butter, sugars and vanilla.  Beat in eggs one at a time. Gradually add flour, cocoa, and salt and mix until combined.  Fill each cupcake slot slightly more than halfway but not more than 2/3 full.  Place a peanut butter cup in each slot pressing it down until it is almost level with the batter.  Bake in preheated oven for 15-18 minutes or until done.  Allow the brownie bites to cool for 5 minutes before removing from the cupcake tin.  Enjoy!

*Notes: Be sure to remove brownie bites 5 – 10 minutes after coming out of the oven.  Otherwise they might cool and stick to the sides making it difficult to get out.  If baking these in a pan, your baking time will increase to 25-30 minutes.  You can be sure they are close to being done when you can smell them from your oven.


Chocolate Mint Brownies

brownie

These were amazing and everyone loved them! 🙂

Chocolate Mint Brownie Bites – adapted from The Pioneer Woman

2 ounces unsweetened chocolate
50 whole mints, such as Andes
1 stick plus 1 tablespoon butter, softened
1 cup sugar
2 whole eggs
3/4 cups all-purpose flour
1/4 teaspoon mint extract
1 ounce bittersweet chocolate, chopped fine

Directions:

Preheat the oven to 325 degrees F. Spray a mini muffin pan generously with baking spray.

Melt the unsweetened chocolate in a bowl in the microwave. Remove from the microwave and stir in 8 mints until all melted. Let cool slightly.

In a mixer with the paddle attachment, cream 1 stick of the butter with the sugar. Beat in the eggs one at a time. With the mixer on low, drizzle in the cooled chocolate mixture slowly, mixing until it’s combined. Add the flour and mix thoroughly. Scrape the sides of the bowl with a rubber spatula, add the mint extract and then mix again.

Using a tablespoon or cookie scoop, scoop the batter into the prepared mini muffin pan. Bake until done, 11 to 13 minutes. Turn upside down out of the pan and allow to cool.

Combine 25 to 30 mints in a bowl with the remaining 1 tablespoon butter and the chopped bittersweet chocolate. Microwave and stir until melted and smooth.

Dip the brownie bites in the chocolate, concentrating on the top “cone” part. Allow to set for a few minutes. Chop the remaining mints and sprinkle them on the top. Set in the freezer for 10 minutes if you need them to set right away. Yum!

Small Batch Brownies

Quick Post: Light, cakey brownie. Not chewy, but it hit the spot 🙂  Thanks for reading, enjoy!

Brownies – adapted from Just Eat It!

  • 1/2 cup chopped chocolate (about 3 ounces)
  • 6 TBSP butter
  • 2 eggs
  • 1/2 cup granulated sugar
  • 1/2 cup all-purpose flour
  • 2 tbsp cocoa powder
  • 1/2 cup chopped, toasted walnuts

Directions –

Preheat oven to 350 degrees. Butter three – 6 ounce ramekins or a small baking dish.

Melt the butter and chocolate on low heat, stir and set aside to cool slightly. Whisk together the sugar and the eggs, then stir the chocolate mixture into the egg mixture.

Add the flour and cocoa powder. Fold in the nuts. Bake for 18 – 20 minutes or until set, and the center should be a little underdone.